Shopify Integration Guide
This section provides information on how to setup the PICTOFiT Virtual Styling Component within a Shopify store.
Prerequisites
Install our Shopify app PICTOFiT Virtual Try-on (PICTOFiT App)
Connect it to our Content Management System (CMS)
Enable the PICTOFiT’s “App embeds” in your Theme
You can find an installation guide here
Create an entry point
PICTOFiT App automatically attach click handlers to marked HTML elements. When it is installed and the “App embeds” are activated, it will search for HTML elements with the data attribute data-pictofit-component. It will change the behaviour of this elements by overwriting the click handler to open the specified component. You specify the component with the value of the attribute. This means each HTML element can become an entry point for the PICTOFiT Virtual Styling component.
Here is an example to showcase this behaviour. You need to access the theme’s source code and copy the below snippet into it. The code below attaches a click handler that opens a collection of our demo store to a div HTML element.
<div
    data-pictofit-component="virtual-styling"
    data-pictofit-collection="gid://pictofit/collection/demo/business-casual-acc"
    data-pictofit-organisation="9a4e90a5-2262-48ca-899e-9216a62dd52b"
    data-pictofit-google-measurement-id="G-xxxxxxxx"
>Click me!</div>data-pictofit-component- has to be set to virtual-stylingdata-pictofit-collection- represents the collection id of the collection you wan’t to open in PICTOFiTdata-pictofit-organisation- your organisation iddata-pictofit-google-measurement-id- add this parameter if you want to sent metrics to GA, remove if not.
Consolidate this page for more details on a data tags based integration.
Add products to cart from PICTOFiT
If a shopper wants to add products from the PICTOFiT Virtual Styling component to the host shop’s shopping cart, the you need to listen to the onPictofitAddToCartIntend callback and need to present the referenced articles in your add to cart screen. Below you can see an example:
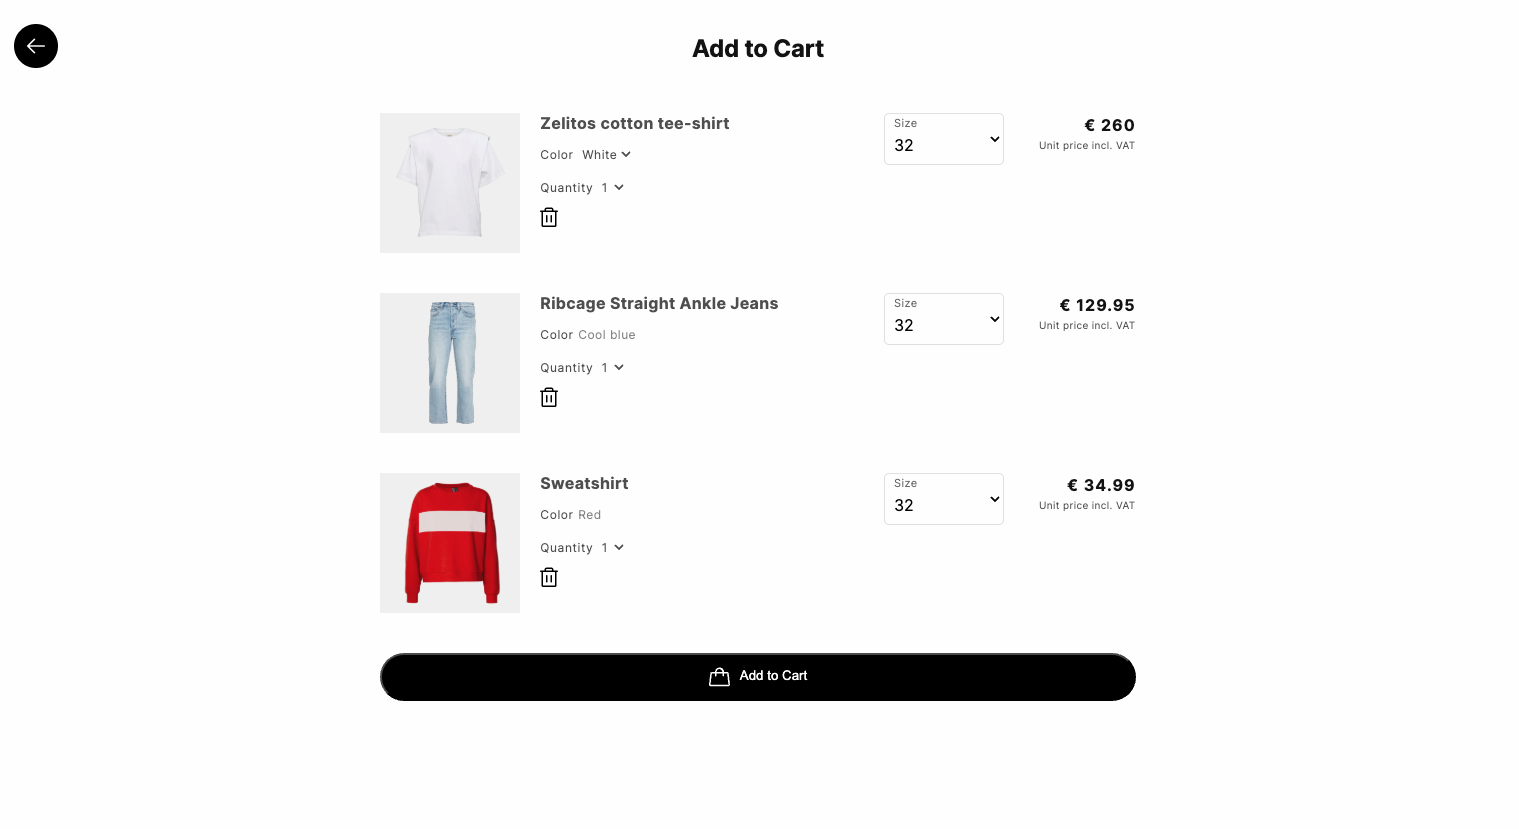
Example of host shop’s add to cart screen
To listen to the Add to cart intent callback you need to define a onPictofitAddToCartIntend callback on the window object somewhere in your theme. For example in the footer.liquid file.
<script>
  window.onPictofitAddToCartIntend = (items) => {
    console.log(`Received cart intent in theme! nice`, items);
    // Here you need to add the code that shows the referenced articles
   }
</script>
If this callback is defined the Add to Cart button will be shown in the PICTOFiT experience.
Add to Cart button
When a shopper clicks the add to cart button in PICTOFiT VS, you should see a list of items in the console that belong to the current outfit within the collection. The items are an array of the object ReferenceData. Here is one example:
[
  {
    reference: "gid://pictofit/sku/xyz1",
    organizationId: "9a4e90a5-2262-48ca-899e-9216a62dd52b"
  },
  {
    reference: "gid://pictofit/sku/xyz2",
    organizationId: "9a4e90a5-2262-48ca-899e-9216a62dd52b"
  }
]
The format of the reference is gid://pictofit/sku/<your-shopify-product-variant-sku>
We use the Shopify’s Product Variant’s SKU (Stock Keeping Unit) to link to a PICTOFiT Garment asset to a concrete Shopify Product Variant.
You need to iterate over the array and extract the SKUs from the the reference. The SKU can be used to gather product specific infos that you want to show in your add to cart modal.