Size Recommendation & Fit Visualisation
The PICTOFiT SDK allows you to compute the recommended size of a product for a certain avatar. This helps your customers to choose the right size when ordering clothing online. Furthermore, our technology enables you to give the user visual & textual feedback on the detailed fit of a product.
You can find the source code for it in our sample repository.
Size Visualisation
This section describes how you can show textual and visual feedback about the fit of a garment in a given size on a specific avatar. It is very convenient and easy to use the size recommendation & visualisation feature, all we need to use is the Pictofit.IVirtualDressingRoom interface as it encapsulates all the required handling.
Analog to the virtual try-on, we need to provide an avatar and a garment instance for which we want to get the recommendation and visualisation. Have a look at the section about virtual try-on to learn more about these assets.
// showcase a 3D tryon with fit visualisation
let dressingRoom  = Pictofit.VirtualDressingRoomFactory.createDressingRoom3D(viewer, computeServer);
dressingRoom.avatar = await dressingRoom.createAvatar(new Pictofit.StaticAsset("https://myserver.com/avatars/12354/"));
dressingRoom.garments = [
  await dressingRoom.createGarment(new Pictofit.StaticAsset("https://myserver.com/garments/12354/")),
  await dressingRoom.createGarment(new Pictofit.StaticAsset("https://myserver.com/garments/62356/"))
]

// trigger size visualisation for the first garment and the current avatar
const sizeVisConfiguration = new VDRSizeVisualisationConfiguration();
const sizeInfo = await dressingRoom.enableSizeVisualisation(dressingRoom.garments[0], sizeVisConfiguration);

dressingRoom.refresh();
The returned object contains the fit information and also the recommended size for the provided avatar and garment. You can access this information via sizeInfo.fitInformation and sizeInfo.recommendedSize.
You can also show the visualisation for a specific size. Therefore, you simply need to provide the desired size to the configuration. The heat map overlay will change accordingly and show the user the fit of a particular size on their avatar.
sizeVisConfiguration.size = "5-XL"; // just an example, size values can look differentlyPlease be aware that the identifier for the size is defined in the size table and can look differently.
If the size chart was provided to our Pictofit Content Service, the respective information is already included in the garment. Otherwise you have to specify two resources to make this work. First, the size chart and second a configuration file which maps these values to measurements on the body. The following snipped shows how it’s done.
sizeVisConfiguration.sizeTable = "http://mystorage.com/.../sizeTable.json";
sizeVisConfiguration.measurementsConfig = "http://myystorage.com/.../sizeRecommendationMeasurementConfig.json";
If there is tech pack data included in the garment, you can also create the size table on the fly, by providing an according configuration file. Note that this can be used to globally alter the behavior of the size visualization without updating the garments.
const sizeTableCreationData = new SizeTableCreationData("http://mystorage.com/.../creationConfig.json");
sizeVisConfiguration.sizeTableCreationData = sizeTableCreationData;
It is also possible to use different fit model charts in combination with the creation config:
creationData.fitModels = "http://mystorage.com/.../fitModelCharts.csv";Textual Fit Information
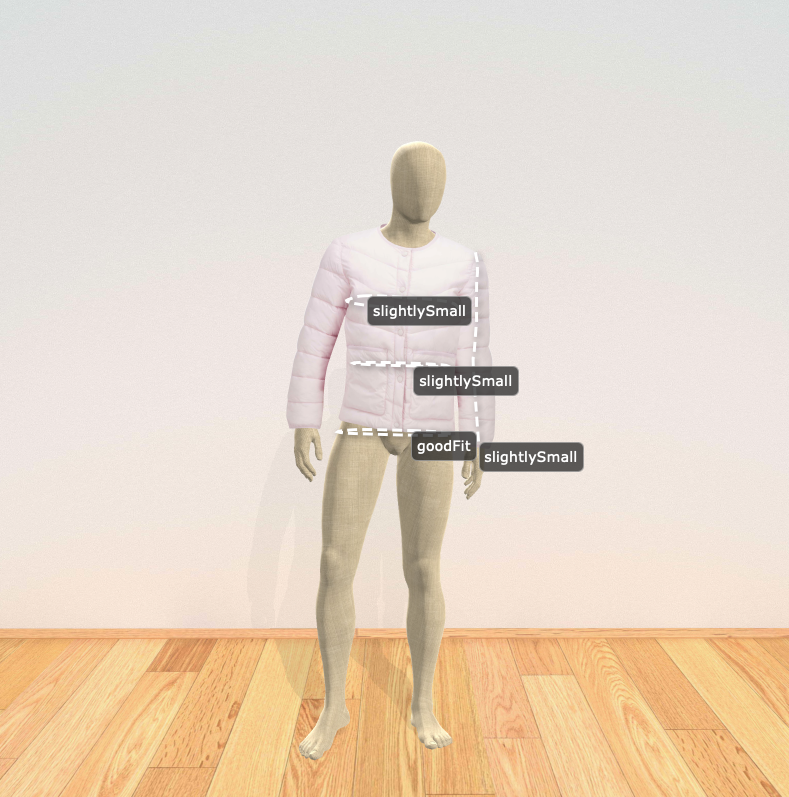
The sizeInfo.fitInformation is a key-value map where the keys are specific measurements and the values are objects with an enum of type FitCategory and an enum of type MeasurementCategory . You can use this information to also give your users textual feedback about the fit of a certain product.
const response = await sizeVisualisation.compute(sizeVisualisationMeshData);

for (const measurement in response.fitInformation) {
  const fitInfo = response.fitInformation[measurement];
  switch (fitInfo.fitCategory) {
    case Pictofit.FitCategory.OVERLY_SMALL:
      // update UI
      break;
    case Pictofit.FitCategory.SLIGHTLY_SMALL:
      // update UI
      break;
    case Pictofit.FitCategory.GOOD_FIT:
      // update UI
      break;
    case Pictofit.FitCategory.SLIGHTLY_LARGE:
      // update UI
      break;
    case Pictofit.FitCategory.OVERLY_LARGE:
      // update UI
      break;
  }
}
Additionally incorporating the MeasurementCategory makes it even easier to find the correct wording:
switch (fitInfo.measurementCategory) {
  case MeasurementCategory.LENGTH:
    // update UI
    break;
  case MeasurementCategory.CIRCUMFERENCE:
    // update UI
    break;
Customisation
The visual appearance of the size visualisation is completely customisable. To provide a custom measurement label design, just implement the IMeasurementPathRenderer interface and provide your implementation to a DefaultSizeVisualization instance. The following snippet shows how to customise the size visualisation label appearance.
// Specify the color to use when visualizing a small fit.
class CustomLabelFactory implements IMeasurementLabelFactory {
  createLabel(labelInfo: MeasurementLabelInfo): HTMLElement {
  // Creates a very basic label with white text on black background.
    const result = document.createElement("div");
    result.textContent = labelInfo.fitCategory;
    result.style.padding = "5px";
    result.style.background = "black";
    result.style.color = "white";
    return result;
  }
}

// Create a proper config for enabling the size visualisation.
const config = new VDRSizeVisualisationConfiguration();
const sizeVisualization = new DefaultSizeVisualization();
sizeVisualization.labelFactory = new CustomLabelFactory();
config.sizeVisualization = sizeVisualization;

// enable the size visualization based on the config.
dressingRoom.enableSizeVisualisation(garment, config);
For more advanced needs, the full placement of the measurement labels as well as the rendering of the measurement paths can be implemented in a custom manner. To achieve this, you need to provide an implementation of the interface ISizeVisualization. See the API docs for more information on what you can/need to implement there.
Size Recommendation Only
There are cases where you might only want the size recommendation without the visual feedback.
As we don’t generate any overlays showing the visual fit of a garment we do not need the Pictofit.IVirtualDressingRoom here. Instead, we can directly handle this through the Pictofit.IGarment interface. As we don’t use the dressing room for this usecase we can use a standalone IAssetFactory implementation to create the actual garment. You can create the corresponding asset factory for 2D and 3D assets using the Pictofit.AssetFactoryFactory and a Pictofit.WebViewer instance. The following lines show you how to do that.
const webViewer = new Pictofit.WebViewer("canvas-id");
const assetFactory2D = Pictofit.AssetFactoryFactory.createAssetFactory2D(webViewer);
const garment = await assetFactory2D.createGarment(new Pictofit.StaticAsset("https://myserver.com/garments/12354/"));
const avatar = await assetFactory2D.createAvatar(new Pictofit.StaticAsset("https://myserver.com/avatars/12354/"));
The sample shows how it’s done in 2D but it works the same way in 3D.
To trigger the actual size recommendation all we need additionally is a Pictofit.ComputeServer, since the computations are done remotely.
The following snipped shows how it’s done.
const sizeRecConfiguration = new VDRSizeRecommendationConfiguration();
const sizeInfo = await garment.getSizeRecommendation(avatar, computeServer, sizeRecConfiguration);
In a similar way you can also query which sizes are available for a given garment using the getSizes(computeServer: ComputeServer): Promise<string[]> method.
const sizes = garment.getSizes(computeServer);Note that you can pass SizeTableCreationData as a second parameter to getSizes. This is particularly useful if you set fit model data in the creation data, as this may influence the set of available sizes.