Personalised Mannequins
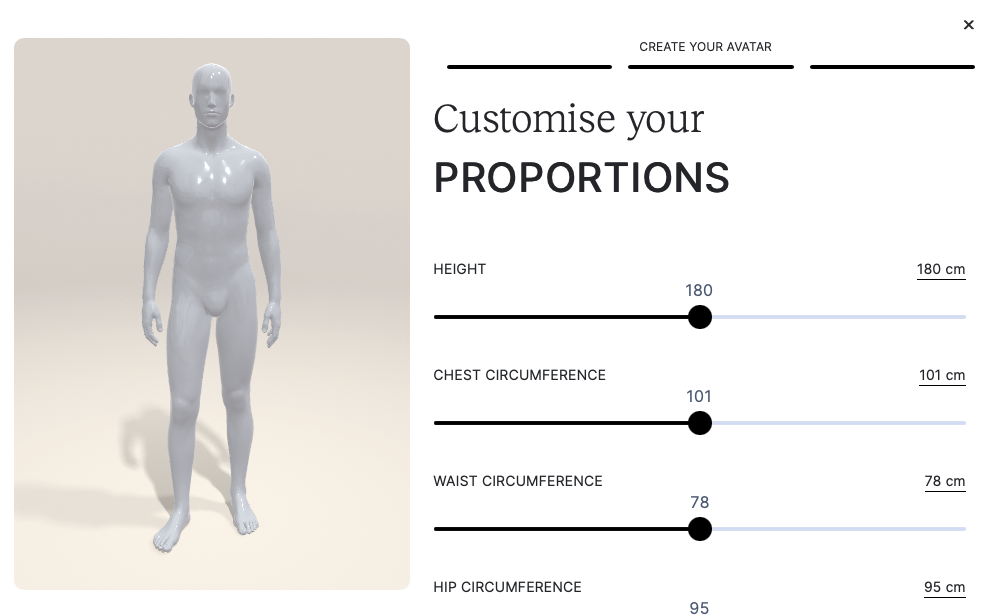
From a few body measurements, we can generate personalised mannequins for mix & match and size recommendation. Based on 6 input measurements, we can recreate the users body shape with an accuracy of around 94%. The resulting full 3D model of the user's body allows to take measurements virtually anywhere on the body. You can find the source code for it in our sample repository.
Configuration Options
When generating a personalised mannequin, several aspects can be configured:
bodyModelIDThere are currently two body models (one for each gender) which define the general body shape & pose (and gender) of the mannequin. These are options at the moment:DAZ_Genesis8Male_default(male)DAZ_Genesis8Female_default(female)
baseShapeTypeThe shape types refer to the basic body type. The options areEctomorphMesomorphEndomorph
customBaseShapeAllows you to define a custom base shape (different from the options available for baseShapeType). The parameter can either be passed as blob or as URL pointing to the respective file. The sample repository contains files for alternative base types like skinny, average, athletic etc.measurementTargetsThis is the list of input measurements which define the shape of the generated mannequin. Please be aware that this depends on the used configuration. With the default configuration, you can input the following values to generate the personalised mannequin.shoulder_lengthchest_circumferencewaist_circumferencehip_circumference
inputMeasurementsConfigAllows you to provide a custom configuration for the input measurements. Please see the sample repository for alternative configurations with other input options. Depending on your use case, you might want to use more ore less inputs.poseThis defines the pose in which the generated mannequin will stand in. The parameter can either be passed as blob or as URL pointing to the respective file. See the sample repository for available poses. If none is provided, the mannequin will stand in a neutral pose.appearanceModelThis parameters allows you to customise the visual appearance (e.g. to make it more stylised) of the resulting mannequin. A an example can be found in the sample repository. Please contact us if your interested in a custom appearance.
Depending on the used configuration files, the available options might change You can also query certain options from the server. How this is done can be seen in the following snippet.
let computeServer = new Pictofit.ComputeServer(SERVER_URL, SERVER_TOKEN);

// request all available body model ids
let bodymodelIds = await computeServer.requestBodyModelIDs();
// request all available shape types
let shapeTypes = await computeServer.requestBaseShapeTypes();

// request all available measurements (identifier and default values)
let measurements = await computeServer.requestInputMeasurements(myBodyModelId);
// Optionally you may also use a custom config file
let measurements = await computeServer.requestInputMeasurements(myBodyModelId, configUrl);
Generating a Mannequin
The SDK comes with a Pictofit.PersonalisedMannequinCreator component which takes care of all the required step. It’s the fastest way to get started since it works out of the box without having to configure anything.
To generate your personalised mannequin, create first a Pictofit.PersonalisedMannequinCreator instance. As the heavy lifting is done in the compute server we need a Pictofit.ComputeServer instance for this together with a Pictofit.WebViewer instance which is handling the visual output.
const computeServer = new Pictofit.ComputeServer("https://myComputeServer", "myToken");
const webViewer = new Pictofit.WebViewer("canvas-id");
const mannequinCreator = new Pictofit.PersonalisedMannequinCreator(webViewer, computeServer);
With this being done you can start to customise the mannequin. Now create a new Pictofit.PersonalisedMannequinCreatorCustomiseParameters instance and provide your values for the different options. Most important are the input measurements that you provide using the setMeasurement method. These define how your mannequin will look in the end. If you don’t provide a target value for a certain measurement, the default defined by the selected body type (baseShapeType) will be used.
The following snippet shows how to customise and create a personalised mannequin:
const info = new Pictofit.PersonalisedMannequinCreatorCustomiseParameters();
// use a custom pose and input measurement config
info.inputMeasurementsConfig = "https://myServer/mannequinMeasurementsConfig.json"
info.pose = "https://pose/myPose.bm3dpose";

info.bodyModelID = myBodyModelId;
info.baseShapeType = myShapeType;
info.setMeasurement(new Pictofit.Measurement(myMeasurementId, myMeasurementValue));

await mannequinCreator.customise(info);
Once the request has finished, the generated mannequin is added to the scene and the Pictofit.PersonalisedMannequinCreator instance takes care that a default material has been defined for the mannequin as well as lights and camera.
It’s not advise-able to generate a personalised mannequin on the fly before computing a virtual try-on for performance reasons. The request takes some time which can easily be saved by doing it once and caching/storing the generated information.
Customising the Material
The appearance of the mannequins surface is defined by a material using our JSON configuration format. You can easily provide a custom material by creating a new Pictofit.JSONMaterial. Please see the Advanced section on how to define your own materials.
Now simply set it onto the mannequin creator and call customise():
mannequinCreator.material = material;
await mannequinCreator.customise(info);
Customising the Scene
The Pictofit.PersonalisedMannequinCreator also allows you to customise the whole scene as well. The steps are very similar to the once for a custom material. All you need to do is to create a new Pictofit.JSONScene. Please see the Advanced section on how to define your own scenes.
Now simply set it onto the mannequin creator and call customise():
mannequinCreator.scene = scene;
await mannequinCreator.customise(info);
Creating a 2D Avatar
The mannequin created in this process is a full 3D model with accompanying semantic information on the body shape and pose. It can be used with the 3D virtual try-on and size-recommendation & fit visualisation. To use the mannequin as an avatar with the 2D virtual try-on, we need to convert it first. This is fairly simple as can be seen in the following sample
const parameters = new Pictofit.PersonalisedMannequinCreatorCreate2DAvatarParameters();
parameters.mannequinRenderingSize = { width: 2000, height: 3000 };
const avatar2D = await mannequinCreator.create2DAvatar(parameters);
Starting with Pictofit WebSDK v18.4.0 and ComputeServer v5.3.0 you have the following optimization option when converting a 3D avatar to 2D. In case you don’t use a VirtualDressingRoom2D you can improve runtime performance and memory requirements by omitting the generation of a full 2D avatar as such an avatar is only needed in the plain 2D virtual dressing room. This can be done by setting the following parameter (default is true):
parameters.returnNonMinifiedAvatar = false;Store a converted Avatar 2D or generated Avatar 3D (Personalised Mannequin)
Please have a look at the chapter Assets on how to save & load files (assets) associated with an avatar.
Animations
Adding animations to generated mannequins will breathe life into otherwise static objects. This can be achieved by creating a Pictofit.IAnimation instance and setting it onto the Pictofit.PersonalisedMannequinCreator instance:
const animation = await AssetFactoryFactory.createAssetFactory3D().createAnimation(new Pictofit.StaticAsset("https://myserver.com/animations/default/"));
await mannequinCreator.setAnimation(animation);
It does not mean that generated mannequins are not animatable in a virtual dressing room if no animation is set on the Pictofit.PersonalisedMannequinCreator at mannequin creation time. The animation only affects the rendering of the mannequin within the mannequin creator.