Virtual Garments
Virtual Garments are the main ingredient for your virtual dressing room. They need to be created for each of your products to be able to use them in the dressing room.
To create virtual garments, your shop will need to connect to the PICTOFIT CMS. You can find a button to do this in our setup guide or alternatively in the settings section of the app.
Once your store is linked to the PICTOFiT CMS, you are able to create virtual garments in the Product section within the PICTOFiT Virtual Try-On.
The connect action triggers a pop up so make sure to check your blocker if it doesn't show up.
This section shows all products that are available in your store. Besides the product name and the status, that are identical to the product section of Shopify, you will find three additional columns:
Virtual Garment
Actions
The virtual garment column shows the state of the asset that has been created for the respective product. You will see one of the following three states indicating that:
MISSING No virtual garment has been created for this product
IN PROGRESS Virtual garment is being created a the moment
ADDED Virtual Garment has been created and is linked to the product
ERROR An error occured while processing the image.
The last column shows actions which are dependend on the state of the virtual garment. Here you can create or edit settings of a virtual garment.
Create Virtual Garment
In the case that there is no Virtual Garment ADDED or IN PROGRESS, you will able to create one. When you click this button an overlay will open (see below). In this overlay, you can choose one of your product pictures that is best suitable for our software. The example pictures on top should give you a good idea of which is best suited, if you are still unsure check Specification 2D input pictures
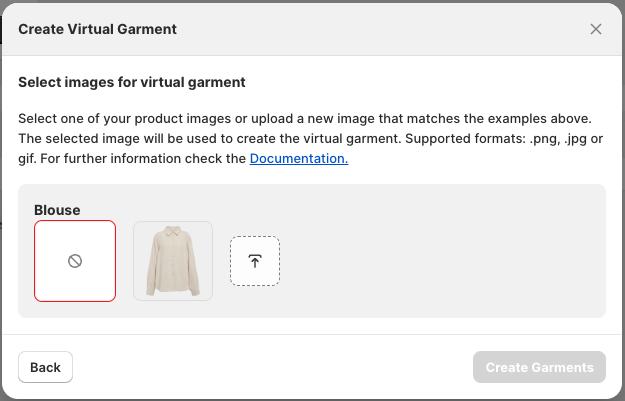
You also have the option of uploading suitable pictures from one of your devices by clicking Add images.
Once you have selected a suitable input picture you can click Use Selected Image. You will get a confirmation screen and see the virtual garment status IN PROGRESS.
We are processing your images automatically, so usually the virtual garment should be ready within a few minutes. If our systems detects that your image doesn’t fulfil our requirements, a member of our QA team will check if we can process it. In this case, the result may take up to 24 hours.
When your garment is ready, the state will change to ADDED and it can be used in the virtual dressing room.
Edit Garment
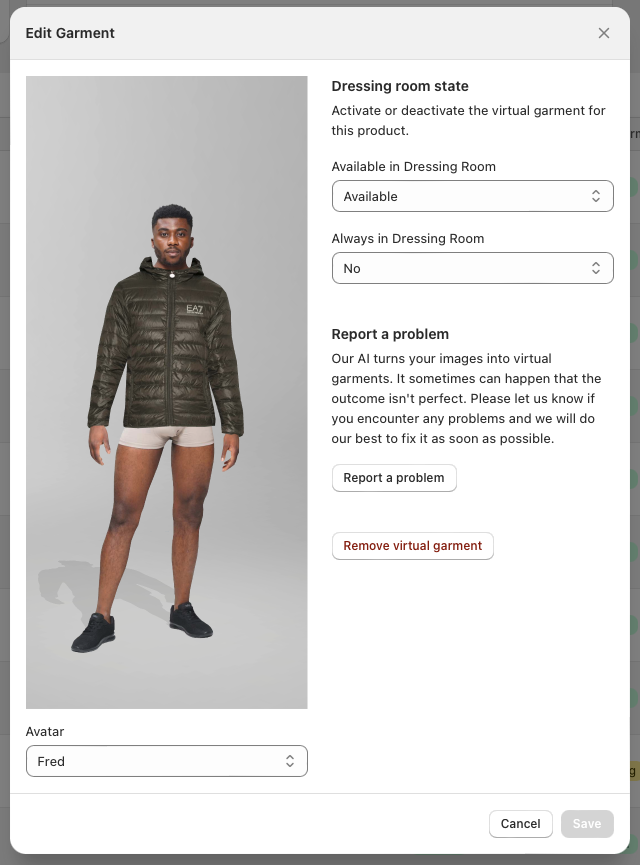
You can change garment settings by clicking Edit Garment.
Available in Dressing Room:
If set to “available”, your customers will be able to add and see the virtual garment in the dressing room.
If set to “not available”, your customers won’t be able to add and see the virtual garment in the dressing room.
Always in Dressing Room:
If set to “yes”, the garment will automatically appear in the dressing room, even without a shopper selecting it. Brands use this option to promote certain products.
If set to “no”, customers will need to add the virtual garment to the dressing room.
Report a problem
In case of garment issues, you can click Report a problem. You can then describe your problem in the text field. Our support team will have a look and try to fix the problem (this can take up to 24 hours).
Garment issues can be reported up to 14-days after they’ve been added. Afterwards, they’ll automatically be approved.
Remove Virtual Garment
If you want to remove the virtual garment from your product, click Remove Virtual Garment. Be aware that it will permanently remove it. You will need to request a new virtual garment if you want it back in your store.
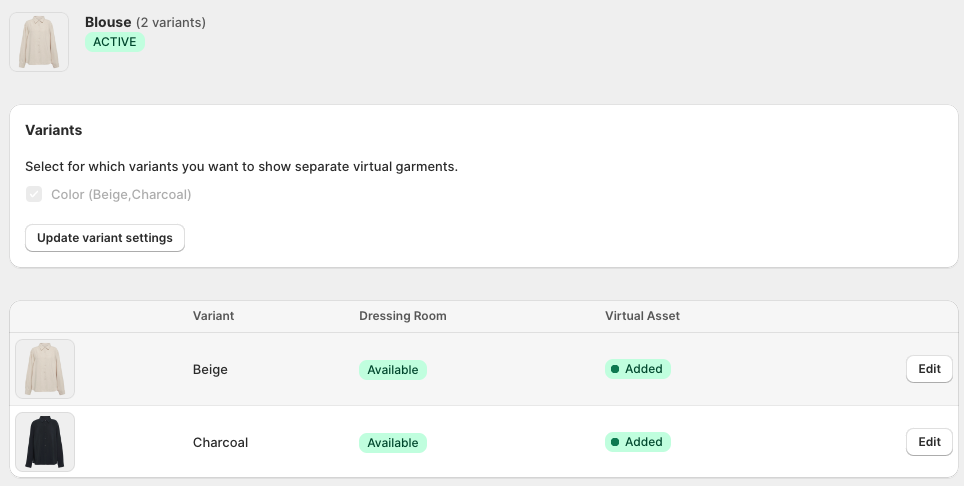
Variants
The PICTOFIT Virtual Dressing Room supports the inclusion of product variants. When a product has visually distinct variants (e.g., color, pattern, design differences) and you want to show these differences, you have to create a separate virtual garment for each variant.
Separate virtual garments for different sizes of the same product design are not required. The system is designed to accommodate size differences without the need for multiple virtual representations of the same design.
On the product overview within the PICTOFIT Virtual Try-On App, you can see an indication when a product has variants.

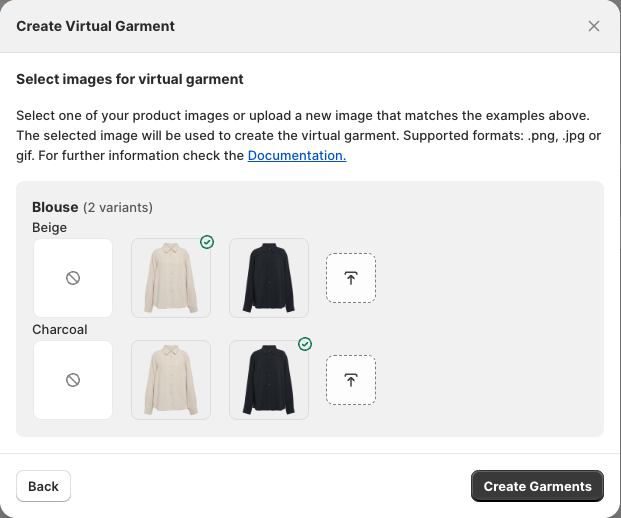
Upon clicking the Create Virtual Garment button, you will be asked to select the variants for which you want to create virtual garments. This is only necessary for visually distinct products.
Example for clarification: If a shirt is available in various colors and materials, but the material does not change its appearance, then only the color variants, being visually distinctive, should be selected for virtual garment creation.
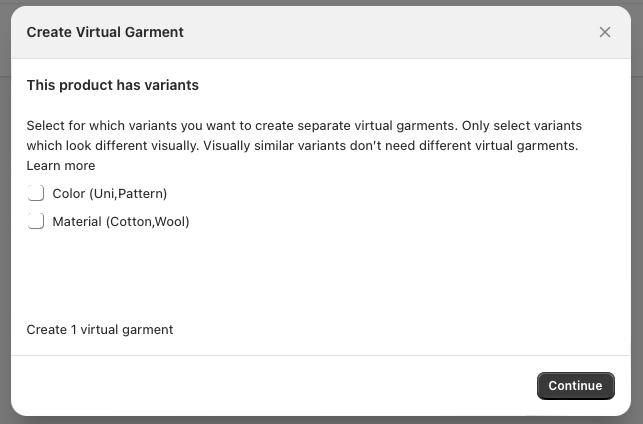
Next, you are asked to select the respective image for each variant option that you want to use. Please keep in mind that these images need to fulfill our Specification 2D input pictures.
Products featuring variants have a specialized details page, showcasing the different options along with their respective states and settings. You have the chance to modify which variants you wish to support in a later stage.