CLO3D Guide
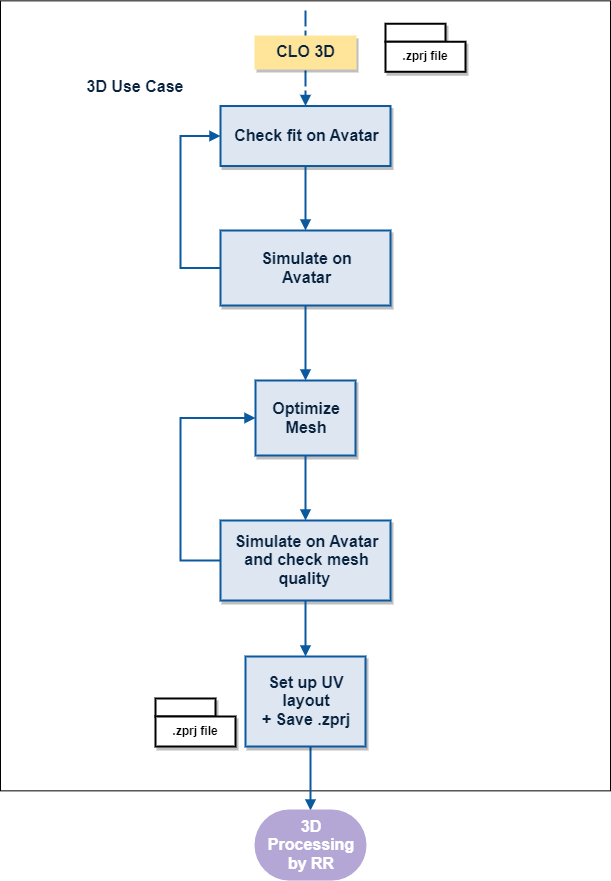
The following workflow visualizes the steps needed in CLO3D to ensure the exported files adhere to our Content Service input specifications. There are two paths with similar steps to produce the necessary data. In the sections below, the steps for the two paths (2D Output, 3D Output) are explained in detail.
Avatars
All CLO3D garments need to be fitted and simulated on an appropriate avatar, that is known to Reactive Reality, and that is stored within the .zprj file of each garment. Within these files, the avatars should be standing in a-pose. The avatar must have the same size as the garment size, which should be the base size, the garment was designed in.
RR Avatars
In case you don’t have appropriate avatars, we can provide you with male and female “RR Mannequin” avatars, that you can import into your .zprj files to fit and simulate your CAD garments on within CLO3D, to get the best possible output for downstream processing according to our specifications, including appropriate output for our 2D Virtual Photography use case.
The RR mannequins have average body proportions and are posed in a neutral and slight A-pose to provide a neutral shape for the resulting fitted and simulated garment. Use the below links to download the RR mannequins.
Female RR Mannequin (download) | Male RR Mannequin (download) | ||
Body Height: | 178,8cm / 5’10 / 70,4 in | Body Height: | 181,3cm / 5’11.26 / 71,4 in |
Chest Circumference: | 88,7cm / 34,9 in | Chest Circumference: | 92,9cm / 36,6 in |
Waist Circumference: | 68,5cm / 27 in | Waist Circumference: | 74,2cm / 29,2 in |
Hip Circumference: | 95,8cm / 37,7 in | Hip Circumference: | 95cm / 37,4 in |
Arm Length: | 58,5cm / 23 in | Arm Length: | 62cm / 24,4 in |
The expandable section below describes how to import the RR Avatars into your .zprj files
To use the RR Avatars, please follow the steps below:
→ delete the present avatar in the .zprj
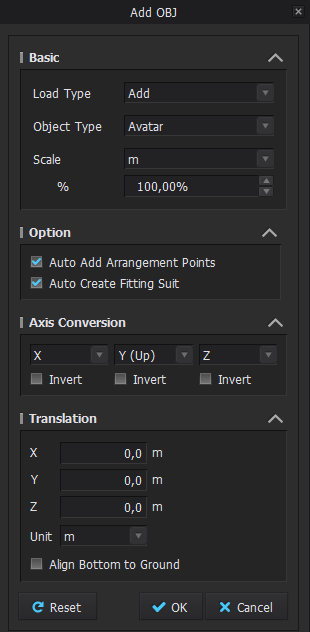
→ import the respective RR mannequin (File → Import (Add) → OBJ) with the following settings:
Custom Avatars
Alternatively to using the RR Avatars, you can choose to provide us your .zprj garment files and generated output based on the avatar files you have used in the design process of your garments.
In this case, please provide the avatar or avatars you are intending to use for your selection of garments beforehand in an .obj file format and the height of the avatar in cm prior to the garment datasets. The .obj export of the avatar should correspond exactly to the avatar used for fitting in your garment project files (size / scale, pose). Please note that we need charge per avatar import.
Color and fabric variants
If your garment has different color or fabric variants, RR will create separate assets of each color and fabric variants.
Color variants of the same garment need to be defined within the garment’s .zprj file using CLO3D's Colorways feature.
Fabric variants of the same garment need to be reflected in separate .zprj files for each variant, since each pattern piece within one .zprj file can only have one type of fabric assigned at a time, and different fabrics need to be saved, simulated and exported individually.
2D Output

1. Check fit on avatar and simulate on avatar
→ position the pattern pieces around the shape of the avatar
→ simulate and check the result for self-intersections or intersections with other patterns like buttons and trims or hard edges and fix them with new iterations of simulation using the appropriate toolset (mesh tool (lasso, box, brush), pins, tack, freeze, solidify, ..., etc) until everything looks sound.
2. Render out Frontal + Back Images
→ use the RR HDRi file to match the light conditions of the RR Avatars. Don’t forget to check and adapt the Light Intensity (0,9 for white garments, 1 for bright garments, up to 1,5 for dark garments)
If you are using your brand's own avatars, please check back with your contact at Reactive Reality in order to get the right light settings for matching your target avatars.
→ please zoom in as much as possible while keeping the whole garment still visible. (hotkey “2” & “8”)
→ use these settings in the Image/Video Properties for rendering out the frontal and back view of the garment named accordingly (_frontal & _back):
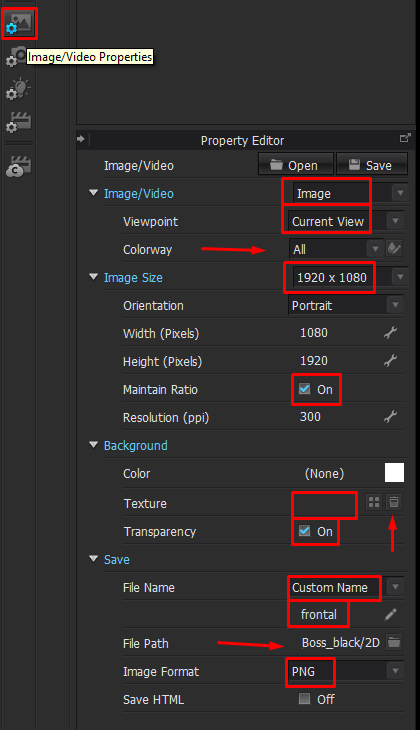
Depending on if there are multiple color variants of the garment present, choose either Current or All in the Colorway section. Please make sure to name the different renderings according to the SKUs.
3D Output
1. Check fit on avatar and simulate on avatar
Before you proceed with any of the steps below, make sure all the pattern pieces of your garment are un-hidden in the 3D pattern view and properly connected via seams
→ position the pattern pieces around the shape of the avatar
→ simulate and check the result for self-intersections or intersections with other patterns like buttons and trims or hard edges and fix them with new iterations of simulation using the appropriate toolset (mesh tool (lasso, box, brush), pins, tack, freeze, solidify, ... etc) until everything looks sound.
2. Optimize Mesh
→ adjust the Particle Distance, Collision Thickness and Skin Offset to achieve a lower, but still good looking mesh density
Aim for a particle distance between 10 - 15. (check if the Low-Res Garment settings are already sufficient)
This might not be applicable for all pattern pieces of the garment. For the sake of detail and realism use a lower particle distance of up to ~5 for delicate pattern pieces like tied bows, straps, bands, smaller or thinner pieces.
Different pattern pieces may therefore have different particle distances, but each pattern piece should not have different areas with varying resolutions.
This is inevitable for a good performance in the subsequent steps and for the final asset in the various use-cases.
3. Simulate on avatar and check mesh quality
→ simulate and check the result for self-intersections or intersections with other patterns like buttons and trims or hard edges and fix them with new iterations of simulation using the appropriate toolset (mesh tool (lasso, box, brush), pins, tack, move tool, etc.) until everything looks sound.
Make sure to finally simulate in mode Fitting(Accurate Fabric). Ensure that the simulation is really finished and the garment stopped moving. This is crucial for all subsequent steps.
If necessary, modify the adjustments done in step 2, simulate and check again and repeat this process until you are satisfied with the results.
4. Set up UV Layout, topstitches and check pattern piece names
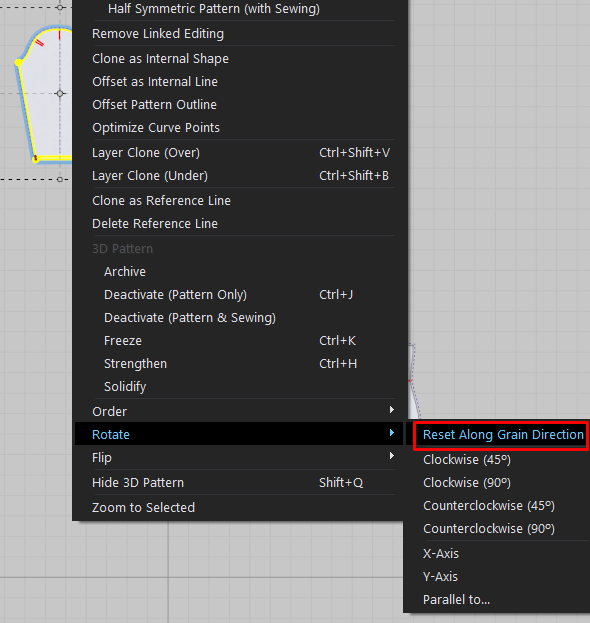
→ the pattern pieces need to be oriented along their grain direction in the 2D Pattern Window. To do so, select all pattern pieces using the Transform Pattern tool (A) and right click, then select Rotate>Reset Along Grain Direction
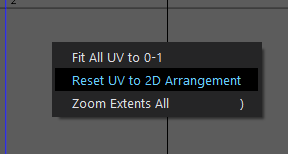
→ go to the UV Editor workspace, click right somewhere in the UV space and choose Reset to 2D Arrangement, which will place the pattern pieces, as you had it in the simulation space.
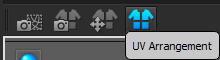
→ in to the UV Editor toolbar, select the UV Arrangement function
→ check the automatically generated UV layout for overlapping pattern pieces, such as shown below
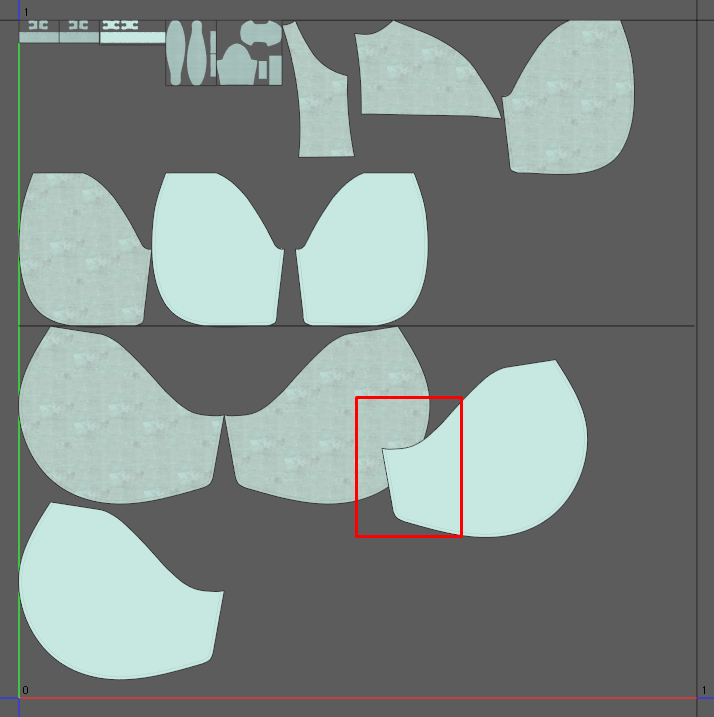
These will have to be manually fixed by moving the overlapping pattern piece into an empty area of the UV space, with some margin to neighboring pieces
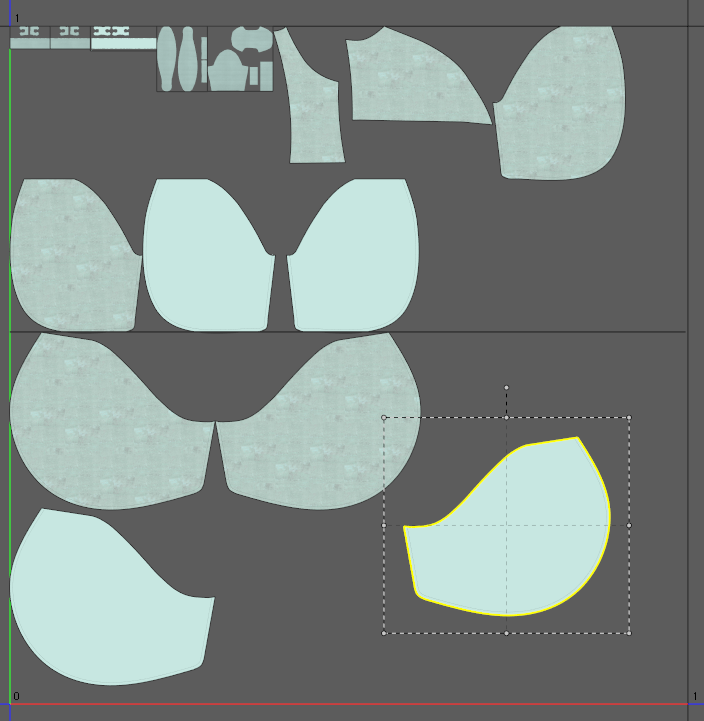
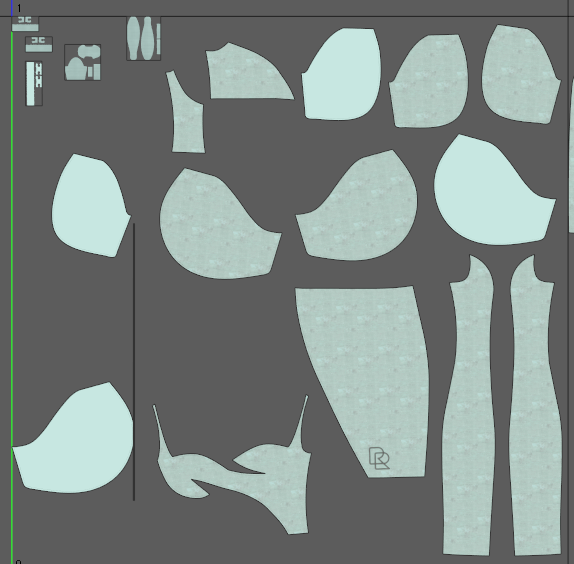
Furthermore, by default, the UV Arrangement function will place pattern pieces next to each other without any margin:
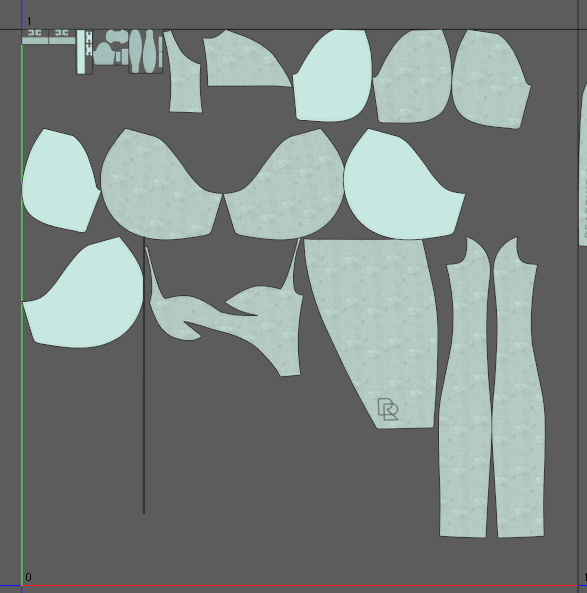
We will need a margin between the pattern pieces so we can add a texture baking margin in the export step eventually. For this reason, make sure to move all the pattern pieces away from each other, so there is some space between the individual pieces:
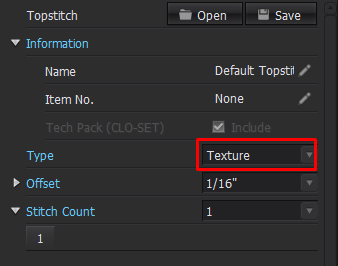
→ set the Type property of all the topstitches to Texture, rather an OBJ
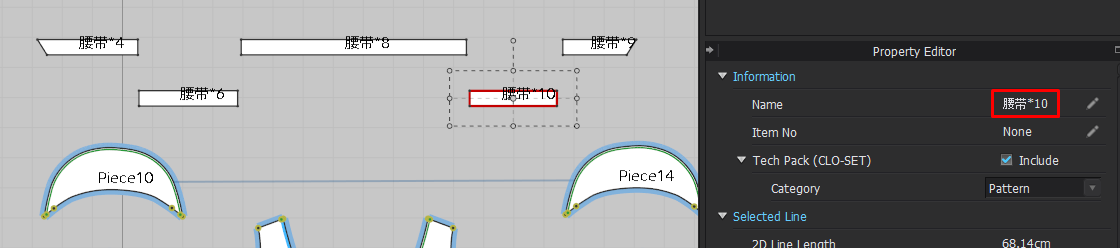
→ finally, make sure all of the pattern pieces' names are written in Latin letters. Non-Latin letters in the pattern piece names will cause issues in the .xml metadata file that is required for the export.
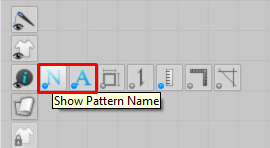
In the viewport of the 2D Window, enable Pattern Names and Pattern Annotation.
Now rename all pattern pieces in the Property Editor, by first clicking on the pattern piece, using non-Latin letters (in the example shown below, Chinese letters) and then on the Name in the Property Editor. Enter a pattern name in Latin letters.
5. Export garment .obj and .xml files
→ From the main menu, select File → Export → OBJ and select an appropriate folder and file name for the export.
Make sure the settings of the export dialogue box are the same as shown in the screenshot below:
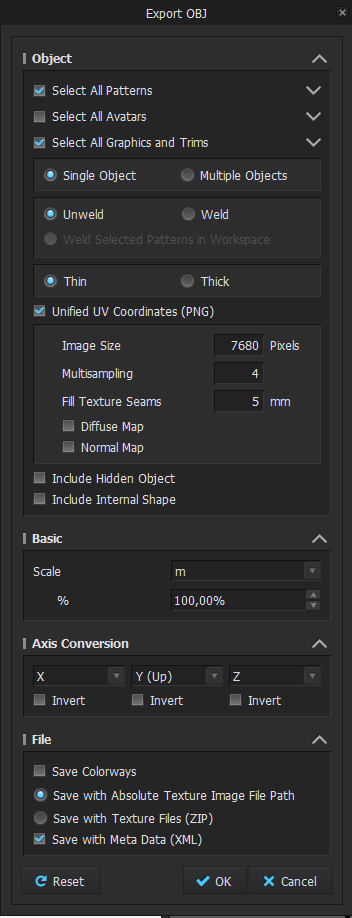
In particular:
Check
Select All PatternsUncheck
Select All AvatarsCheck
Select All Graphics and TrimsSelect
Single Object,UnweldanThinCheck
Unified UV Coordinates (PNG)Set the Scale to meters (
m) and100,00%Set Axis Conversion to
X, Y (Up), ZUncheck
Save ColorwaysCheck Save with
Meta Data (XML)
→ click OK to export
6. Bake and save Texture .png files
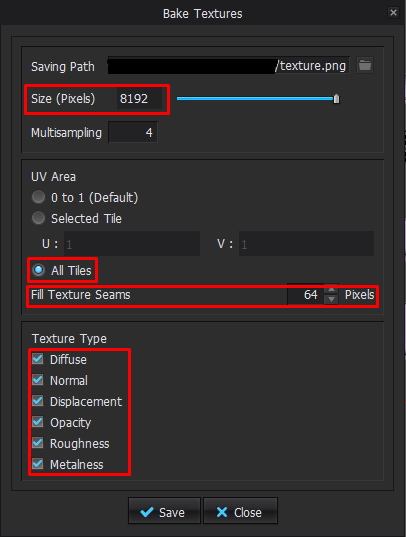
→ Choose Bake Textures from the UV Editor toolbar
By clicking on this symbol, a window with the bake settings will pop up.
Make sure, the texture size is set to 8192, chose a proper Saving Path (if the garment has multiple colorways, create subfolders named in the respective colors for each colorway), name the baked textures texture, set the UV area to All Tiles , Set the Fill Texture Seams amount to 64 Pixels and check all Texture Types. Then hit Save.
→ As mentioned above, if the garment has multiple colorways, repeat this step for each colorway, exporting the individual colorways' textures into their own, respective subfolders.
Finally, please save the .zprj file with the set up outlined for upload to Reactive Reality’s CMS
Troubleshooting
If this description is insufficient, you need further explanation or you run into problems, please reach out to your contact at Reactive Reality.