Background Scenes from Images
Overview & Supported Outputs
Reactive Reality creates 3D background scenes for with a parallax effect with 2D image input. Finished scenes can be used in our Virtual Try-on applications on Mobile and Desktop.
Scene Categories
Standard
Any scenes which fully meet our Standard Scene Requirements.
.gif?inst-v=62f7ba27-13aa-439f-9cf6-94966873b385)
Non-standard
Any scenes which do not fully meet our Standard Scene Requirements. These are by default a custom job and charged on an hourly basis.
Requirements for Standard Scenes
In order to qualify as a Standard Scene, the request must fully meet the following requirements:
General
Customer must provide the input photograph.
Image must be a real photograph. This means, no Computer Generated Imagery (CGI) is acceptable.
If any logo or branding is visible, Reactive Reality needs to have specific clearance to display them.
Specific landmarks and distinct pieces of architecture and art might be protected by copyright law, even if on public display, and might need clearance for commercial use. The responsibility to the image and content rights lies fully with the customer. Reactive Reality is excluded from any responsibility.
Image Properties
Lighting Direction
Do's: The lighting should come from the front ¾. The side of the ¾ front light is not important, unless specified by the customer.
Don’ts: The image can’t be backlit. This includes direct backlight or backlight from “the sides” (¾ backlight). Fully frontal lighting is best avoided, as it diminishes the effects of shadows and depth, which are part of the point in creating scenes. Side lighting can work but is not ideal.
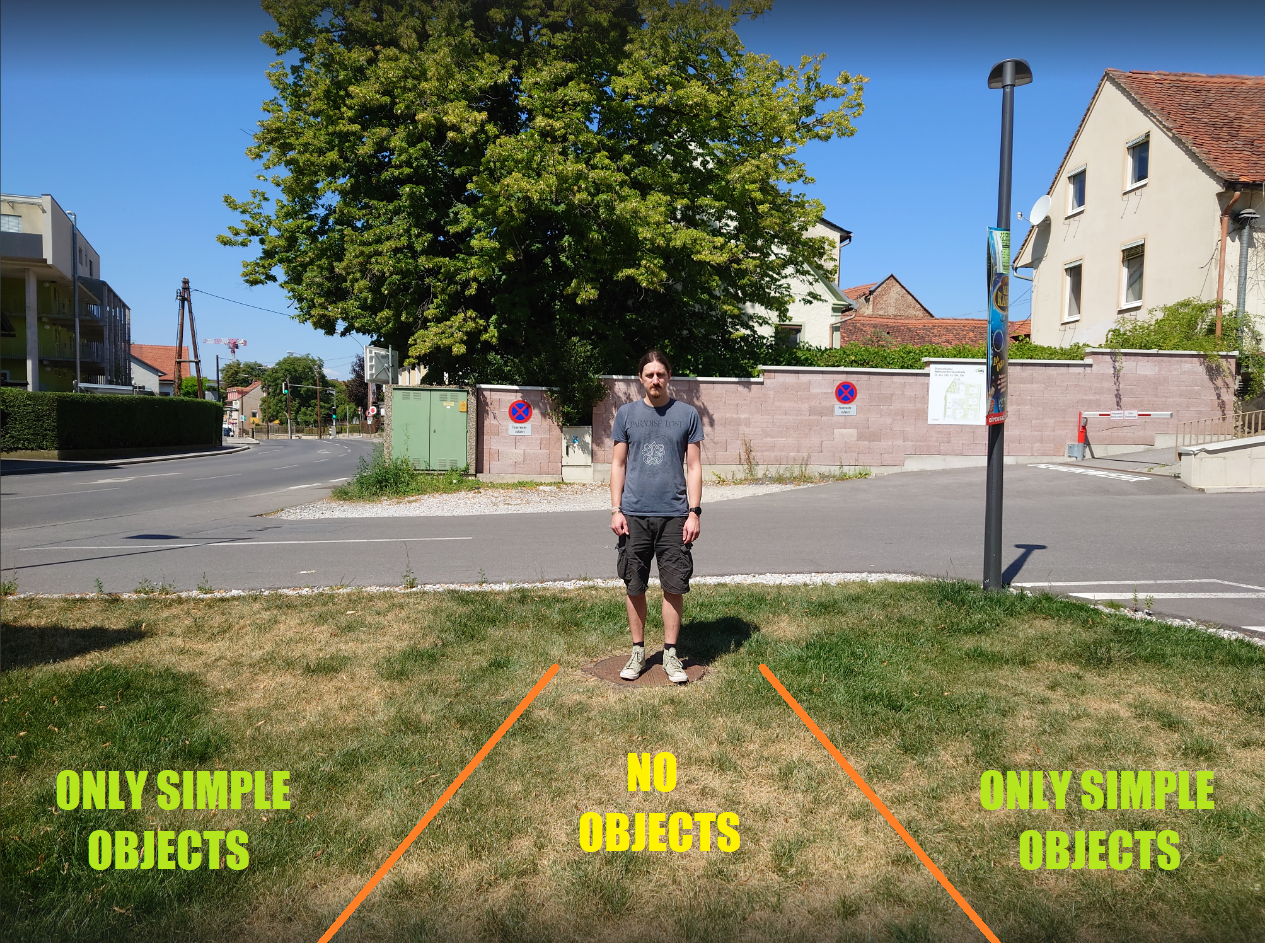
The green and yellow portions represent the lighting angles hitting the front of the avatar (center black). Green being ideal and yellow not recommended. The red portion represents light hitting the back of the avatar and is not accepted.
1. Frontal light: Not recommended. 2. 3/4 front light: Ideal. 3. Side light: Not recommended.
4. Backlight: Not accepted. 5. 3/4 backlight: Not accepted.
Shadows
Do’s: The avatar should be either fully in or fully out of the shadow.
Don’t: No shadows should fall on the foreground of where the avatar will stand, unless the whole area is under shade. The main point is to not have the avatar or it's shadow partially under a shade.
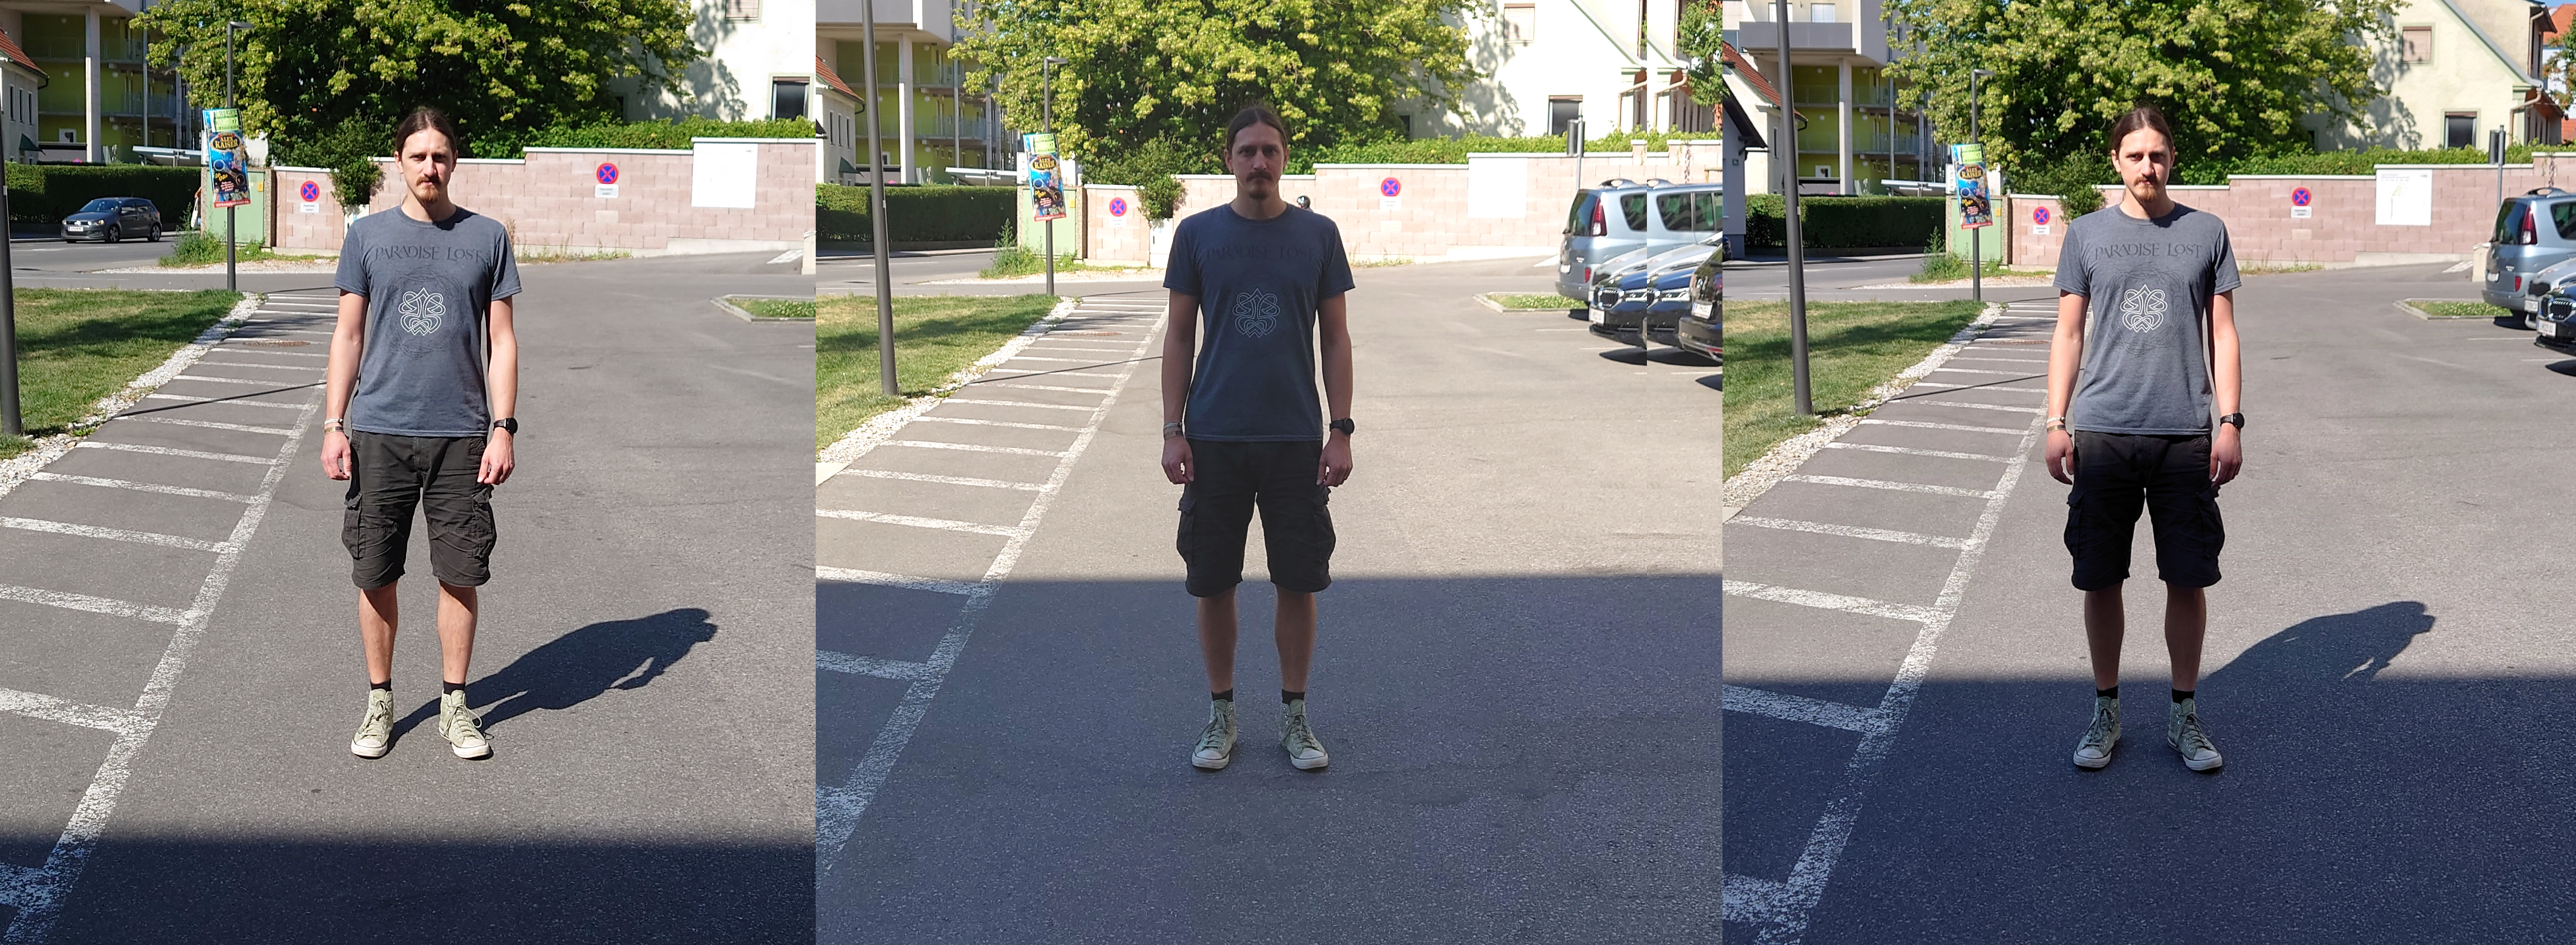
1. Fully out of shade: Ideal. 2. Fully in shade: Acceptable, as long as exposure is enough. 3: Partially in shade: Not Accepted.
Position
Do’s: The avatar needs to stand on a flat surface and the feet must be completly unobscured. This means, the spot where the avatar is intended to stand must be flat or of a flat nature.
Don’t: Avoid any uphill or downhill directions. The avatar should also not stand in a dent in the ground or on any surface which goes up at the front and covers the avatar's feet. This can be misleading, for example on wavy grounds.
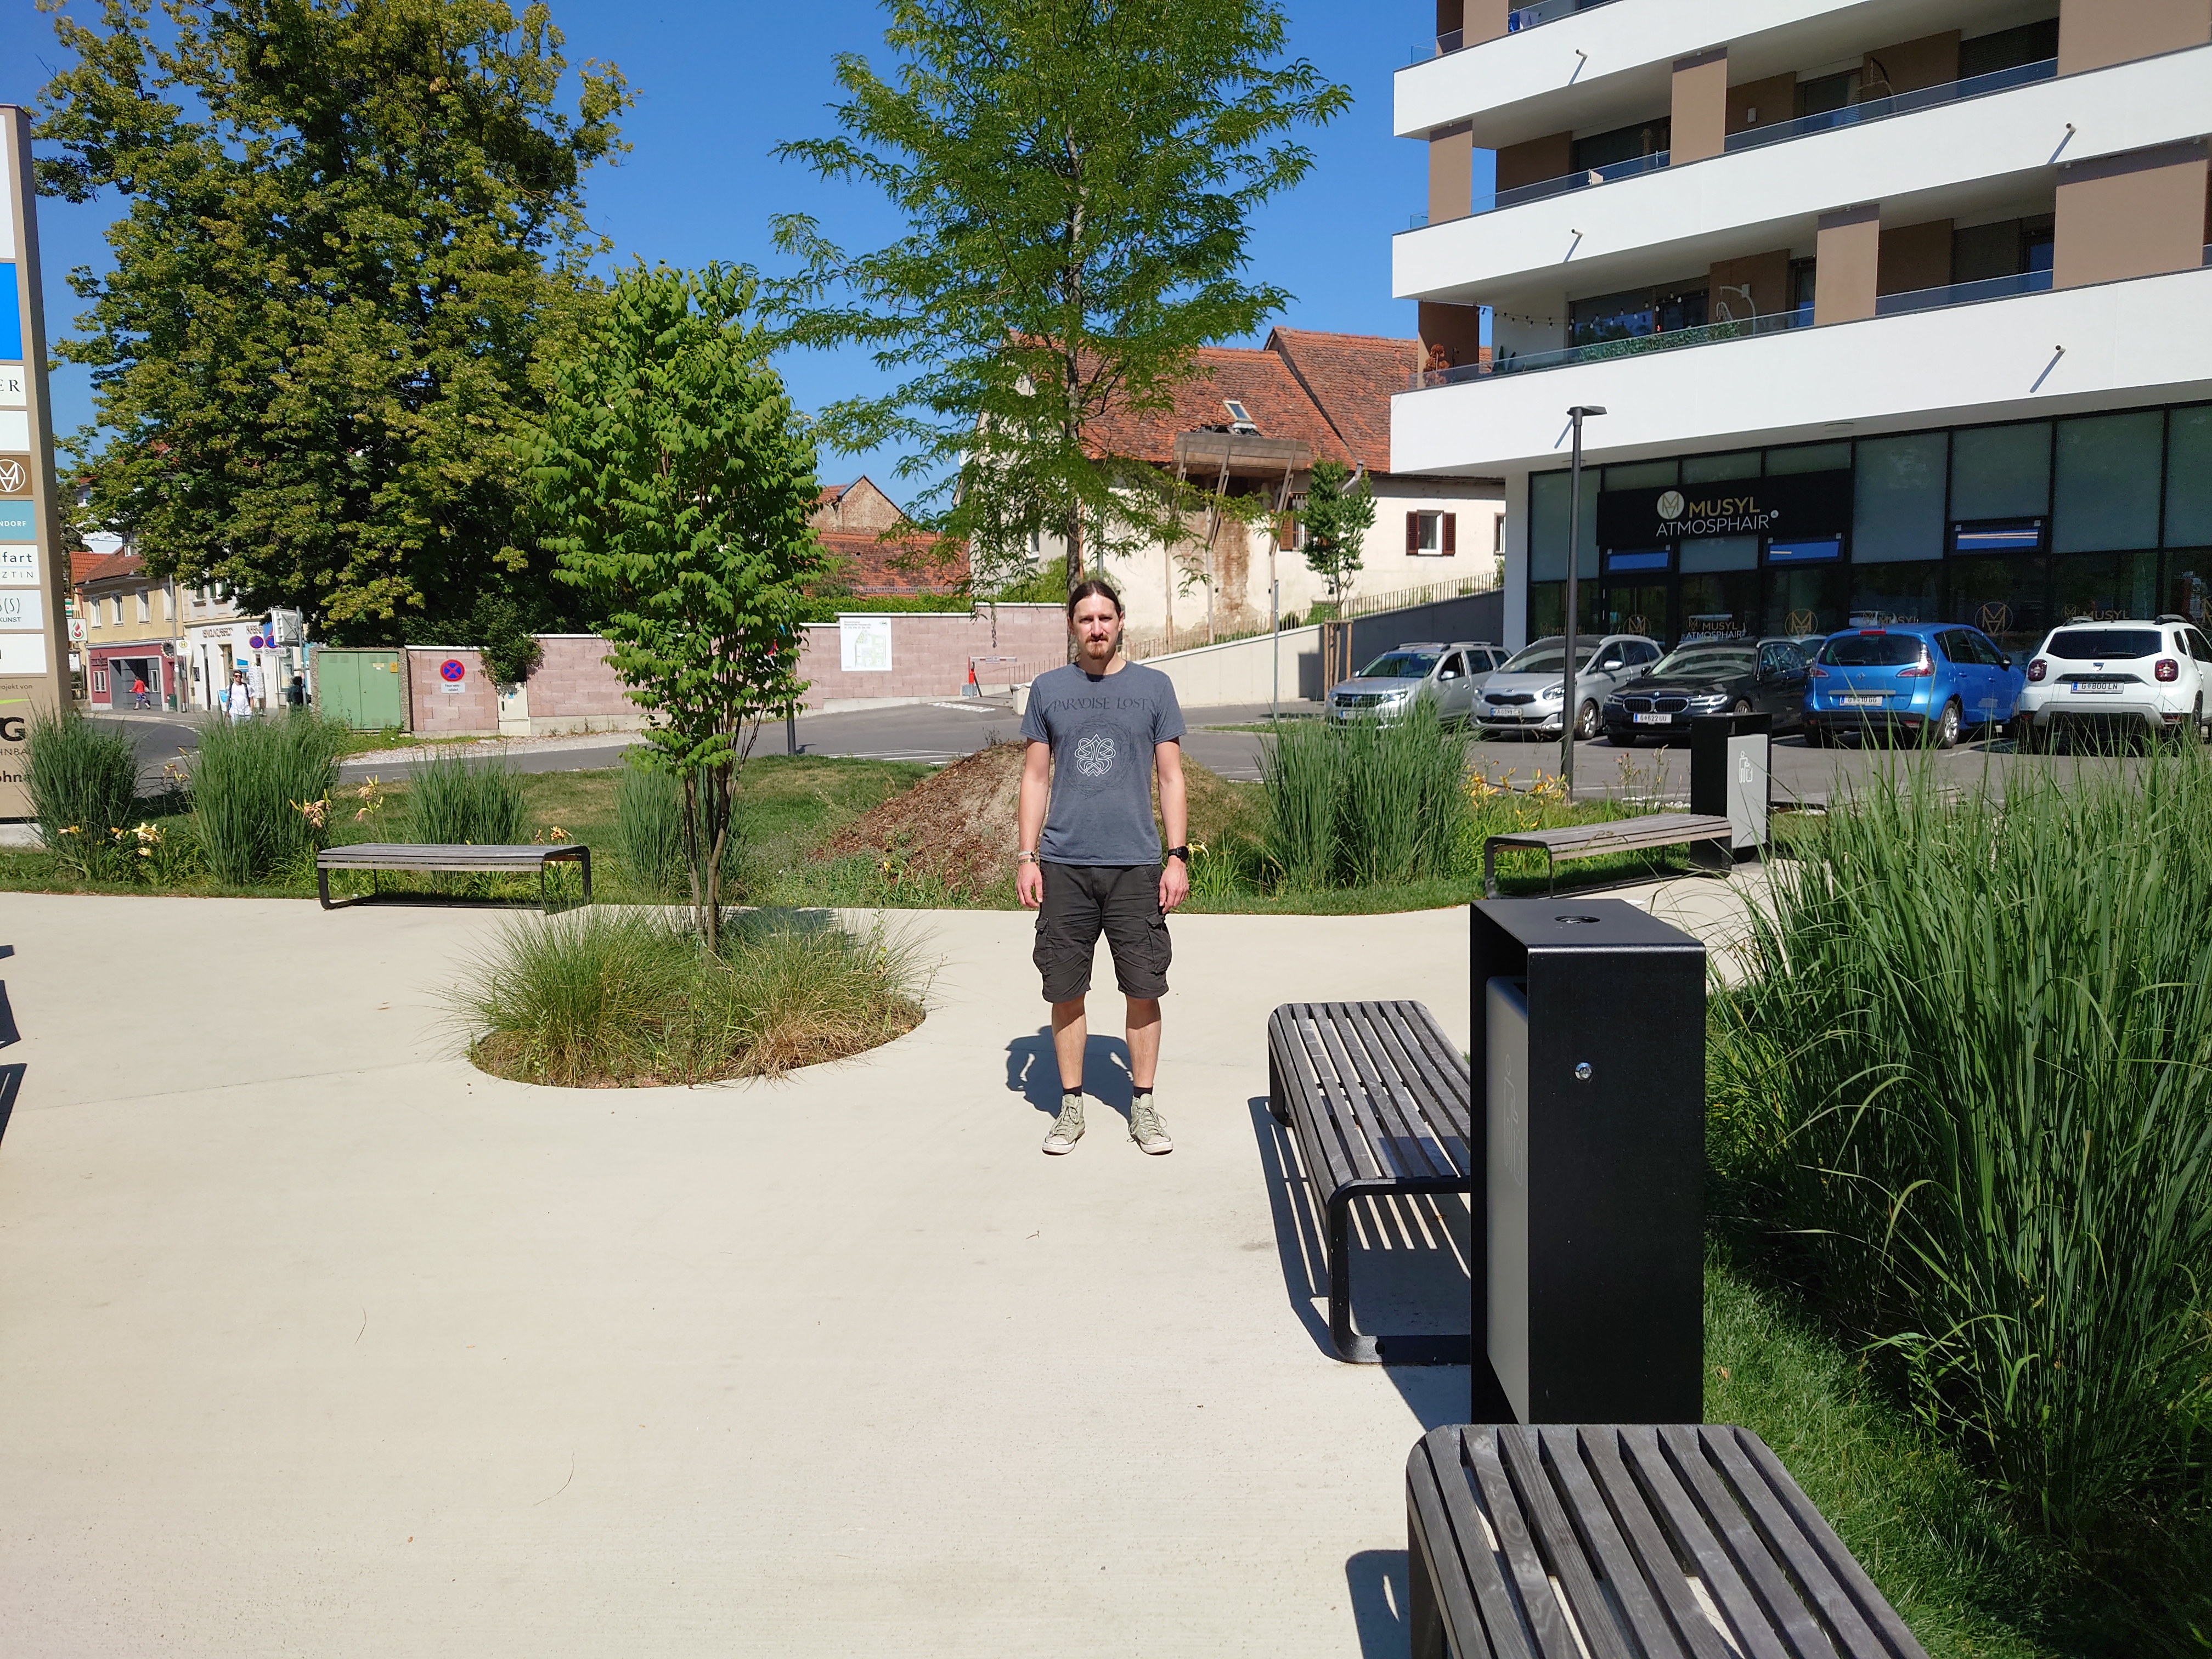
When taking the Input Photo, it may not be immediately obvious that parts of the avatar will be obscured when viewed in a different angle, which is part of the parallax effect. So, it’s important to keep that in mind and check the different angles while taking the picture. In the example below, from the perspective of the Input Photo (left) the foot is not obscured, but when the camera is moved to a lower position (right), which is the case in the finished scene, the left foot is clearly obscured by the bench.

left: input image, foot is fully visible, right: viewing angle is lower and the foot is obscured
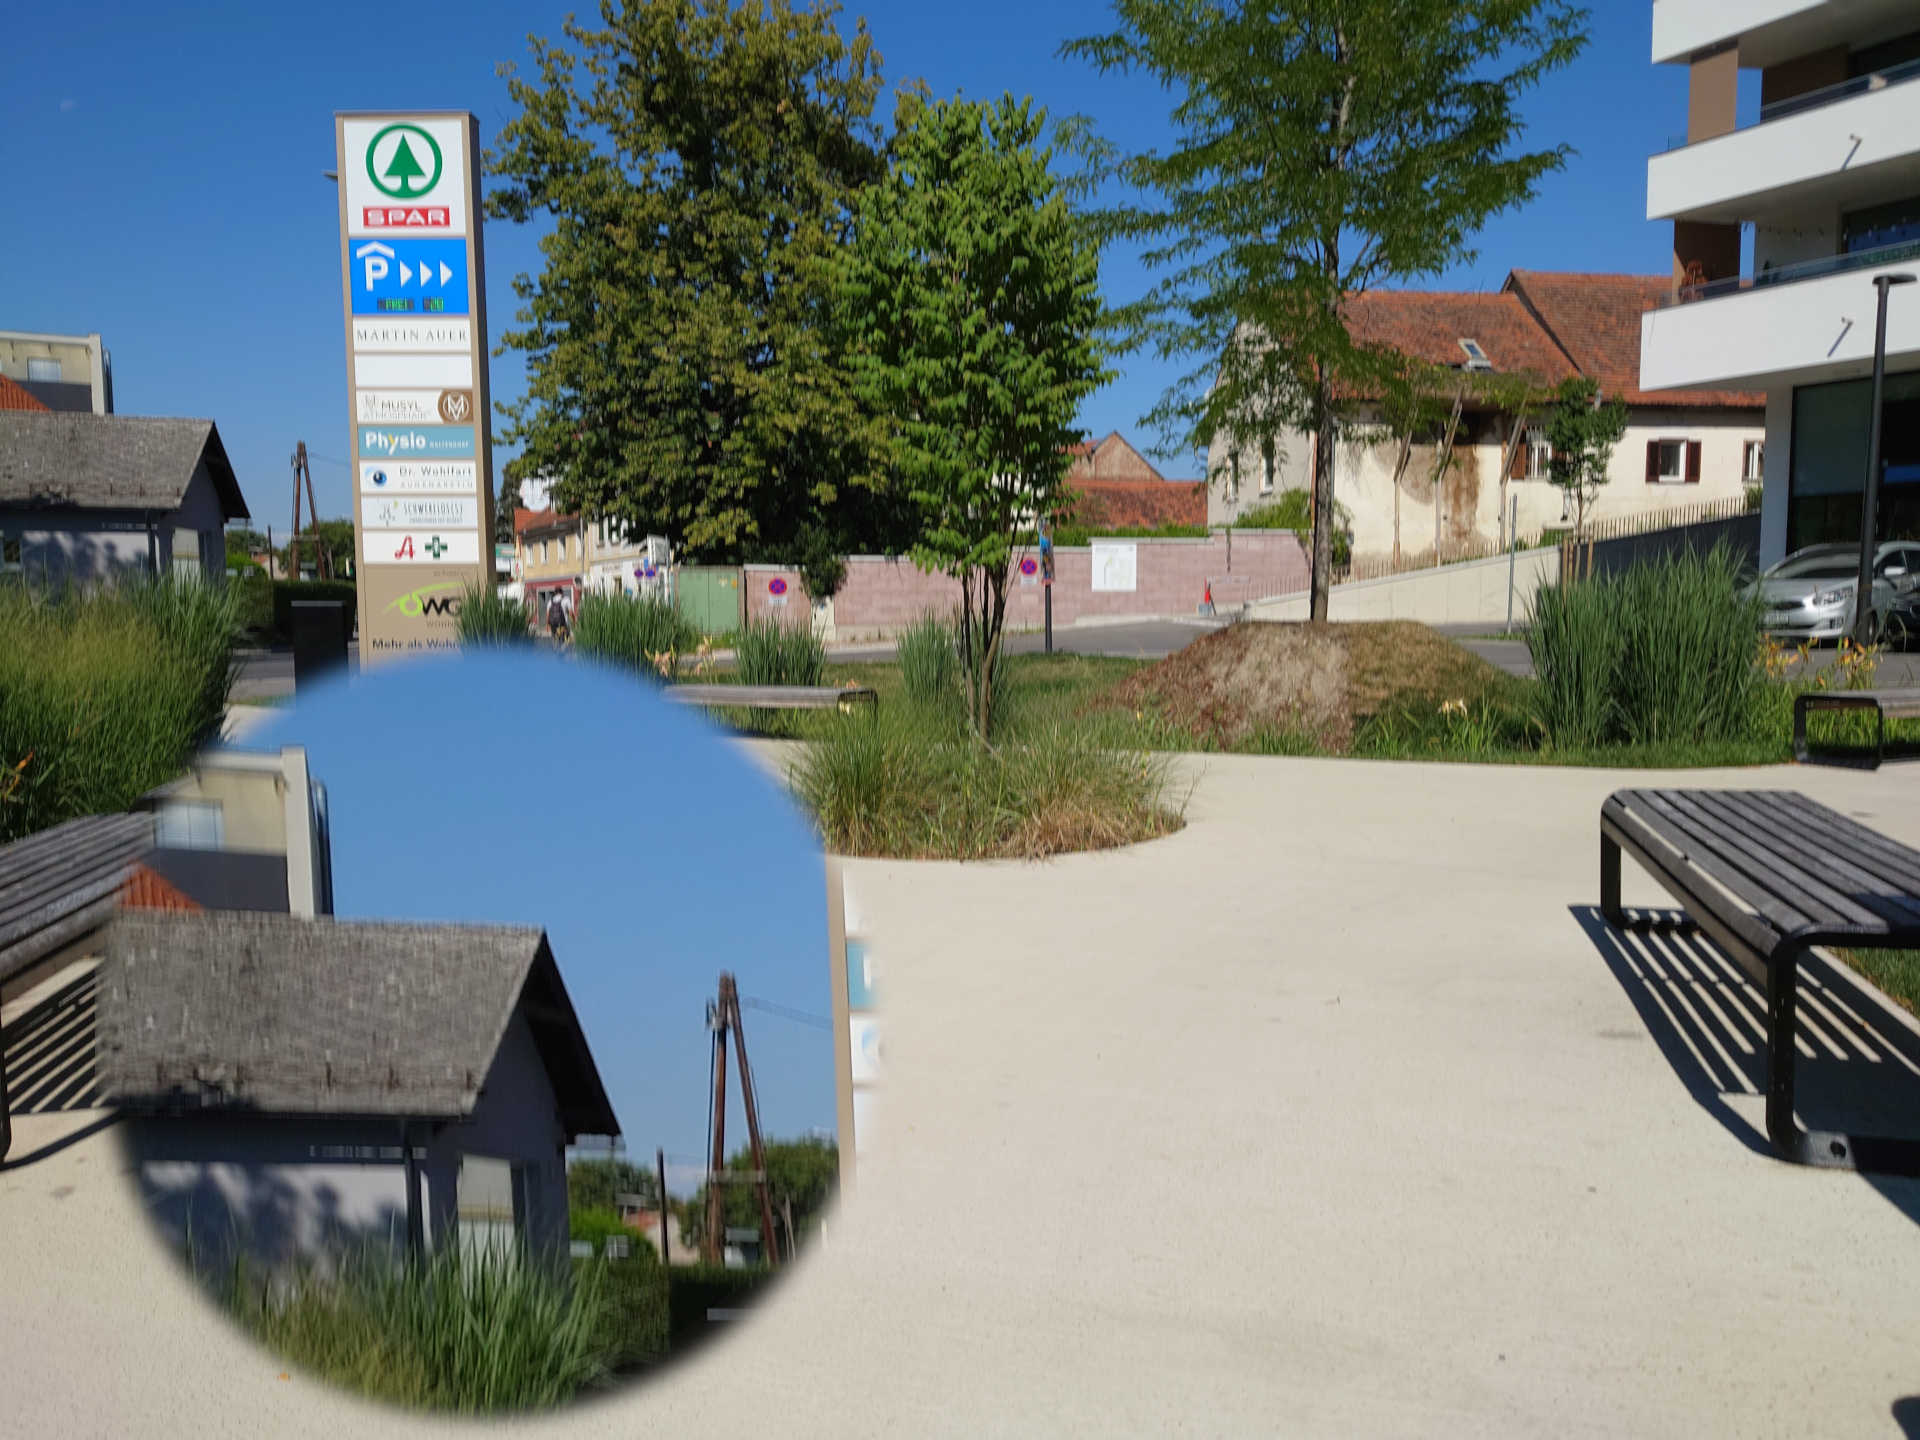
While the first examples is easy to spot, this second example is less obvious. It’s only noticeable that the toes are covered by the grass if looked closely.
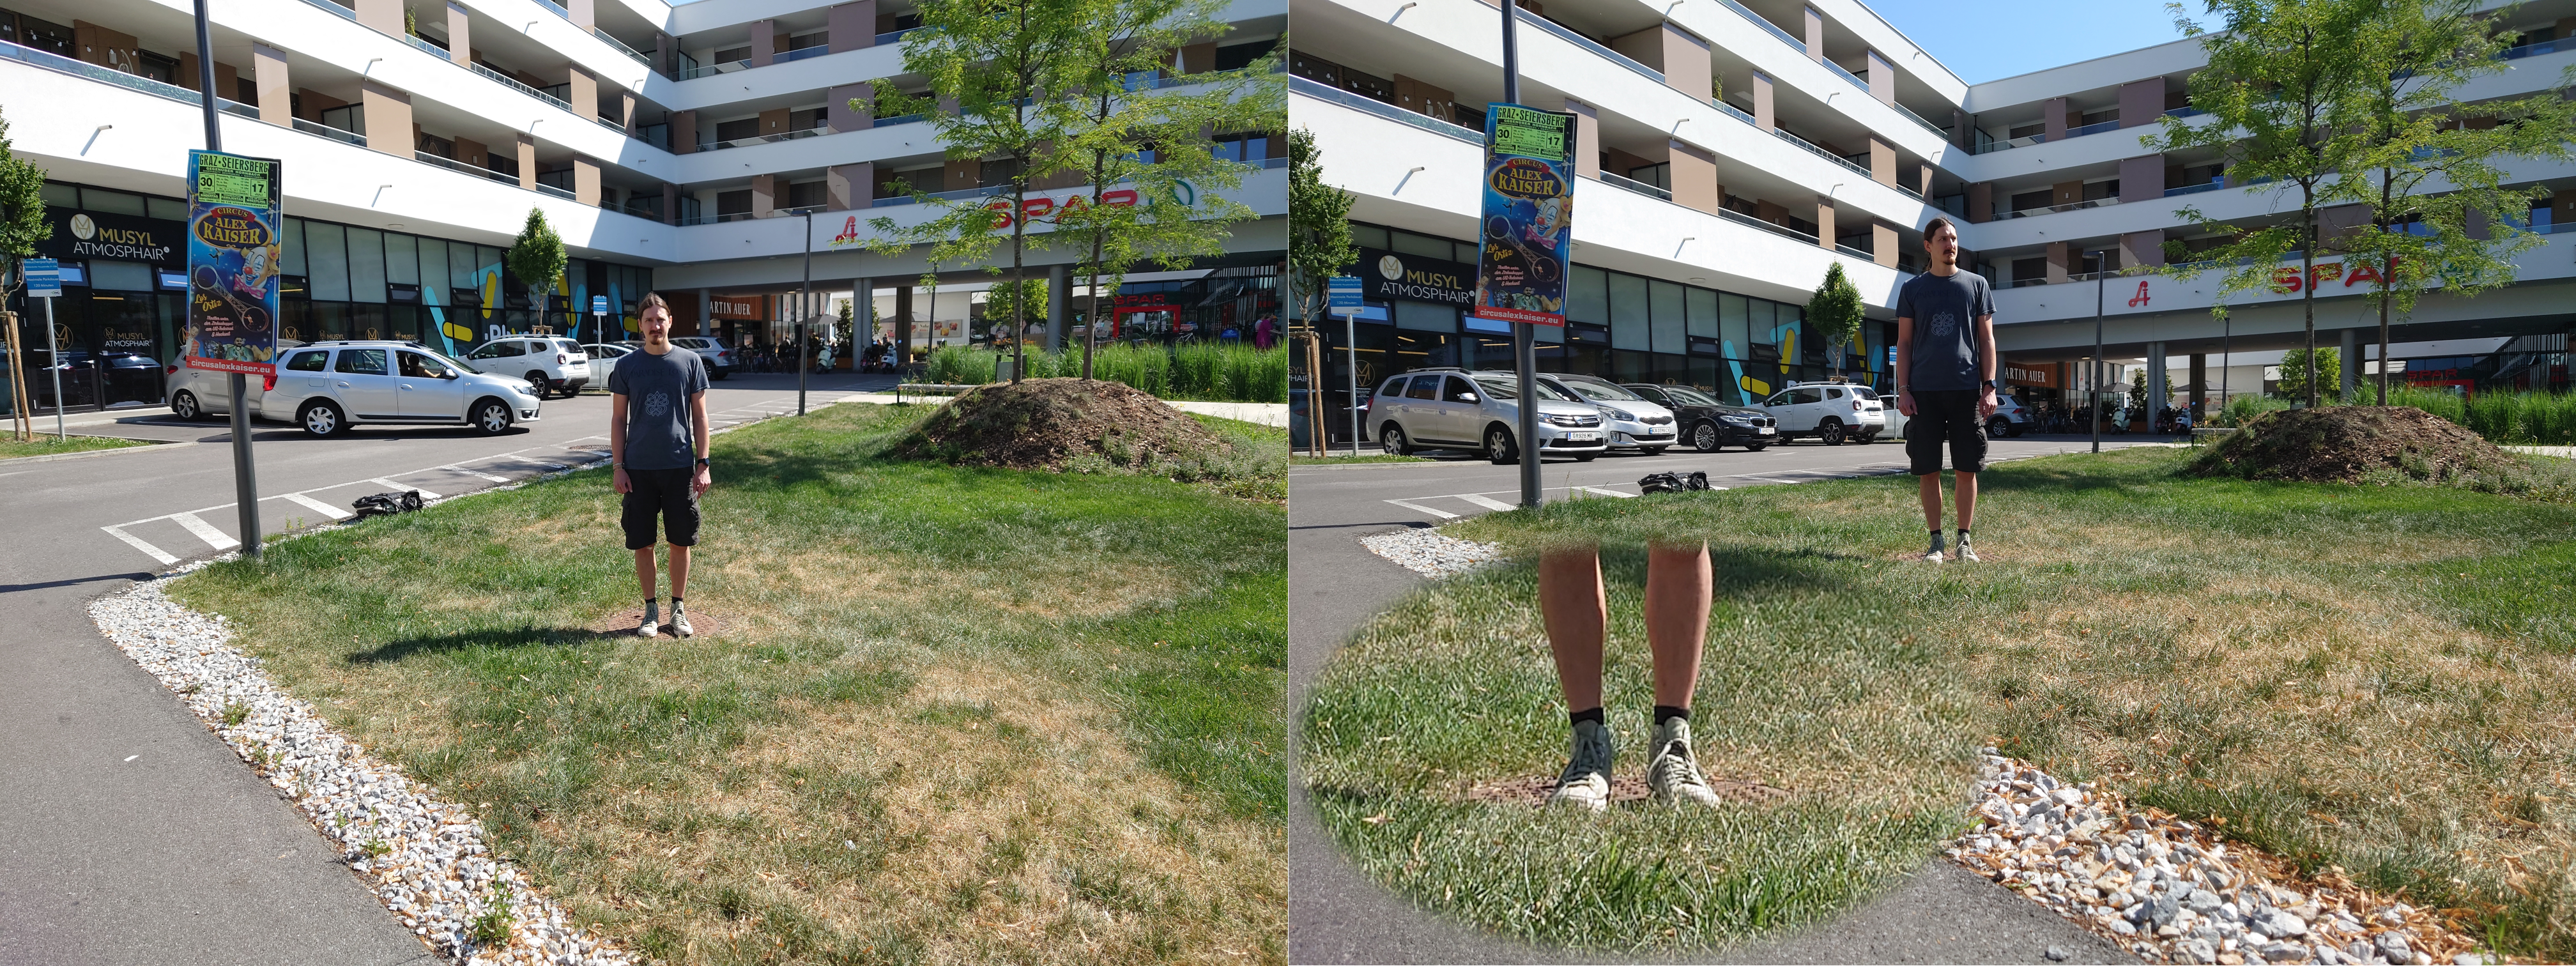
left: everything looks fine form afar, right: zoomed in we can see that some gras is in front of the shoes
Surfaces
Do’s:
The spot where the avatar is supposed to stand must be hard/solid.
Artificial surfaces, such as flooring, any hard and flat surface like wooden flooring, tiles, low height carpets and the like are useable, as long as they are non-reflective.
Don’ts:
Natural surfaces, such as sand, puddles, high grass as well as other sinkable surfaces such as high fur carpets, are not accepted.
The surface must not contain individually identifiable shapes, such as tall or longer grass, gravel, rocks, small branches or bushes or any distinct three-dimensional shapes. Grass if longer, but lying down, can be ok.
There can be no reflections, which includes no mirroring, no shine, no glare and no luster, such as a smooth wooden floor would produce.
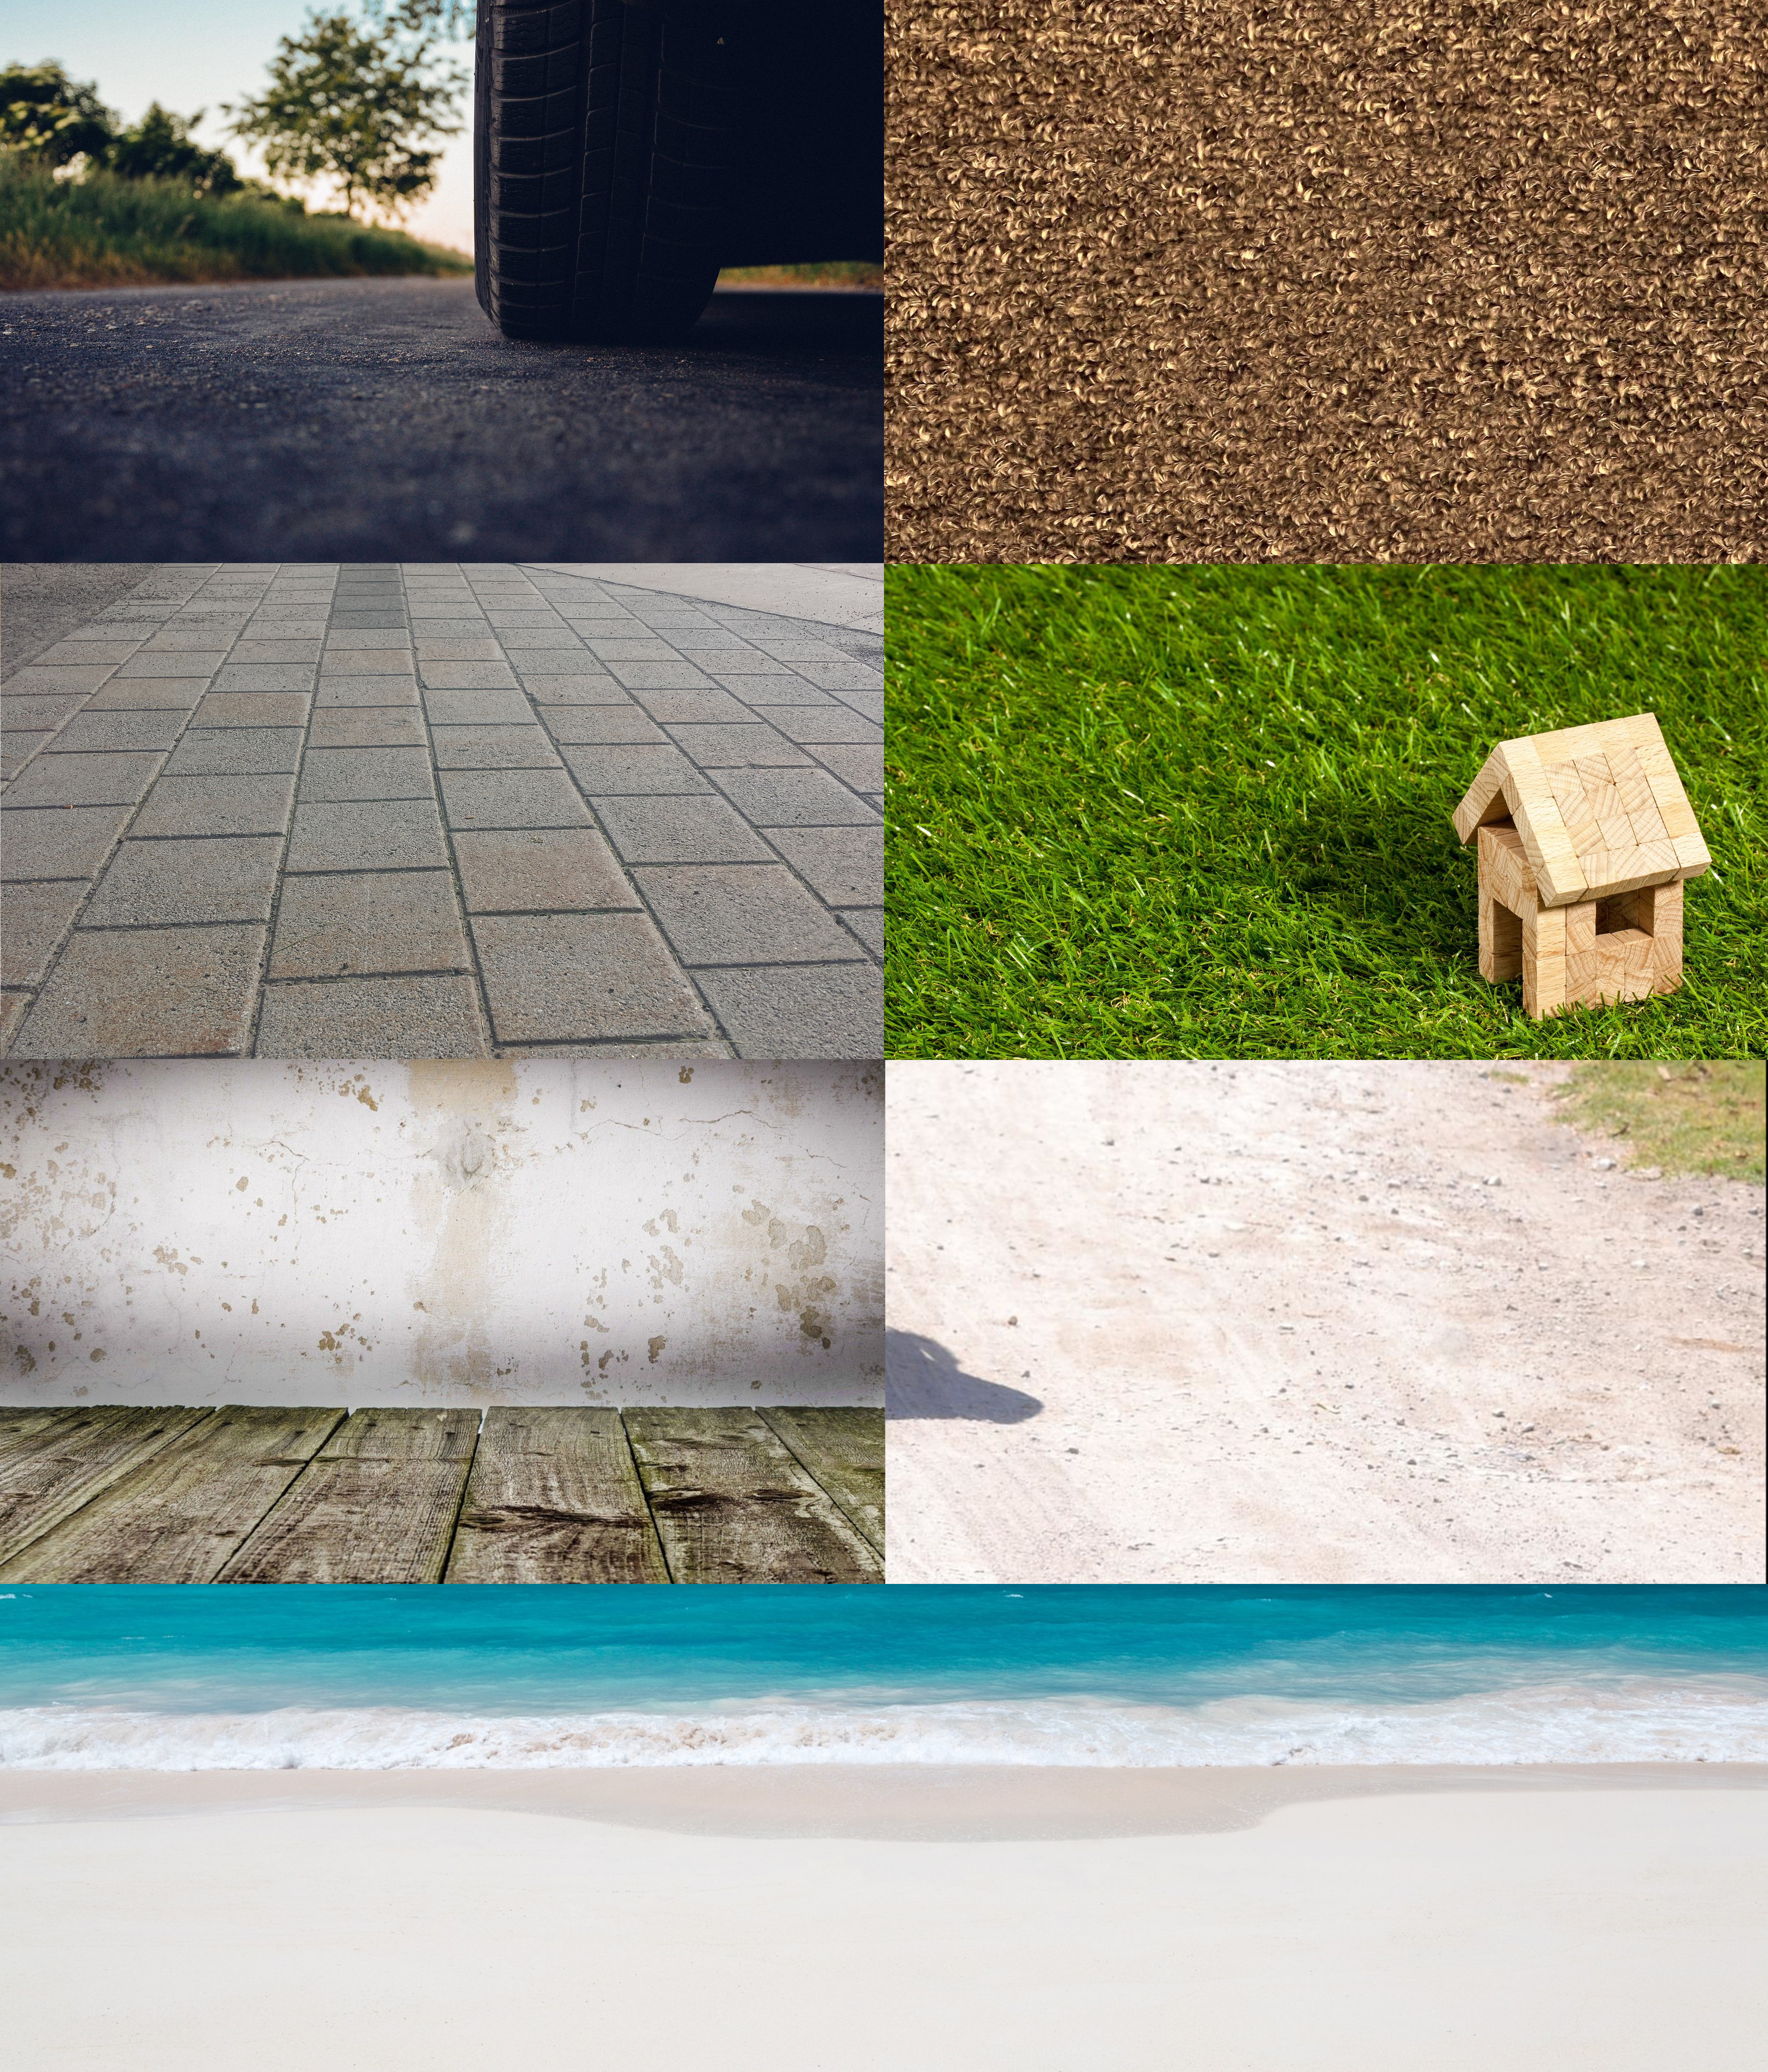
The above surfaces are fine.
1. Asphalt or concrete. 2. Low length carpet. 3. Flat stone.
4. Low grass. 5. Rough wood. 6. Pressed earth.
7. Flat sand
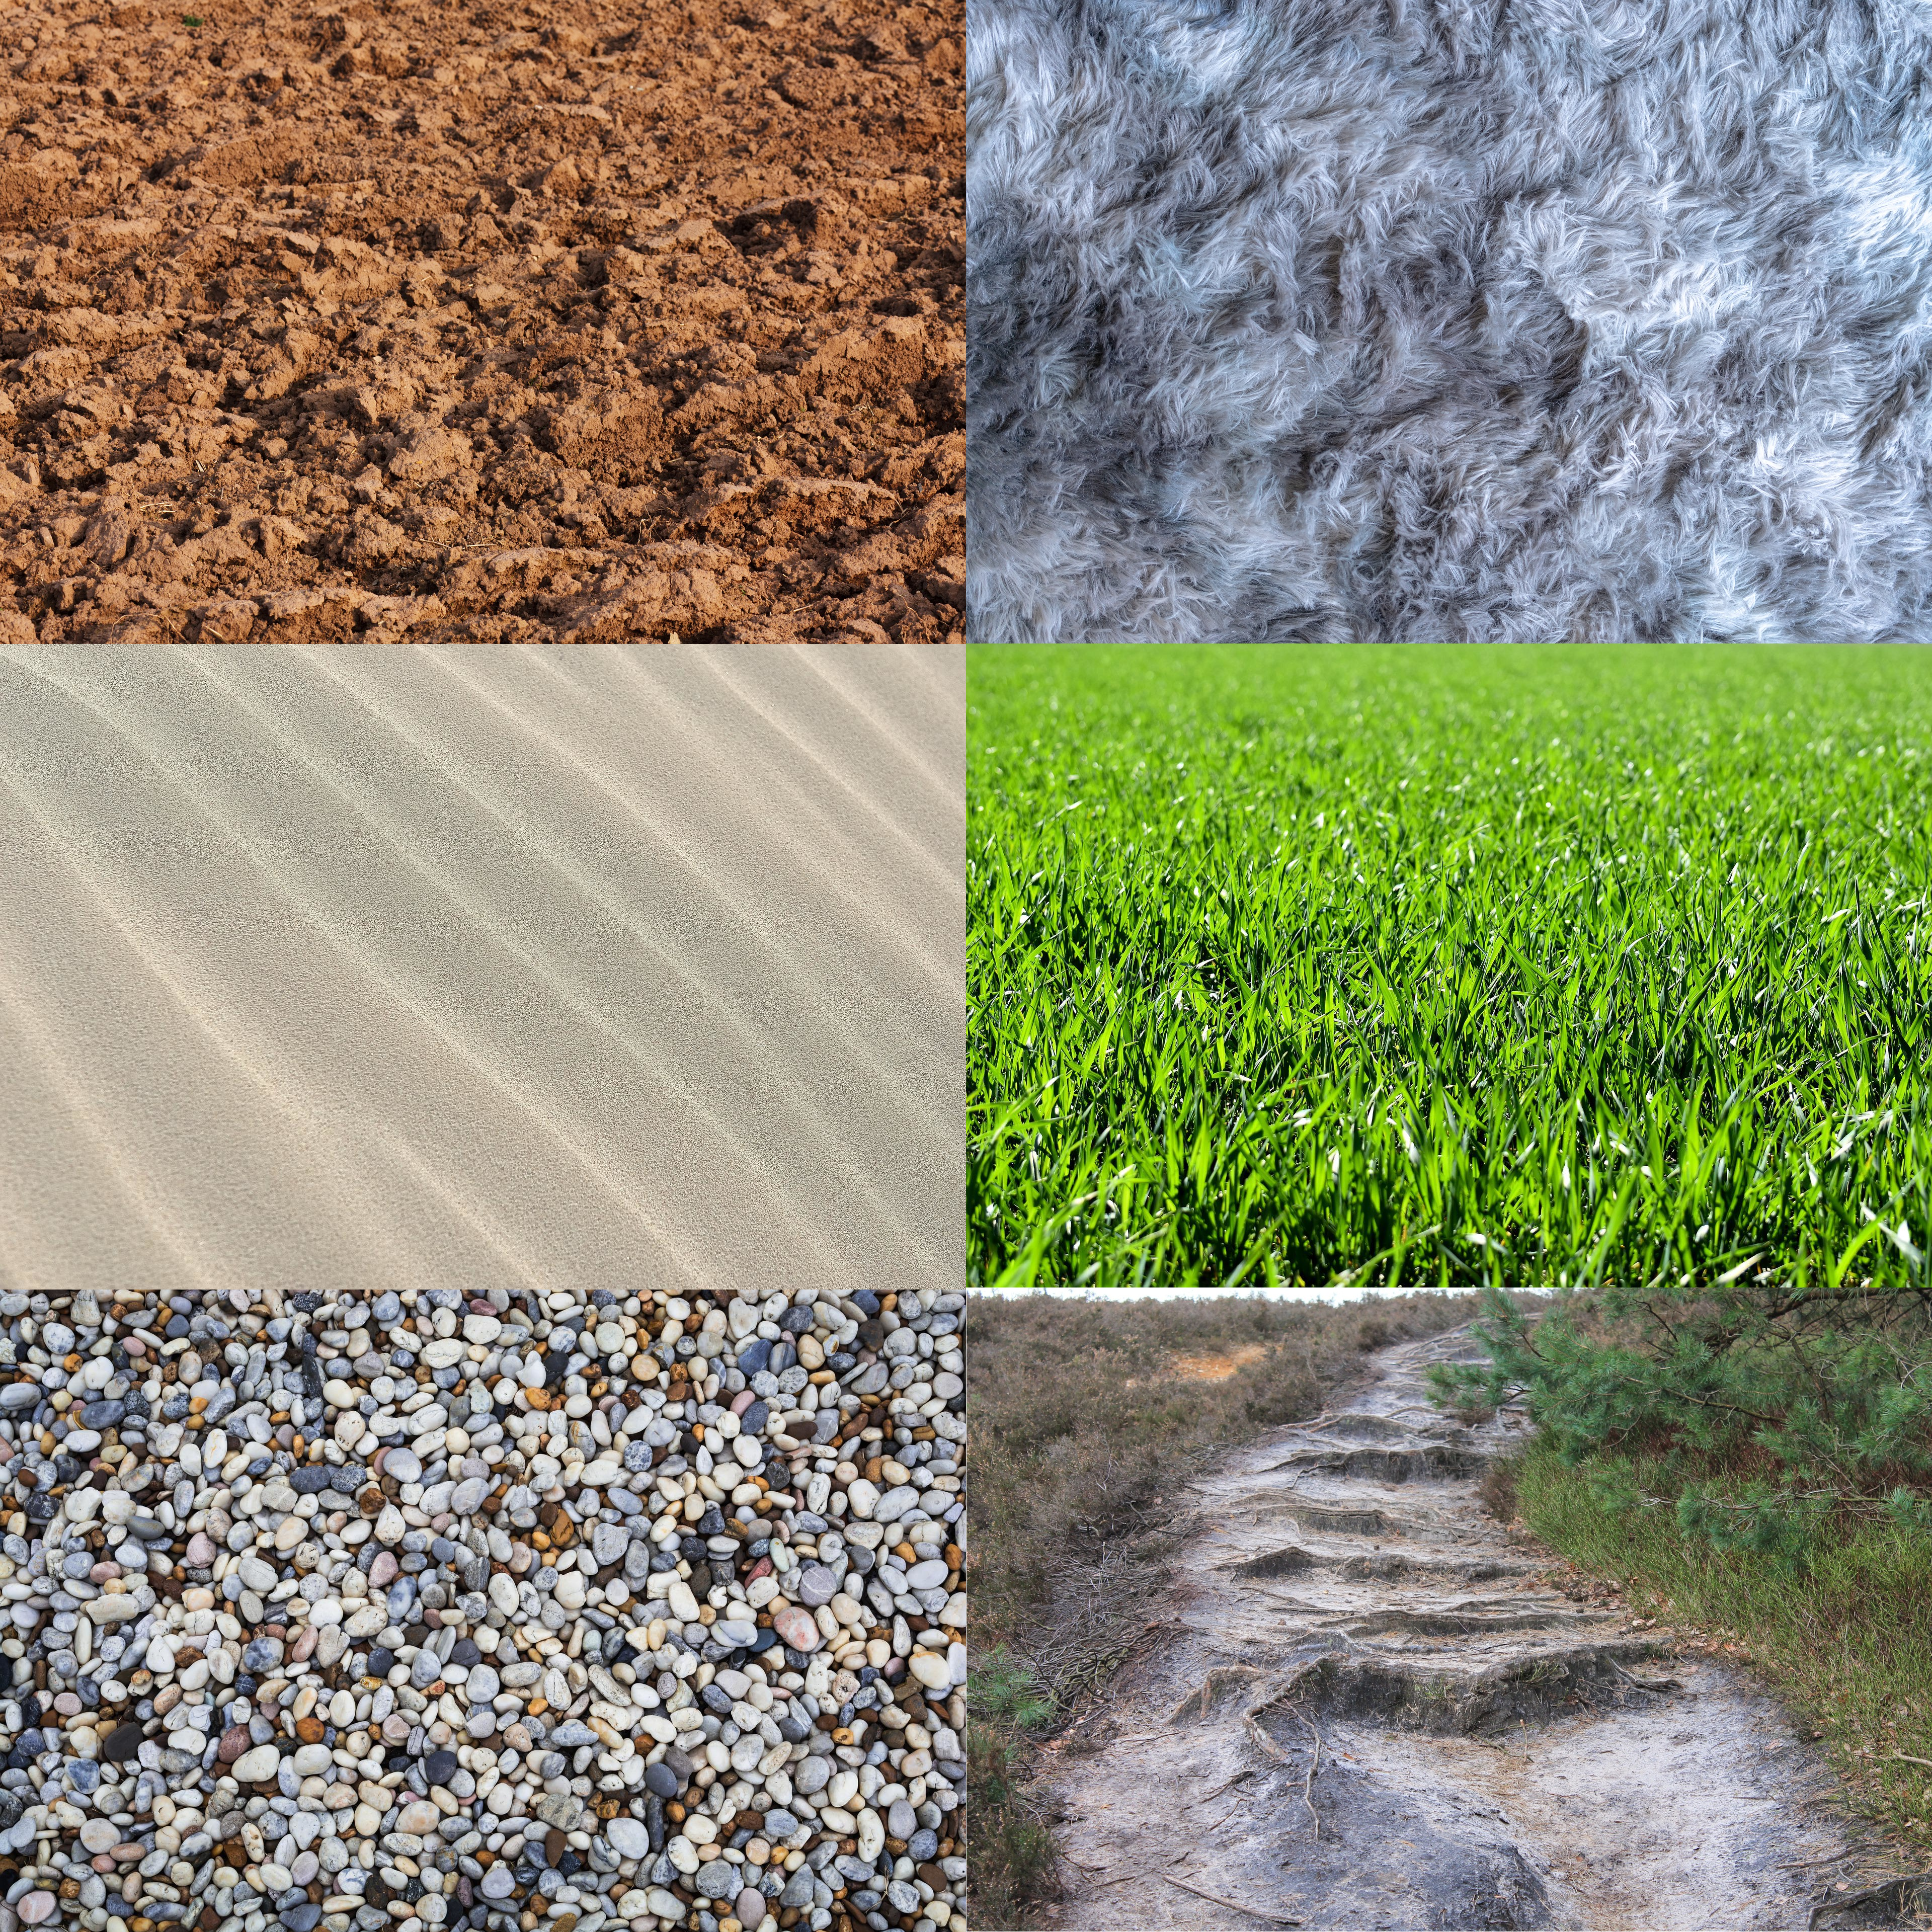
The above surfaces are not acceptable.
1. Mud. 2. High fur carpet. 3. Sand.
4. High grass. 5. Gravel or pebble. 6. Uneven terrain.
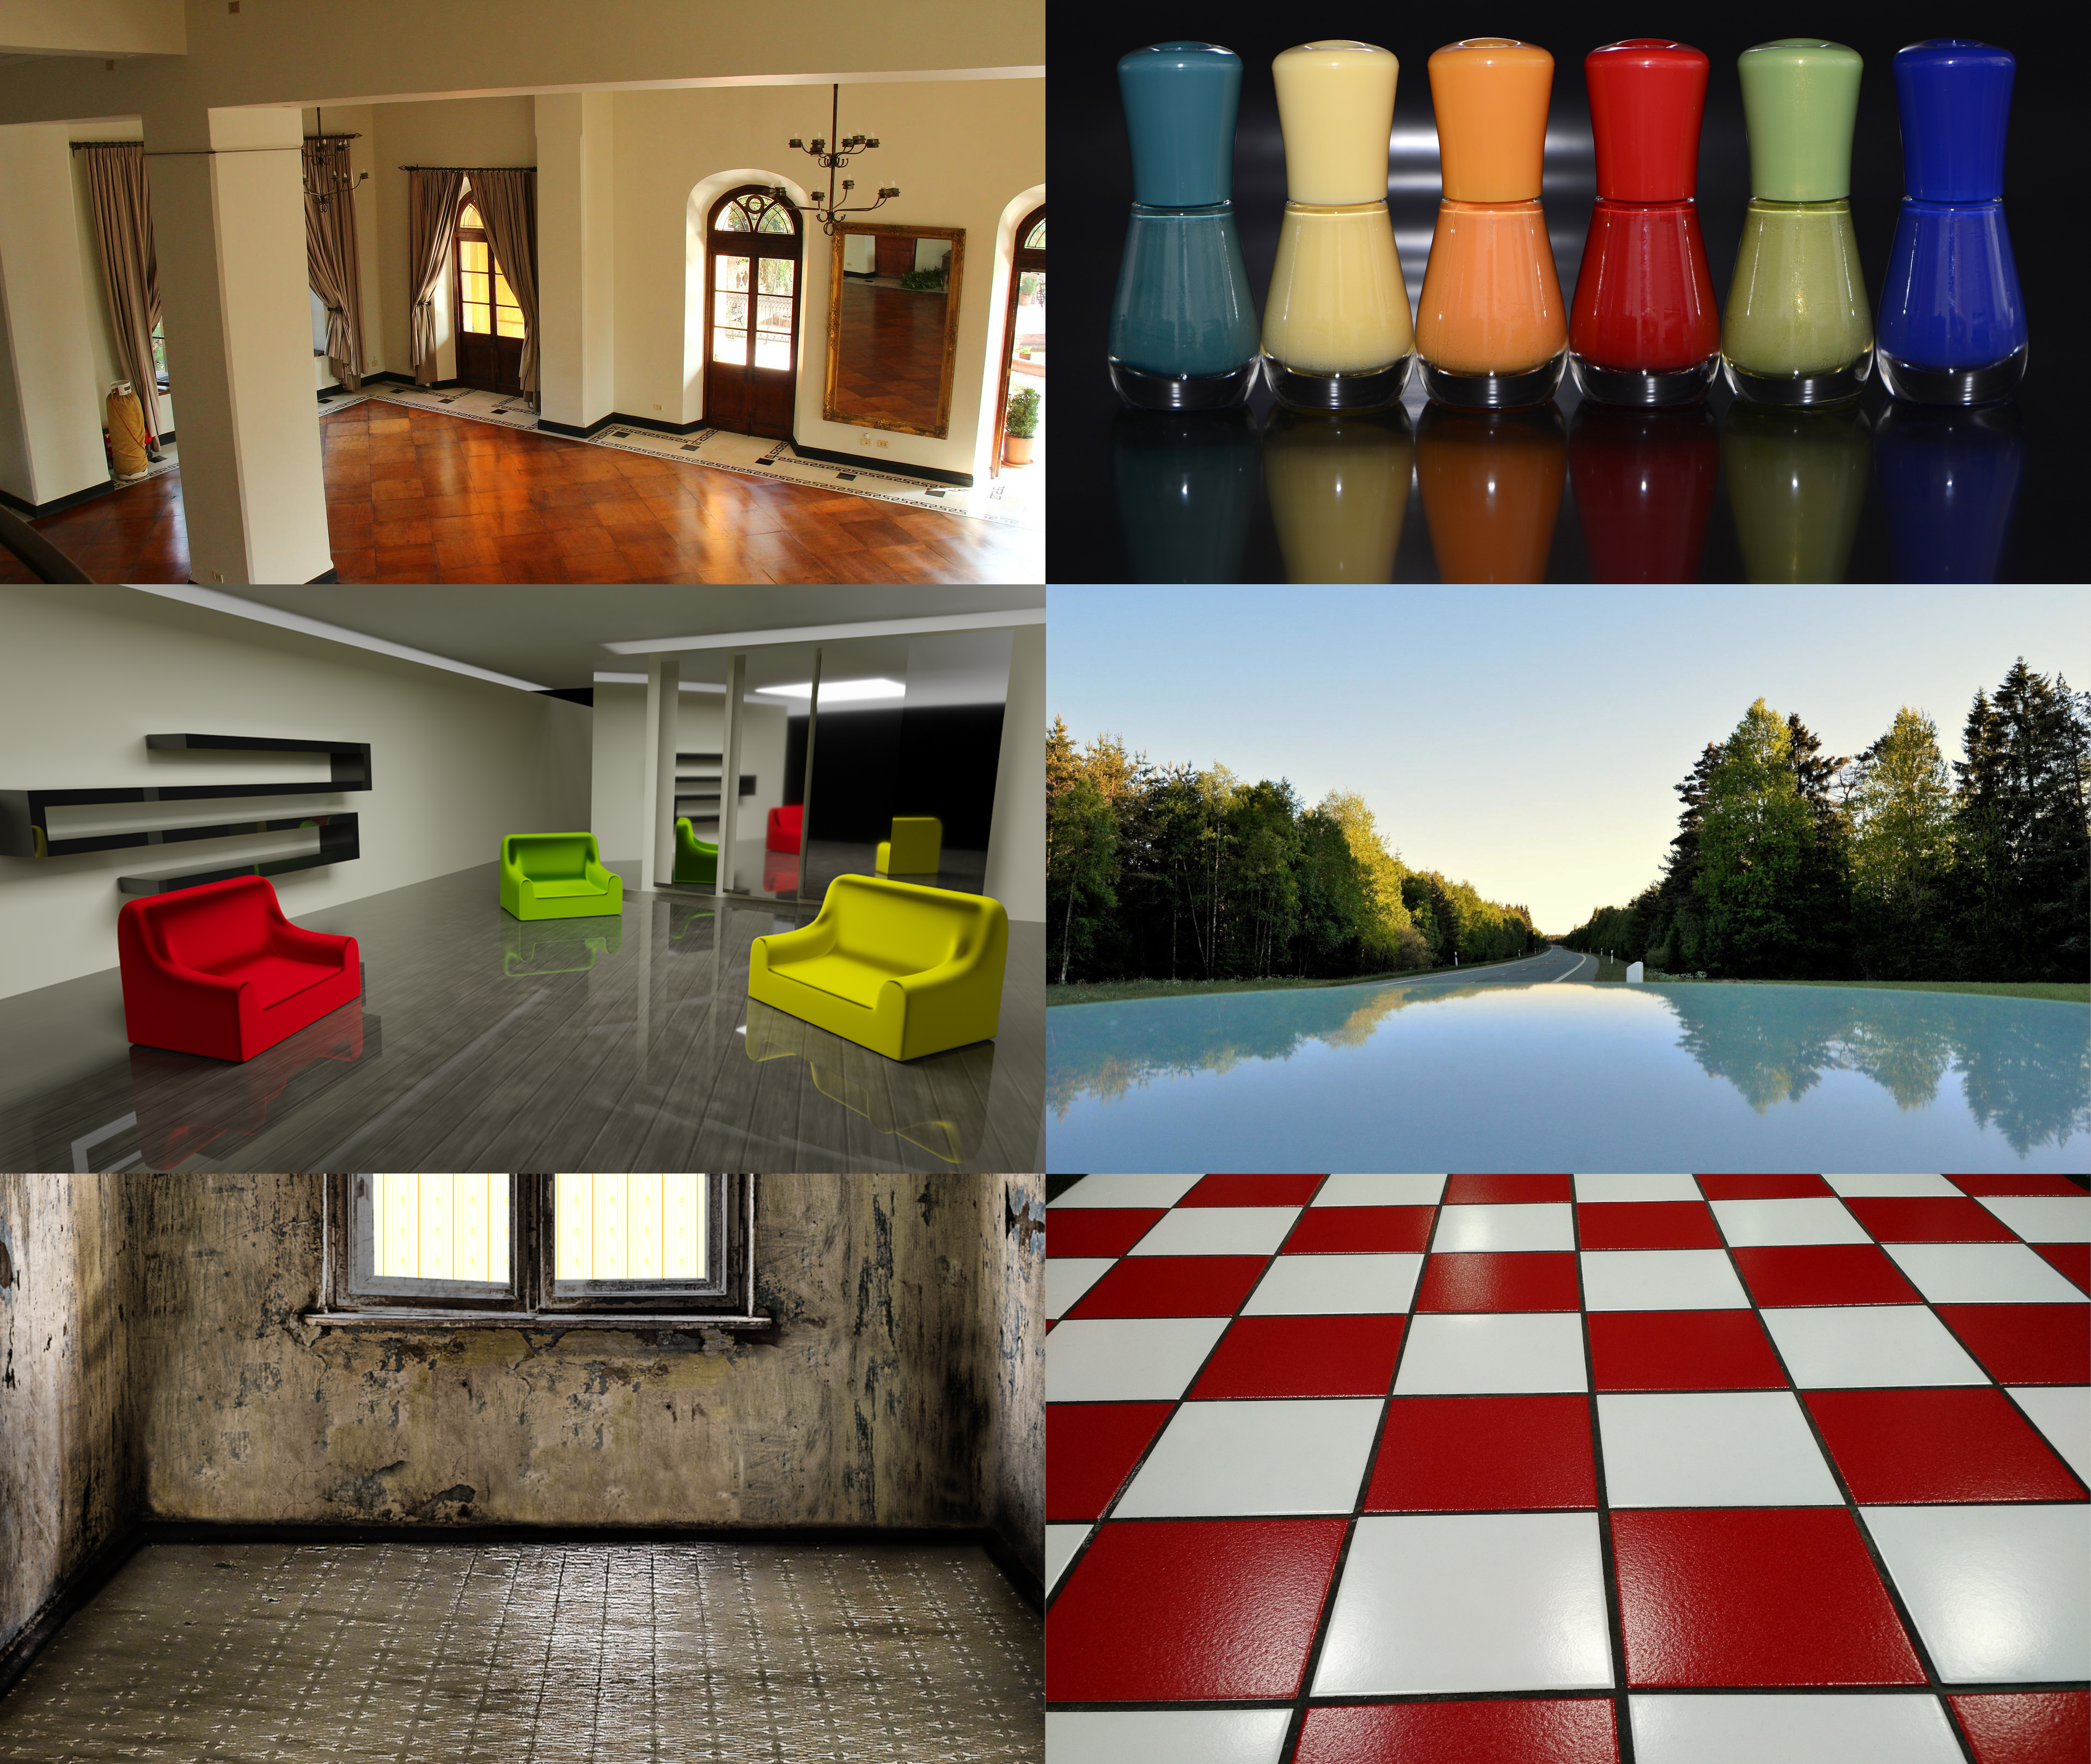
Reflective and shiny surfaces are a big issue. 1-4 above are absolutely not accepted.
1. Shiny floors. 2. Reflective surfaces. 3. Mirroring surfaces. 4. Water
5-6, floors with luster, can be acceptable as long as the limitations are accepted by customer.
Objects
General definition of an object: anything that is not a flat floor, a full wall (doesn’t allow what’s behind it to be seen), or a ceiling. A rock, a plant, a box or a protruding part of the floor or wall would be considered an object.
Definition of a simple object: The determination if an object is simple is based on it's geometry. Simple objects are objects, that can be recreated using only simple, basic shapes (e.g. boxes, cylinders, planes). For example, a football, is a single sphere and a pole is a single cylinder. A street with rectangular buildings that resemble a box shape, is fine.
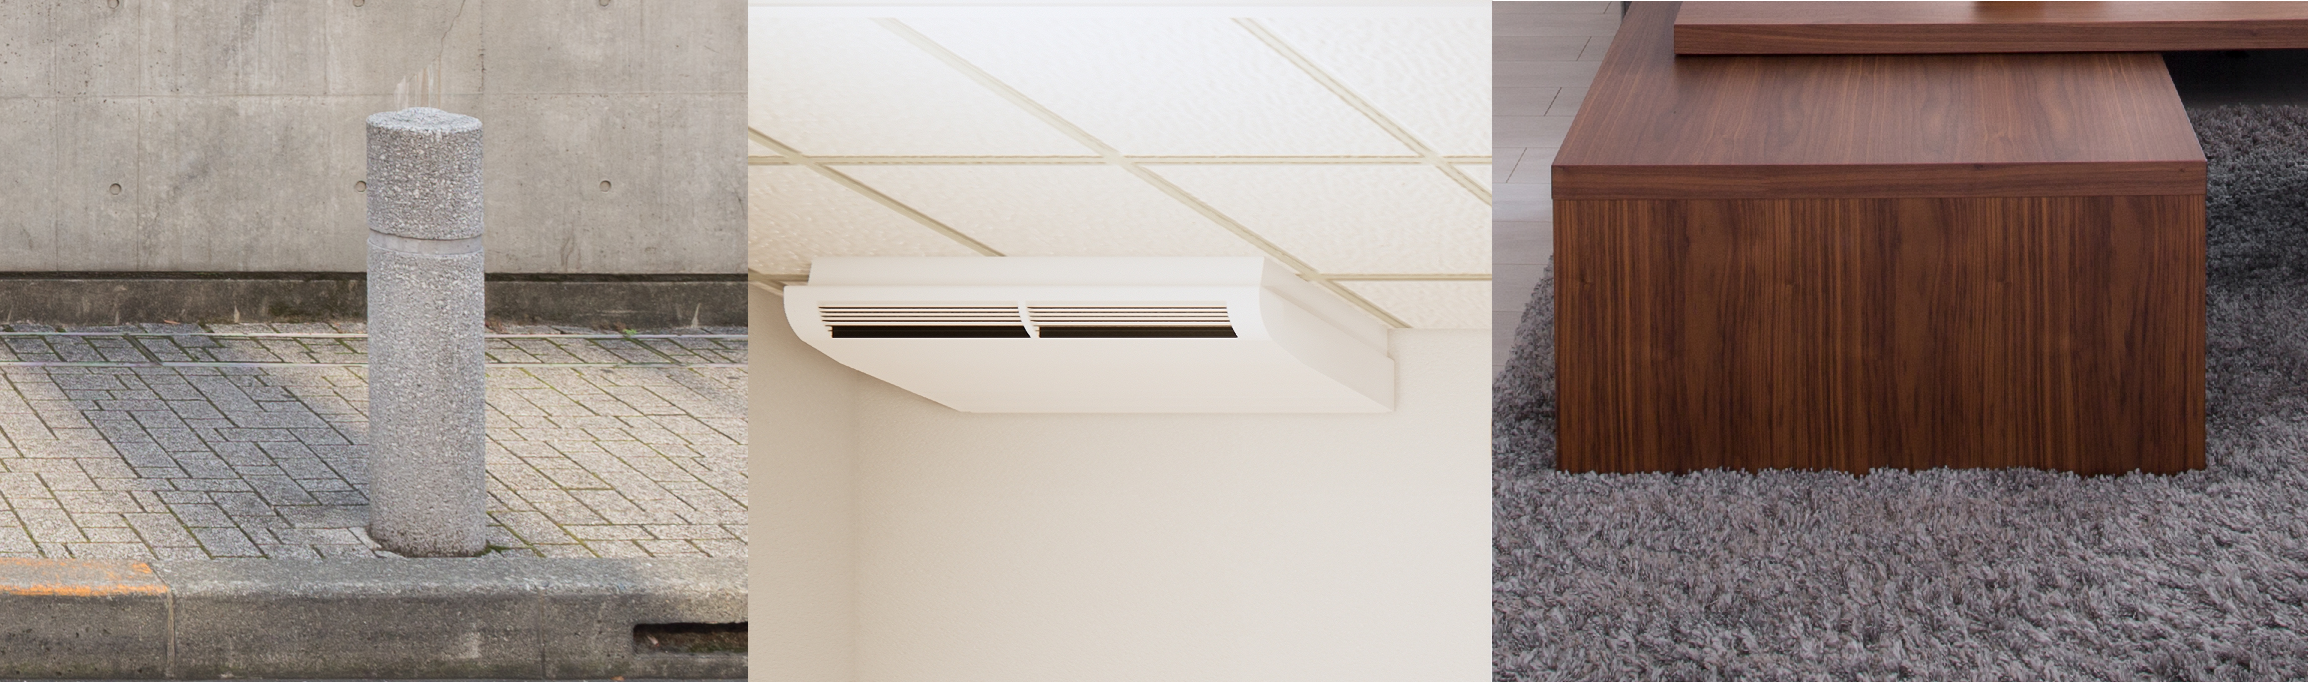
All the above objects can be built using simple geometry such as cubes, planes and cylinders. They are suitable for a Standard Scene.
Definition of a complex object: Anything that is made out of multiple parts.
For example, a tree branch with leaves. The branch and the leaves combined include lots of single objects that together make out one big complex object.
In general, overlapping with other things behind it or even self-overlapping by protruding parts should be avoided.
To tie on the example before, a street with elaborated architecture, such as spear roofs or an elaborated fountain are build out of multiple simple and complex shapes, and therefor need substantially more time to build. Therefore these are limited to custom scenes.
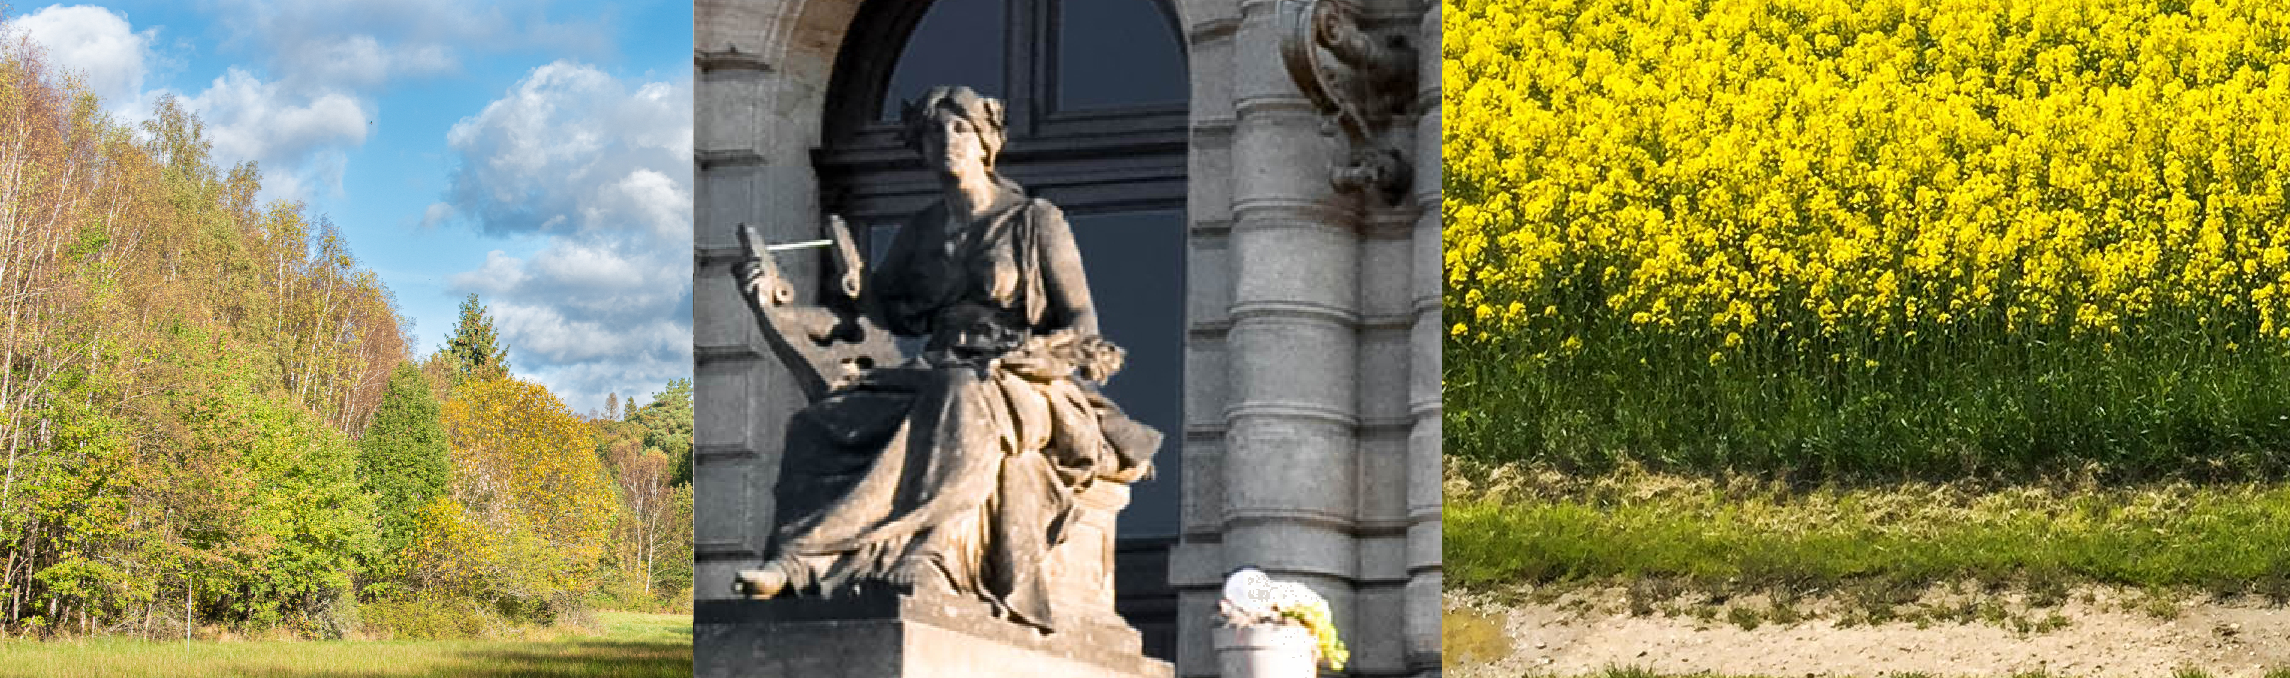
None of the objects above can be considered simple geometry.
1. The tree overlaps other trees on the background, making the edges complex to build.
2. The Statue is a complex shape itself and overlaps the background.
3. The flower field is too complex as to be properly done. Every single individual flower, at least in the first row, needs to be build/generated.
Objects in Standard Scenes
Do’s:
Simple objects are fine, as long as they do not overlap with complex textures. For example, a pole overlapping a street or wall is fine, as both are simple objects.
Complex or organic shapes, such as trees or leaves have to be beyond the infinity point in the horizon or at least 10 meters away.
Don’ts:
Simple objects overlapping with complex objects. For example, if the simple object overlaps a car, or a bush or any other texture with distinct pattern or complex shapes within the texture, it’s a problem.
Complex objects close to the avatar’s position.
Example: Even though both objects below are poles, the one to the left is considered a complex object, while the one to the right is not. The reason for this is, that while the right pole can be built using a simple cylinder shape, the left pole must be accompanied by the ropes, which are more complex to build and overlap the pole behind. In this regard, the rope is what makes it complex, but the ropes are an inherent part of the poles.
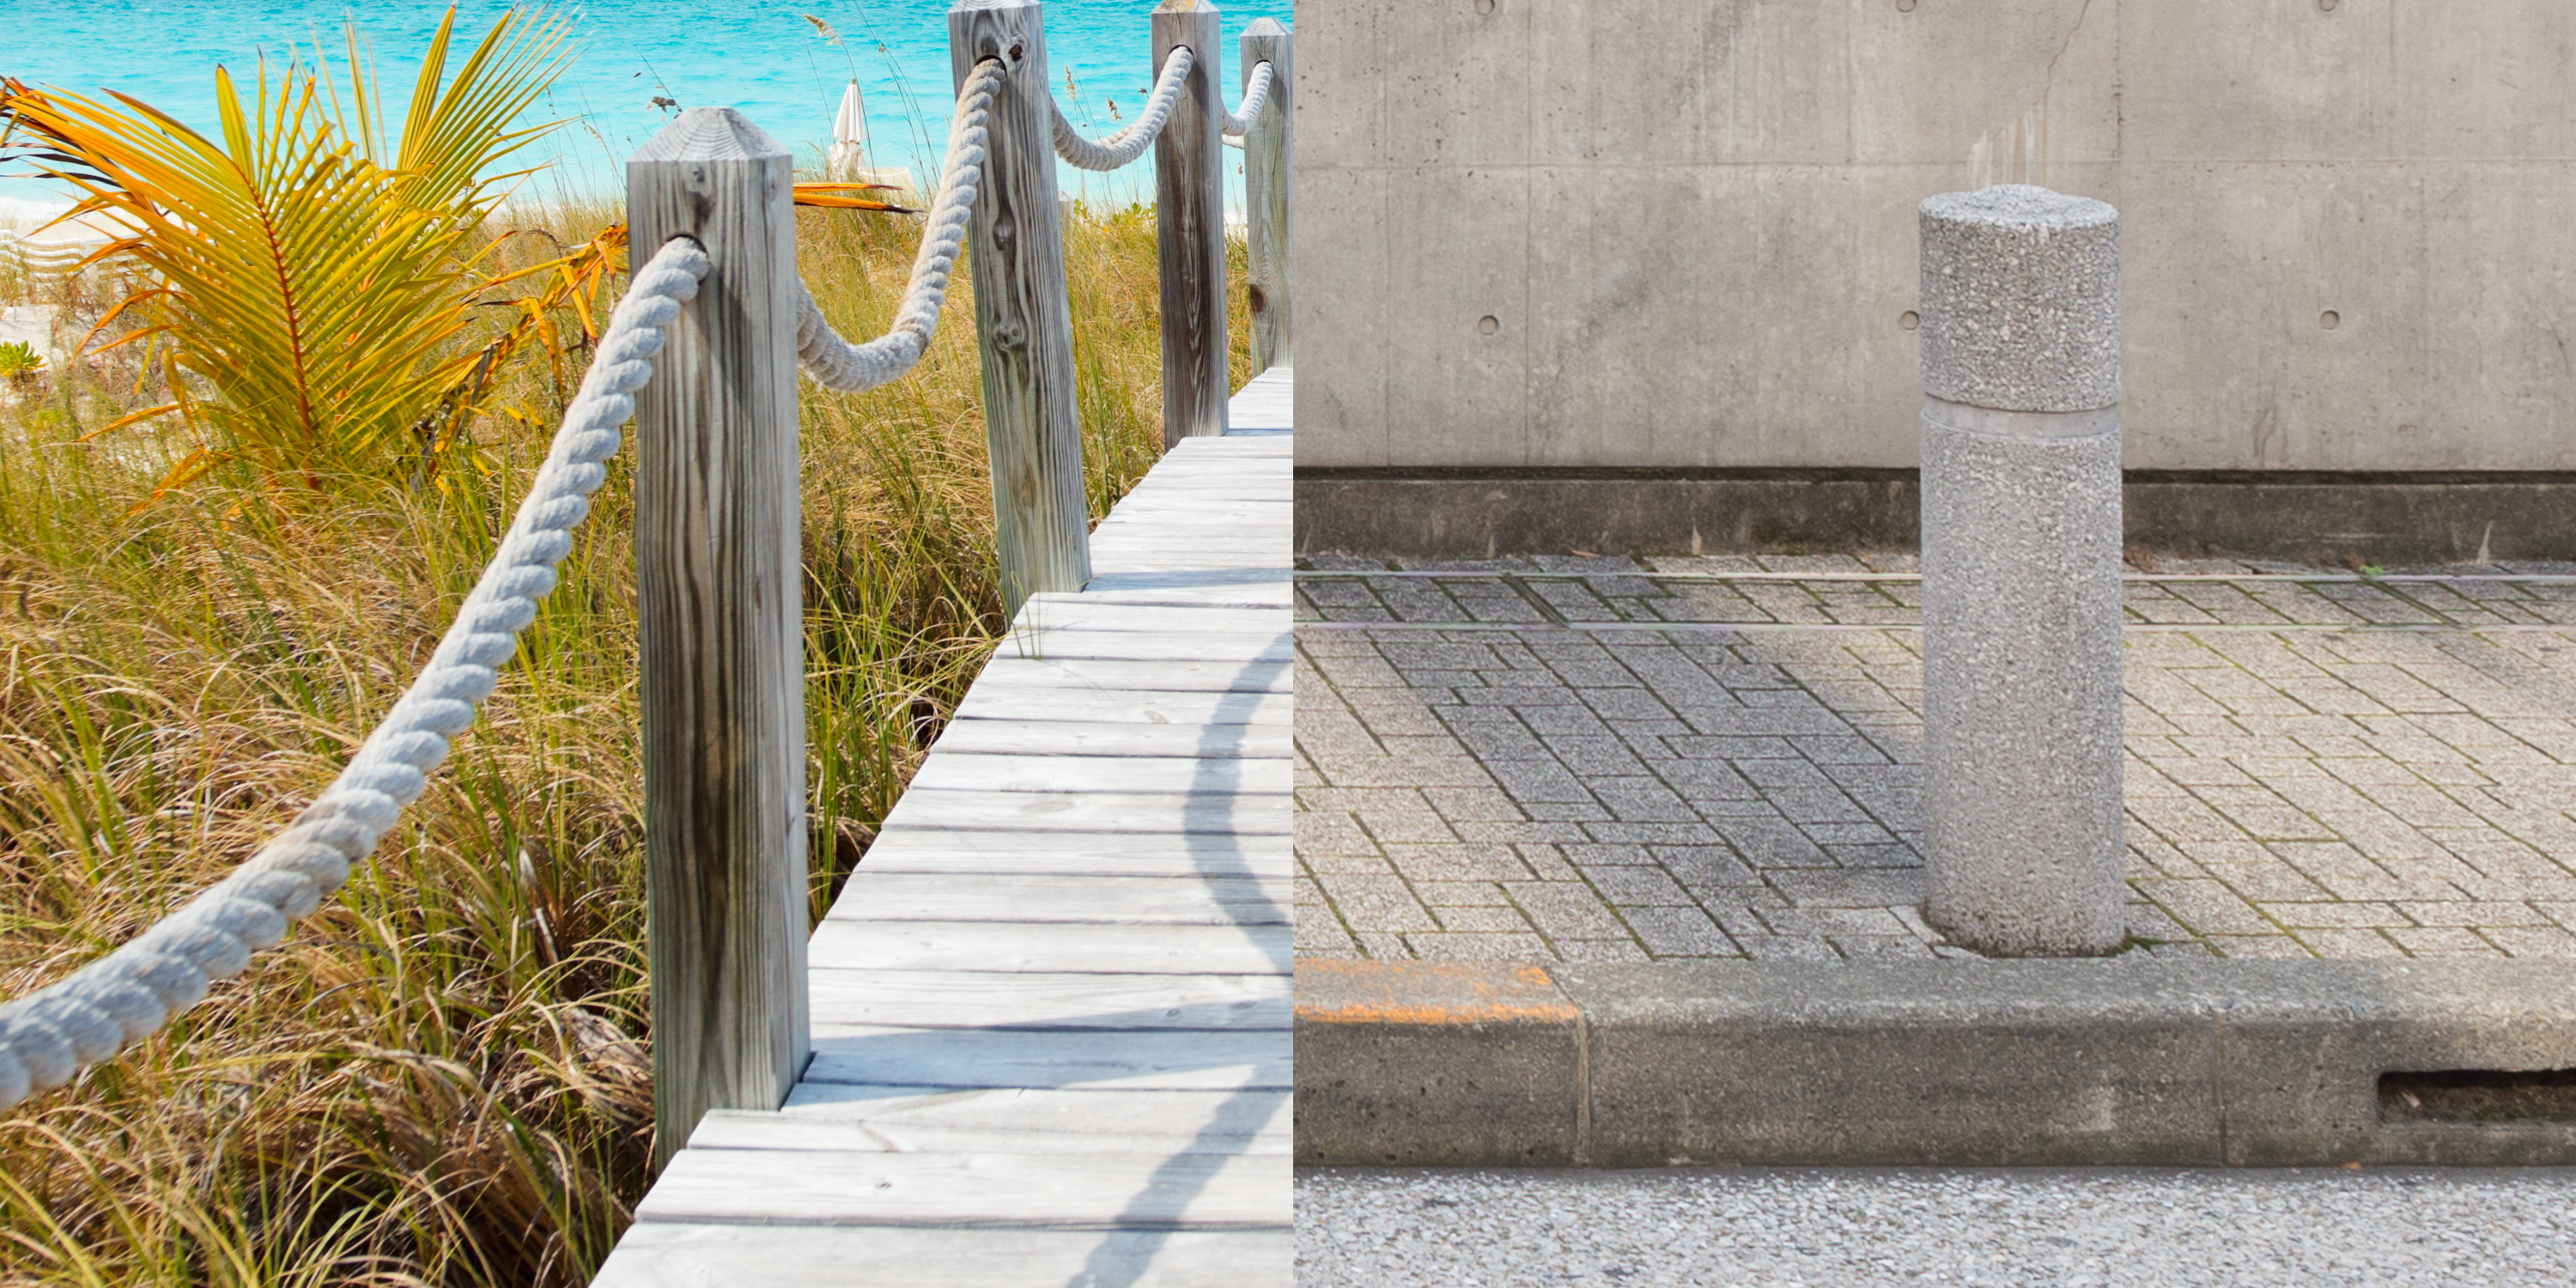
Left pole: complex, Right Pool: simple
Foreground objects can’t overlap themselves.
In the photo above, the first bench overlaps the trash can, which overlaps the second bench. This is not acceptable for Standard Scenes
No complex objects can be between the avatar position and the camera. Simple objects are allowed, as long as they are not in the direct line between avatar and camera.
No bodies of water of any kind can be in the foreground. In the background it’s fine, as long as it is in the far distance. This includes swimming pools, lakes, rivers, ponds or even a puddle. There can be no reflective surfaces near the avatar at any case.
No moving water of any kind. For example, a spring fountain.
No moving objects in general. For example, a moving car. This would be standing still, as it’s not a real live moving scene. Additionally, it will most likely have motion blur, which does not fit a “static” scene.
There can be no more than 2 objects, unless they are at least 10 meters away from the avatar’s position. Additionally, they can't overlap the avatar or themselves.
Requirements for Non-Standard Scenes
For non-standard scenes, the client can provide the base photograph or just put in a request for the scene and Reactive Reality will source the input image. If the input photo is a stock photo, meaning it doesn’t fully adhere to our technical requirements for input photographs, it is considered a custom job.
Guidelines for Non-Standard Scenes without input photograph
The more specific the scene request, the more difficult it is to produce the input photograph.
For example, a parking lot at Sears in the 1970s will be very heard to find, as it’s very specific. Adding the fact that the input image needs to be photographed in the right perspective, this might be impossible to source or take up a lot of working hours. In contrary, if the request is simply to create a general parking lot scene, there are plenty of stock images available, so it’s much more likely to find an input image in a reasonable time frame.If any logos or branding is requested to be visible, Reactive Reality need to have specific clearance to display them. The responsibility for any rights of usage lies fully with the customer.
If specific landmarks and distinct pieces of architecture and art is requested to be seen, it needs to be checked if they are protected by copyright law. Even landmarks on public display can be protected and need clearance for commercial use. The responsibility for any rights of usage lies fully with the customer.
Specific requirements for the scenes must be communicated clearly and included in the input requests. These include lighting, overall mood, time of the year as well as the general feeling the customer is aiming for. For example, for a forest scene it should be stated if the customer wishes a specific season (e.g. Fall will have read leaves).
Input image characteristics that must be individually evaluated
For input photographs, no transparent objects with reflections, glares or flares, such as windows or glasses can be within 10 meters from the avatar’s position. Exceptions are if the glass view is basically clear, to the point of the glass being “invisible” or nothing can bee seen through the glass, such as with milky glass or blown out windows, with no glare, flare, reflections, shine or the likes.

Qualified for Standard Scenes: 1. Glass windows are far away enough. 2. Window glass is blown out and far enough.

Qualified for non-standard Scenes only: 1. Glass has structure, which would move separately from background. 2. Window frame would move separately from background.
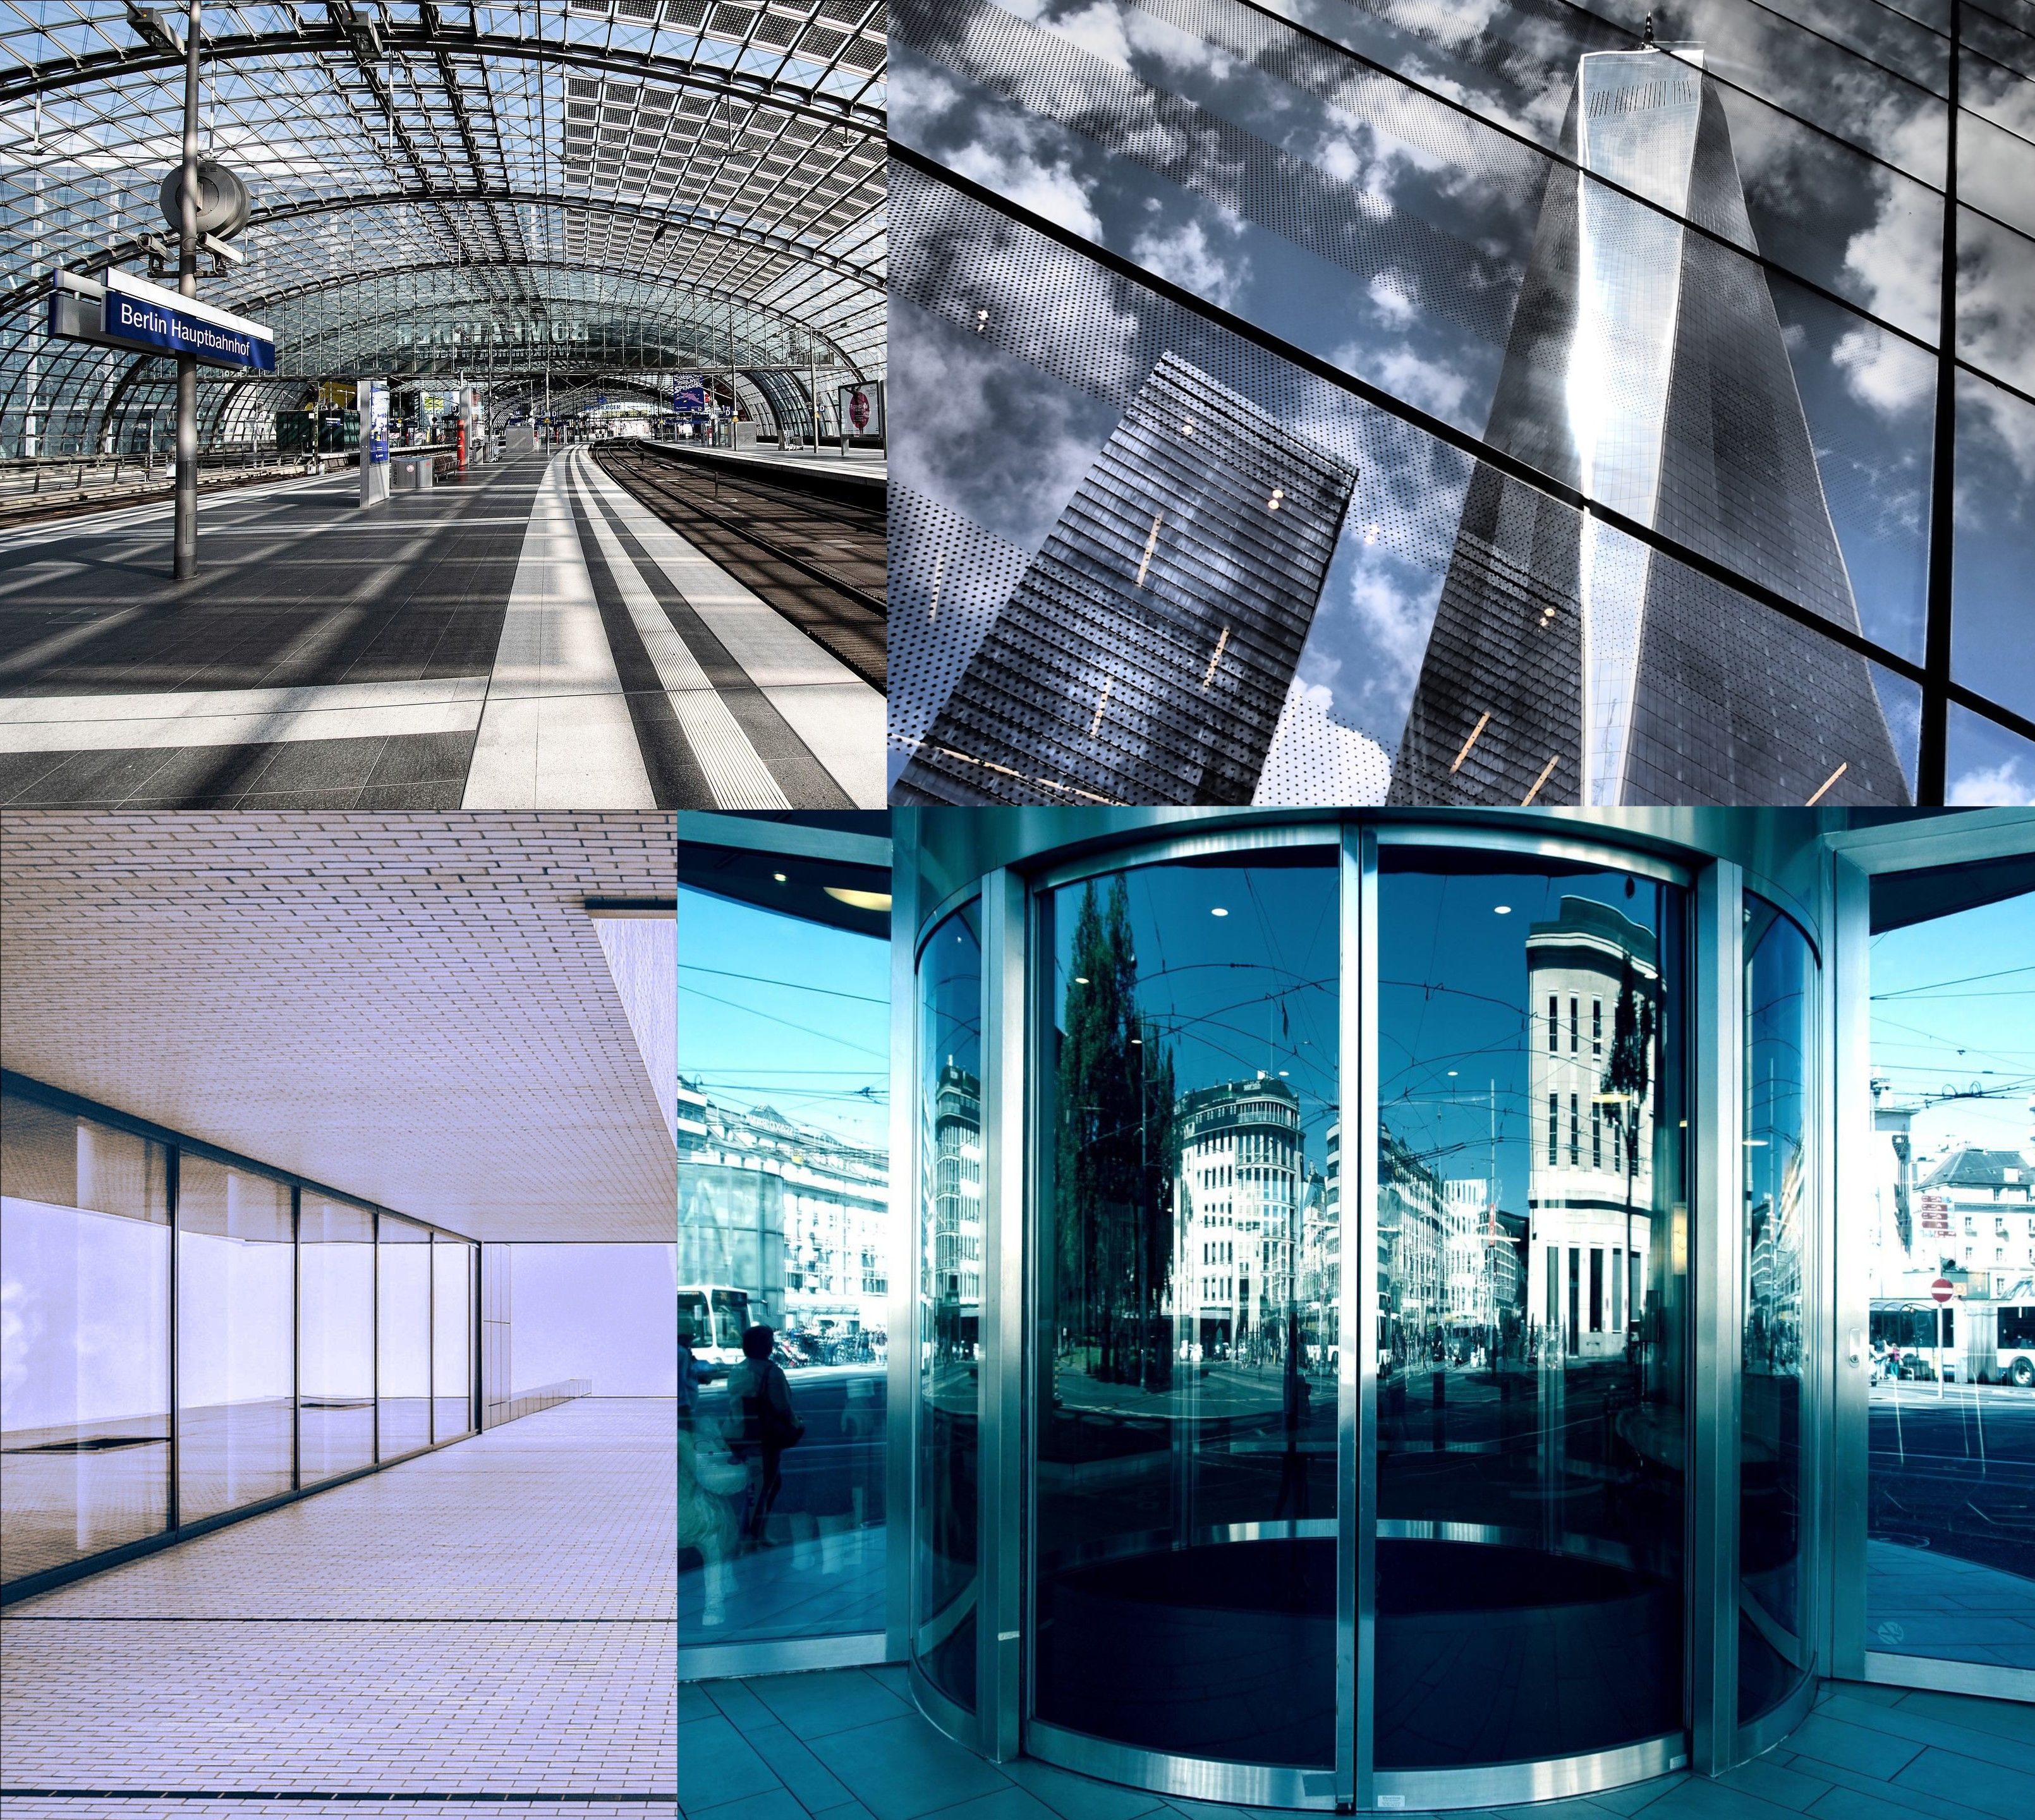
Not recommended: 1. Background can be seen through all the small openings on the roof. 2. Clouds and buildings reflected on the glass. 3. Sky, ceiling and floor reflected on the glass. 4. Whole city reflected on the glass.
Required input images for scene creation
There are three types of input images which make up our inputs specs.
The Input Photograph: This is the photograph which will actually be used to build the 3D scene.
The Input Reference Image (IRI): This is used for technical reference, such as scale, lighting and other details.
The Framing Reference Image (FRI): This is an optional reference, used as a guide for how the frame should look like in the final 3D scene. This is especially important, if a Featured Element is desired or the scene composition is important. Otherwise it is not needed. See Framing Guide bellow.
Only the center part of the image with the Stand-in model will be visible in the final scene. If specific parts of the scenery should be visible it needs to be planned accordingly before and during taking the image. Reactive Reality is available for support if guidance during regarding the creation of input images is needed.
In case a FRI is needed, it should be the first image to be taken, before the IRI and Input Photography.
Technical requirements
Image Property | Recommended Specification | Remarks |
|---|---|---|
Resolution | at least 12 MegaPixel | |
Focal length: outdoors | Focal length 24-28mm | Note that the focal length needs to be consistent in all images. Meaning the Input Photograph, IRI and FRI need to be taken using the same focal length. |
Focal length: narrow spaces/indoors | Focal length can be adjusted to 16mm if taken from a shorter distance to the subject than recommended. Min. distance: 3,5 m | For this, a camera with more than 12MP must be used. Otherwise, the image will not be sharp enough. This will usually exclude phones! In this case, the production of the optional FRI is not possible, as the distance required can’t be met. In such situations, please contact Reactive Reality for further instructions. |
Sharpness | Tripods should be used to avoid motion blur. If only handholding is possible: Check the photo after it’s taken, if it’s really sharp. Pressing the shutter button can cause the camera to slightly move and add motion blur. If the photo needs to be retaken because it’s not sharp enough, restart the process from scratch and retake the reference image as well. | |
Focus | The whole image needs to be in focus, from foreground to background (no shallow DOF). | |
Exposure | Blowing highlights and noisy underexposed shadows should be avoided. Lower contrast is better than higher contrast lighting, if one of the extremes must be chosen. | |
Motion blur can be seen on the photo, which can be caused by moving the camera as the photo is taken. (click to enlarge)
With these technical base requirements, photos taken with an iPhone's main camera can be accepted. iPhone X and newer should be fine.
Framing Guide
As seen above, in order to make sure the best result is obtained from the image to be used as the Input Photograph, additional reference images are required.
Input Reference Image
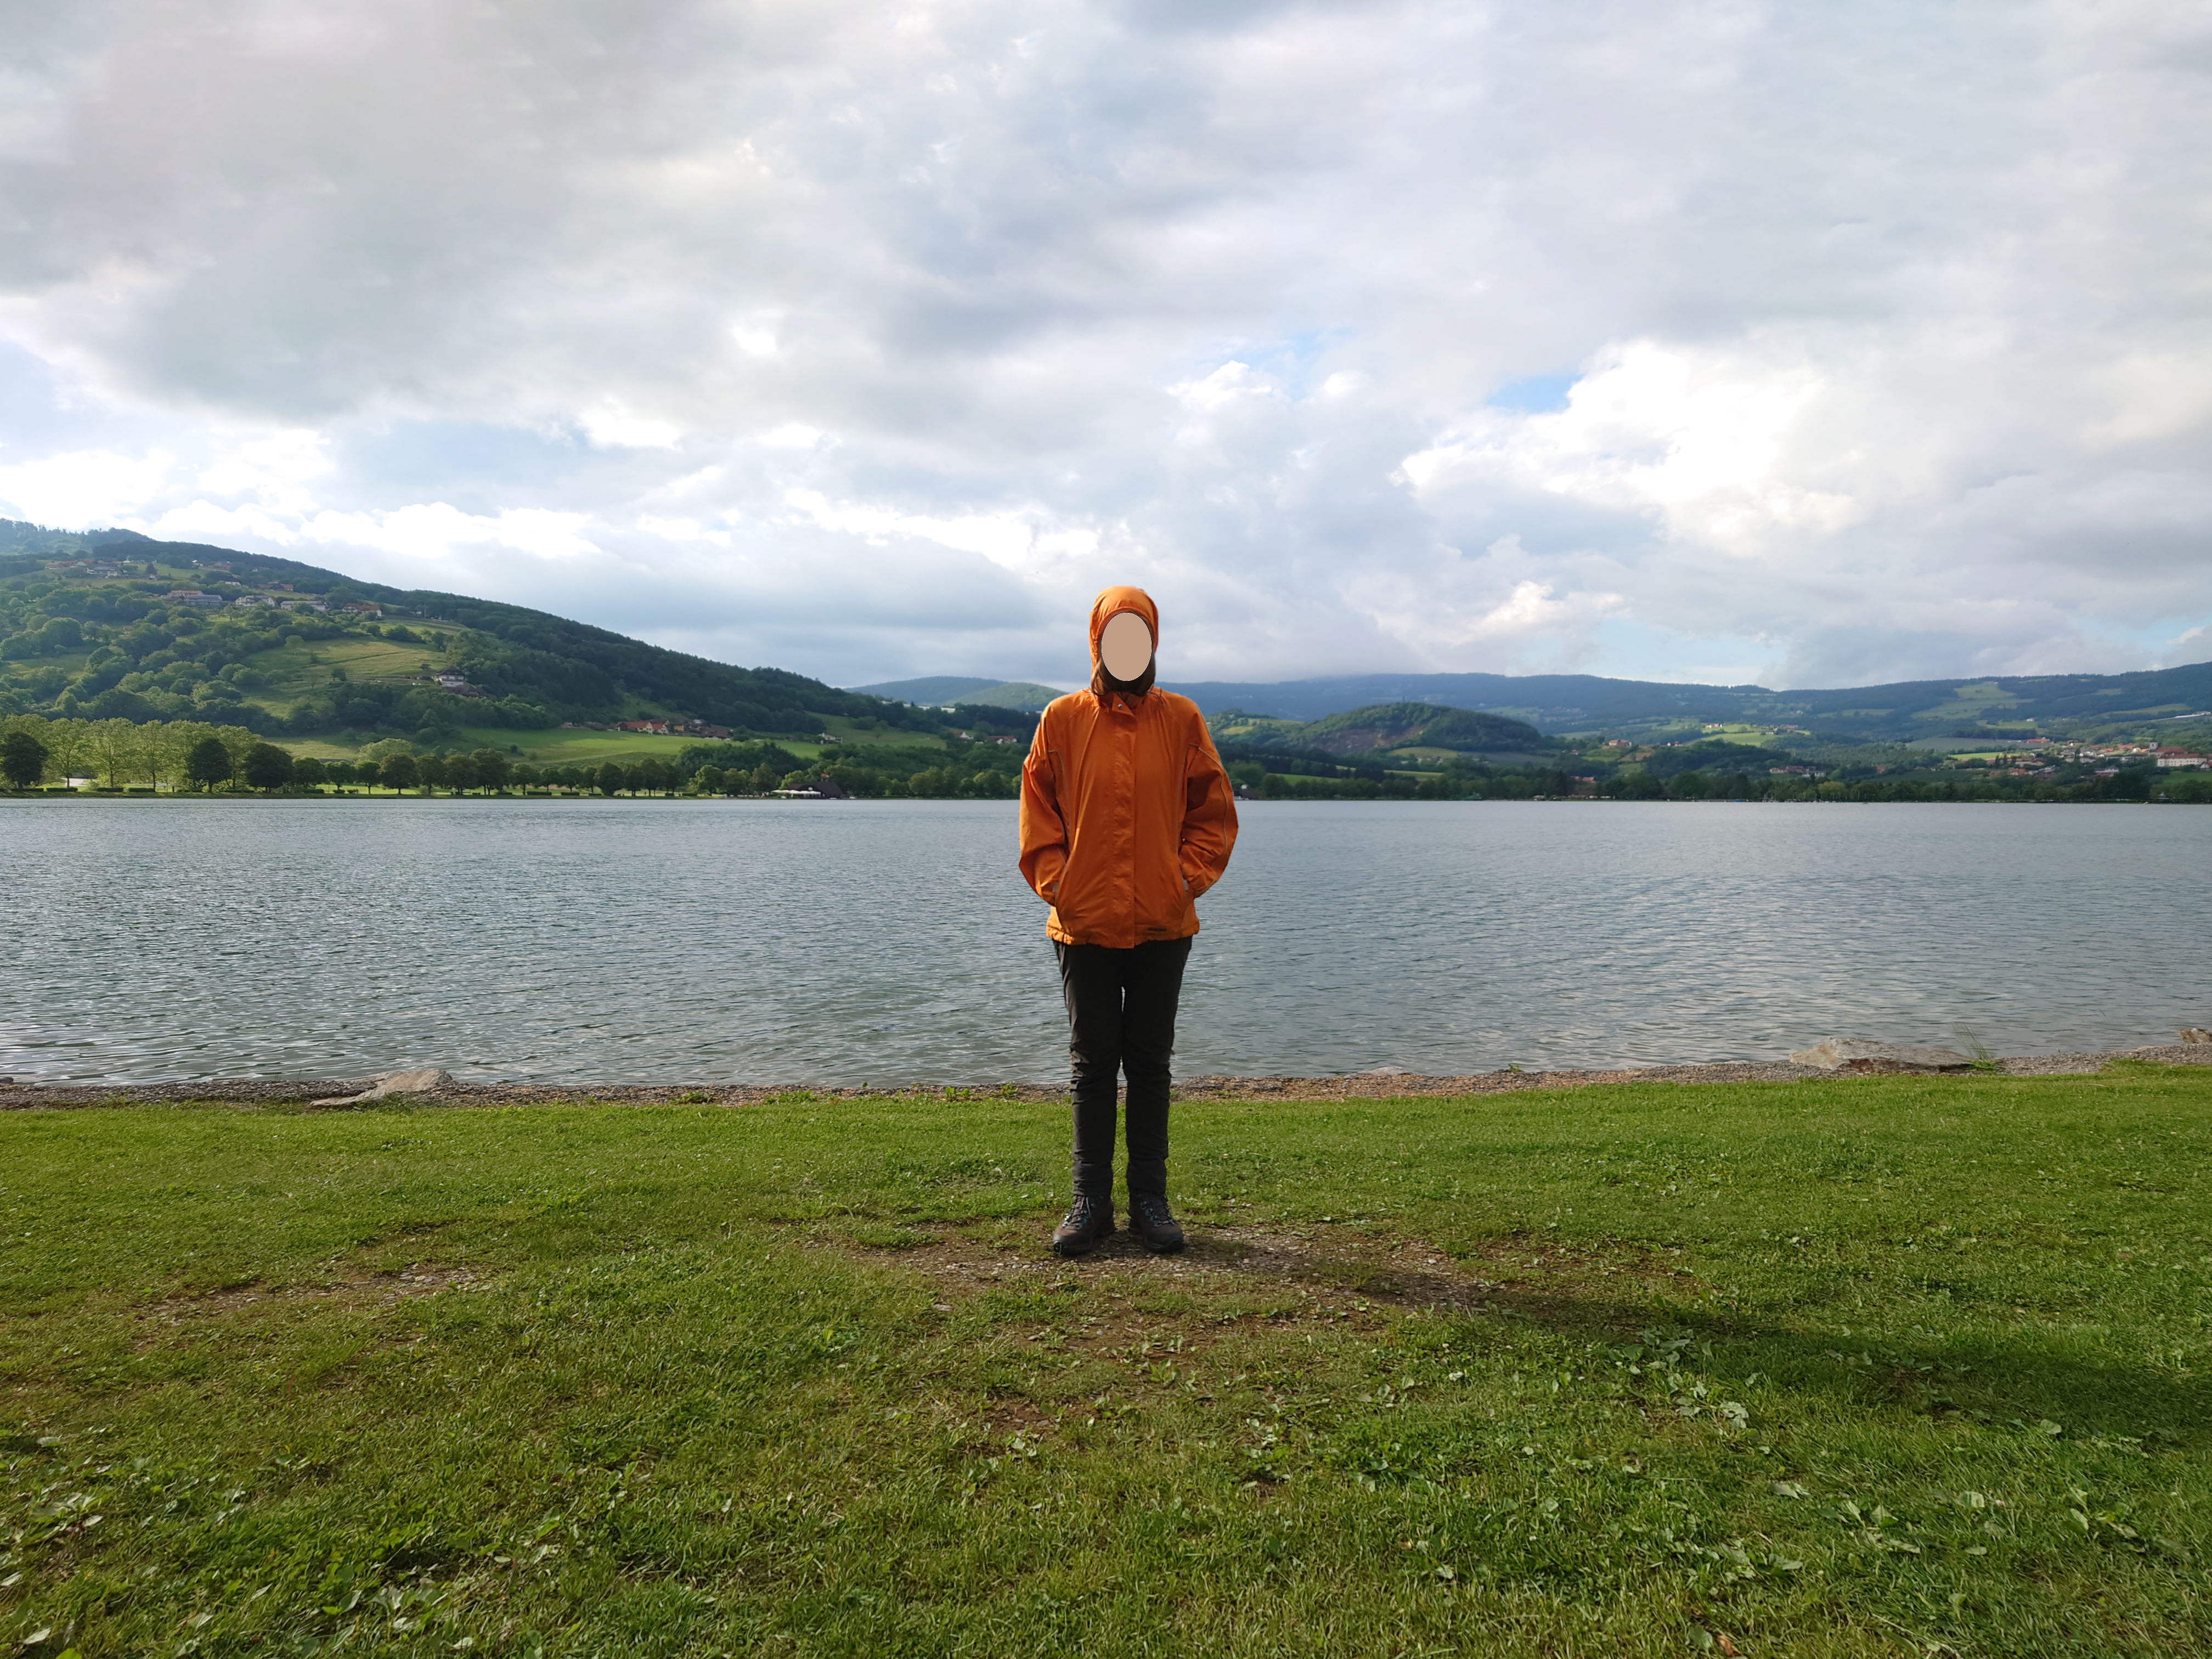
Position a person on the spot where the avatar will be placed in the final scene. This is our Stand-in model.
Move away 5 m from the Stand-in model.
Use the camera in landscape format, hold it at 180 cm height and adjust the tilt so that there is an equal amount of space above and below the Stand-in model to the end of the frame.
Take a photo using this setup. If done handheld, keep the camera in position after pressing the shutter button, no movements. A tripod is highly recommended!
Input Photograph
After taking the reference image, don’t move the camera and tell the Stand-in model to move out of the frame.
Make sure that neither the Stand-in model nor their shadow is visible in frame and take the second photo. This is the image that will be used for scene creation.
Important: Note down the height of the Stand-in model.
Framing Reference Image (FRI)
For the optional Framing Reference Image (FRI), we need to take a moment to analyze the reason it's needed.
First, let’s consider this Input Photograph, taken as instructed above:
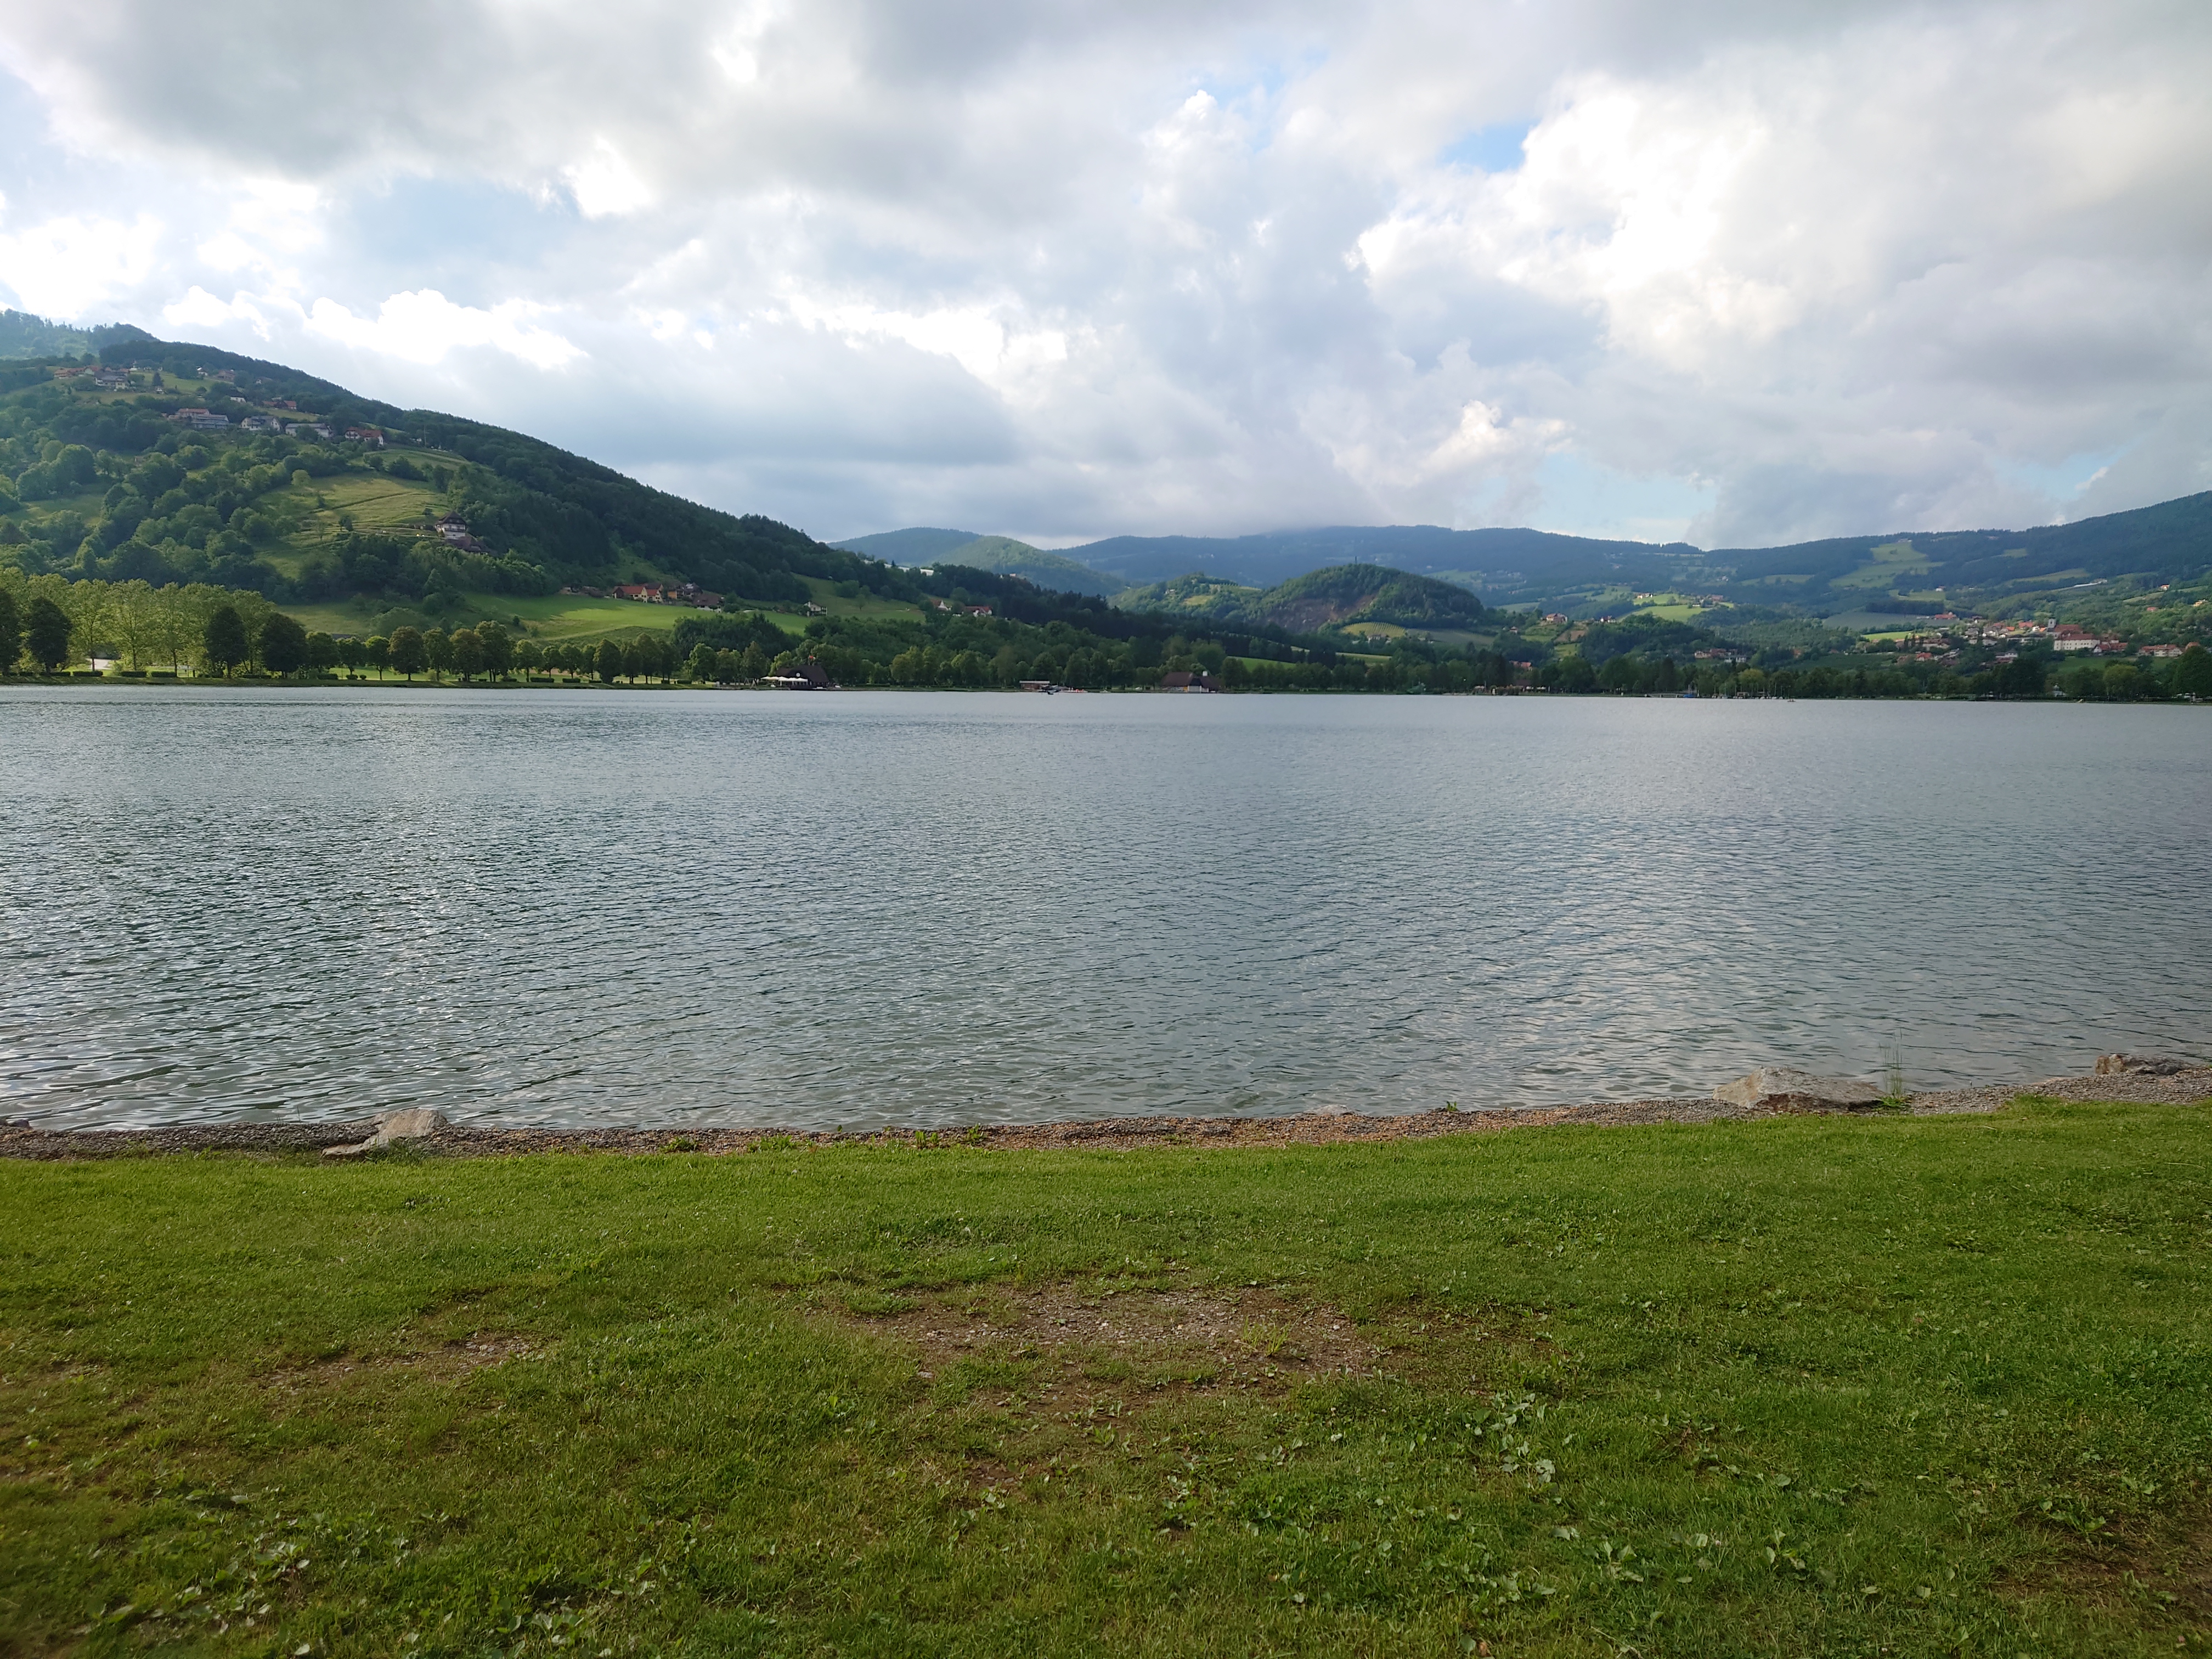
Input Photograph
The image above, being the Input Photograph, will be directly used to produce the 3D scene. So it needs to be free of any unwanted objects.
For framing reference reasons, especially in case there is a Featured Element required, we need to produce the aforementioned Framing Reference Image (FRI), again with a stand-in model, which serves as the avatar place holder. A Featured Element is any particular element which is desirable to be prominently featured in the background. Elements such as a landmarks, your business facade or any other element, which complies with our input specs, can be strategically framed and featured in the scene.
Another case where an FRI might be necessary, even if there is no desired Featured Element, is if the composition of the scene is particularly important. This would be the case if e.g. a certain amount of sky needs to be shown, or a certain amount of forest. In this case, it’s not important that this part is in the middle or how much of it is cut out by the frame. In this case producing an FRI, which is showing what is wanted, as precisely as possible, is good help.
Summed up, the FRI is very helpful in lining up the requested 3D scene beforehand and making sure all elements fall into place the way they should.
The Input Photograph is taken from a much higher position, to maximize the information captured for 3D creation use. For the FRI, we need to take the photo from the same perspective as the 3D scene camera, so it's better to judge how to place it the way it should look in the final scene.
Bellow you can see how the FRI would look for the above Input Photograph:
Frame Reference Image
Important to note here is, that the FRI is only a reference and the final scene will be an approximation of the FRI's perspective and framing.
FRI specifications
Before going further, it's important to reiterate that the FRI should be the first image taken. Before the IRI and Input Photograph.
The avatar still needs to be exactly in the middle of the frame and in accordance to our input specs.
Apart from that, the most important is your background. Define beforehand if there is a featured element or not.
Instructions:
Set the camera height to 134cm
Shoot in landscape
Move away 4.65m from the Stand-in model
Especially important for the featured element:
The featured element shouldn’t be dead center, as it will then be obscured by the avatar. It can’t be outside the scene crop, or it could be cropped off by the frame. See the device cropping guide bellow.
Taller elements, such as buildings, only work if they are far enough away.
The distance depends on the desired outcome. It has to be visible in the frame, as much or as big as you want it to be in the final scene.The element still needs to comply with our general input specs.
The general inputs specs given above, also apply for the feature element. Three examples of needed compliance are:
it needs to be behind the line where the avatar stands
it can’t be a moving object. A water fountain for example, if sprinkling water, would be considered a moving object.
it can’t be casting a shadow where the avatar will stand.
The best results are obtained when the distance between the avatar and element is of enough length to induce a higher level of parallax. The longer the distance, the more parallax.
After observing all the above, snap the photo.
Featured Element Placement
The featured element is best placed slightly offset form the avatar. It might be partially obscured by the avatar, depending on the size of the element, but as the camera is moved, more of the element will be seen because of the parallax effect.
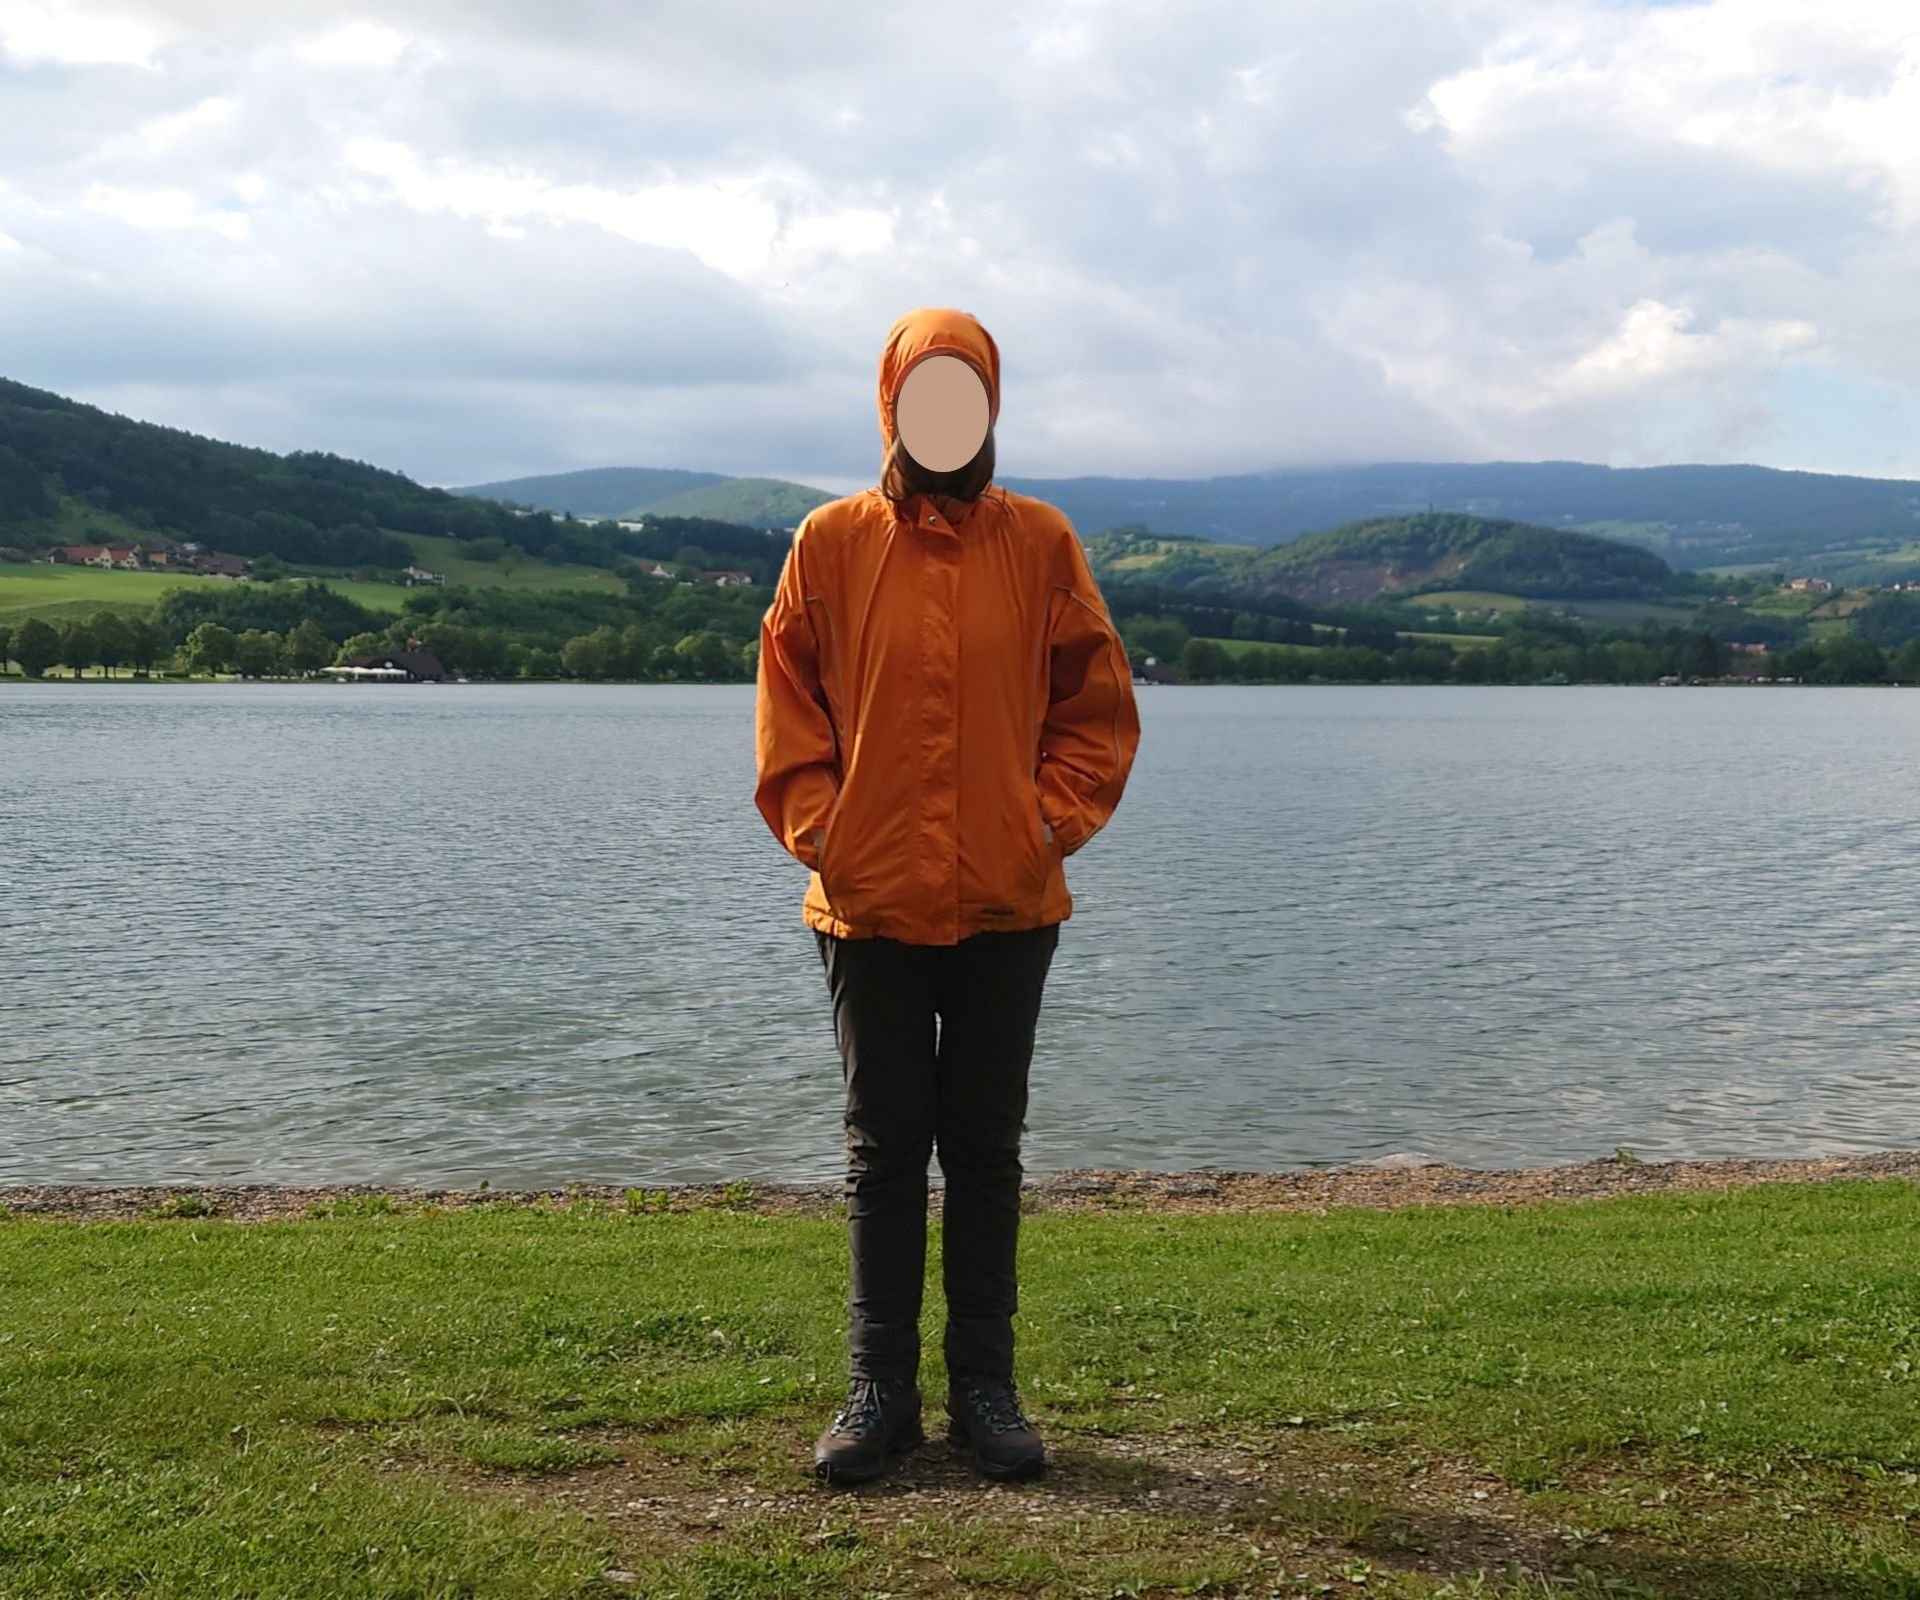
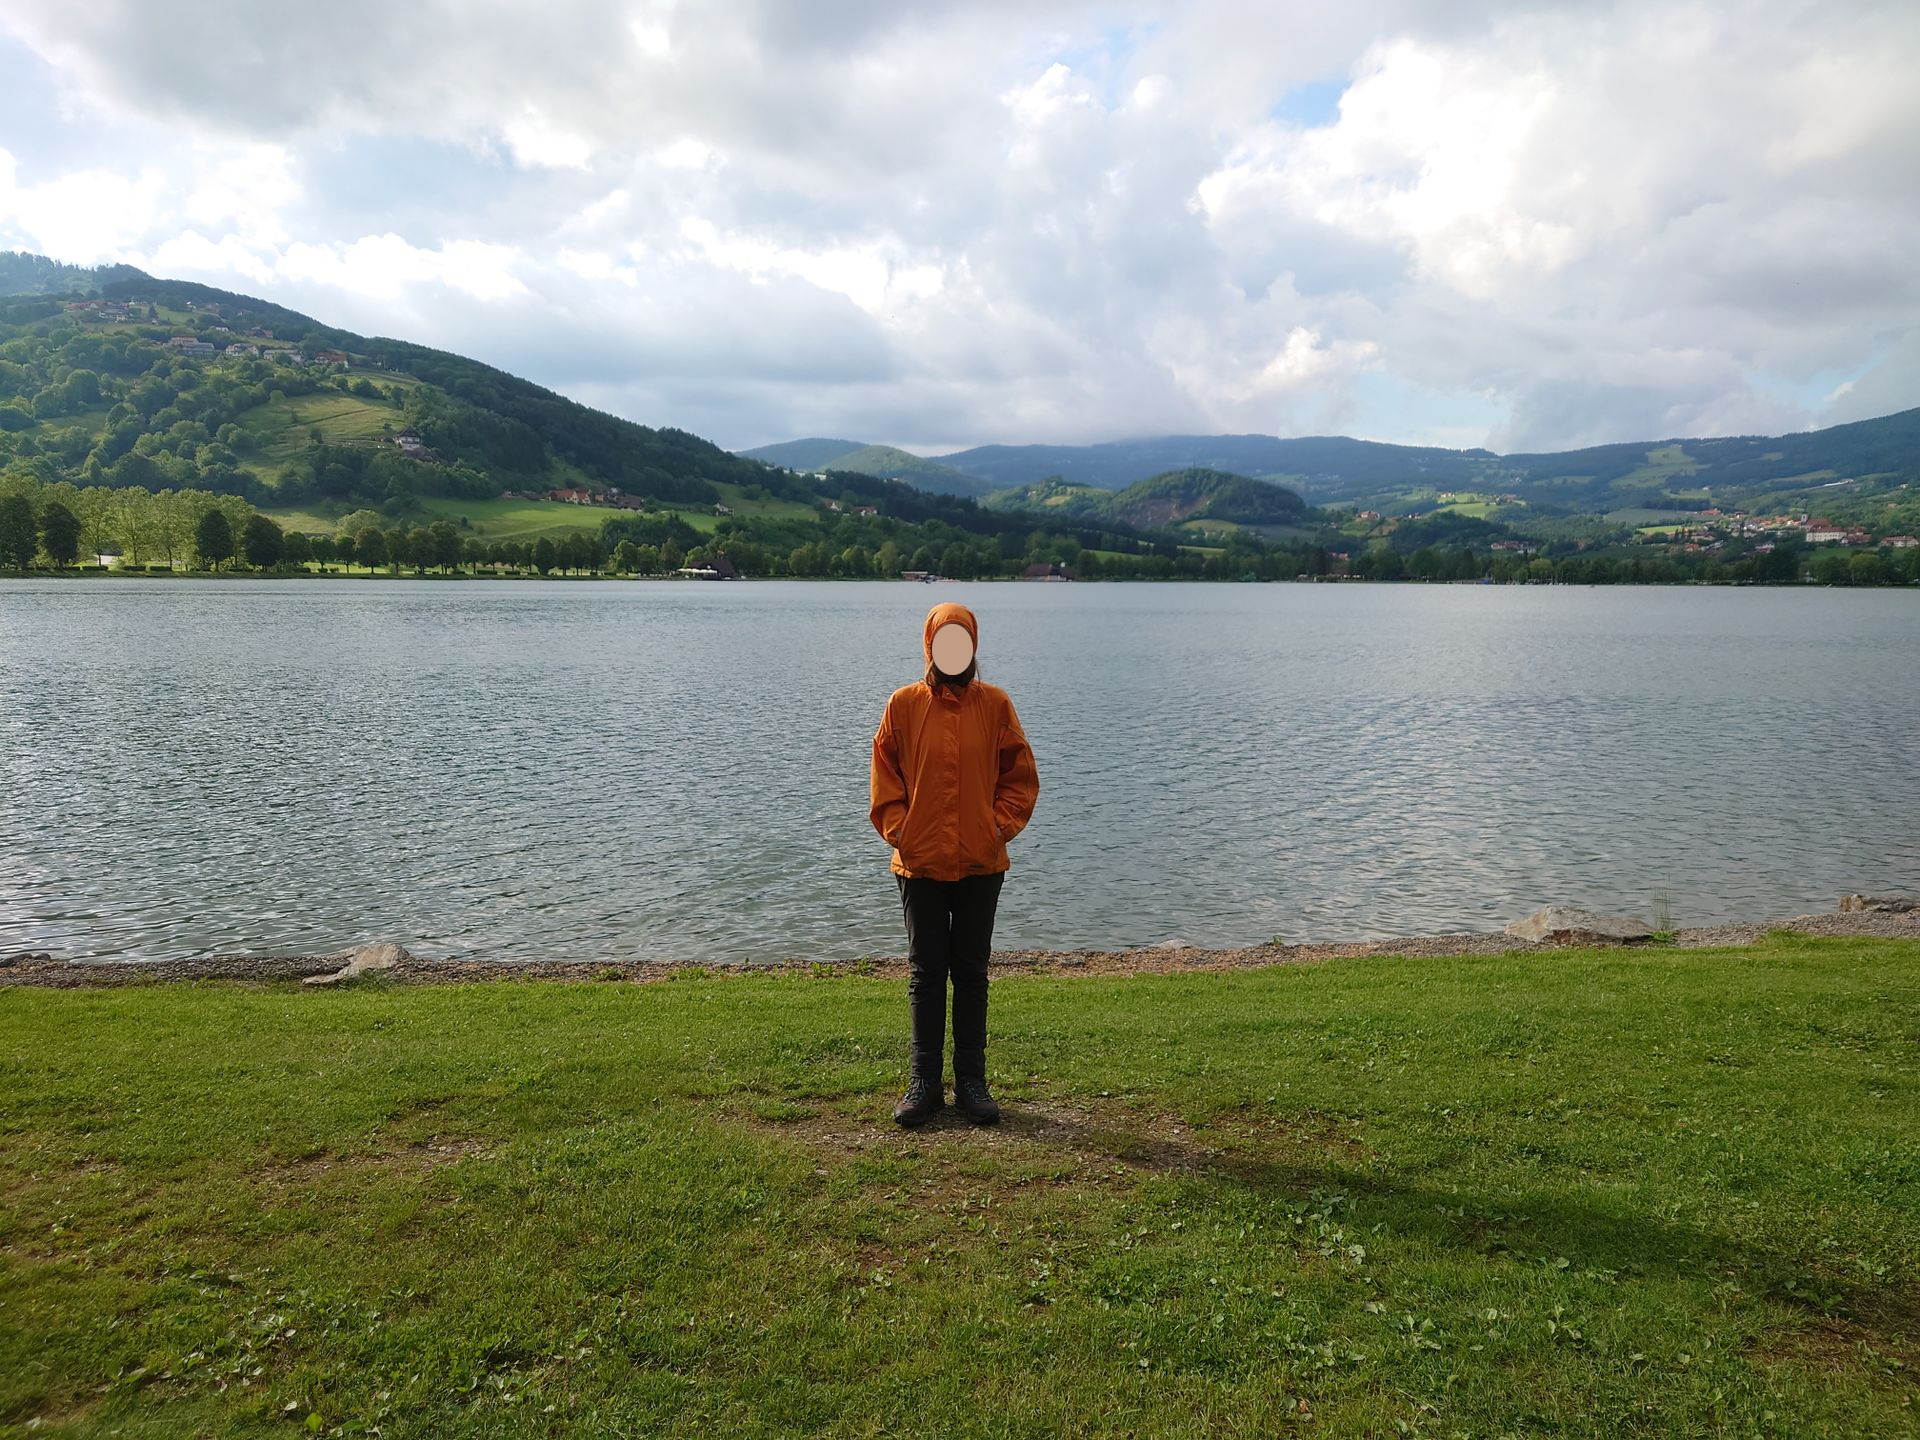
To guide in how to frame the Featured Element, place the Stand-in model where the avatar should stand, according to our specifications, and make sure the Featured Element is in the correct spot to be featured. Once the scene is built in 3D, it will roughly match this reference image, and the Featured Element should then be at about the same place in frame.

Frame Reference Image
Example: Let's consider that the desirable Featured Element in the photo above is the hills in the background. We would like to make sure they are nicely featured in the final scene. So for the reference image, we place our avatar place holder model in the exact same position we want it to be in relation to the Featured Element, the hills. Again, as the reference photo is taken from the same point of view as the app camera, once we build the scene in 3D, it should closely resemble the image above :
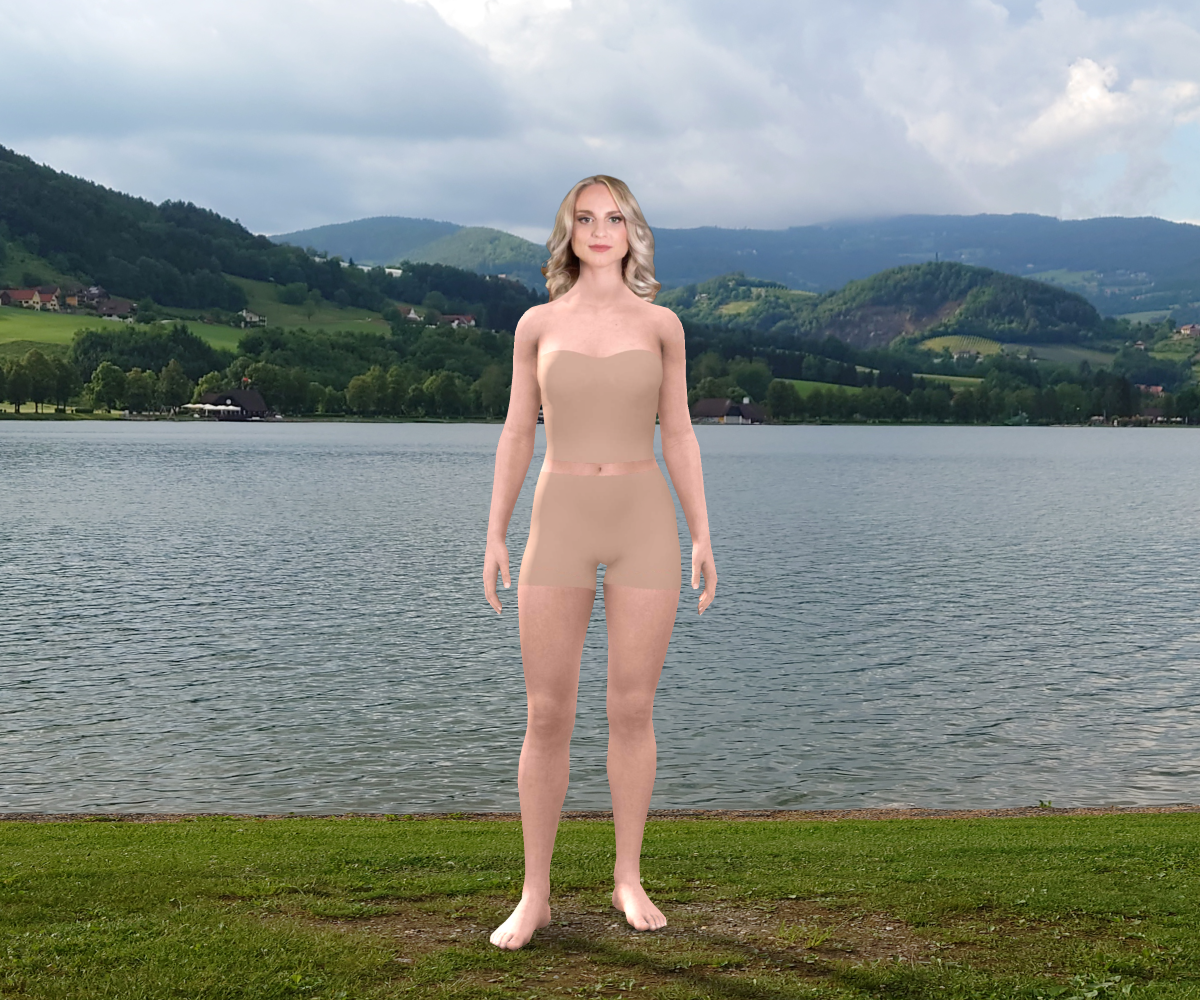
Camera perspective in the finished 3D scene
Notice that only a center crop from the photo will end up in the actual 3D scene. In the case above, the image is cropped for desktop displaying. Bellow is the reference image cropped to the same device.
Frame Reference Image cropped for desktop displaying
The Input Photograph gets cropped in different ways for the scene, depending on the device the scene is being viewed on:
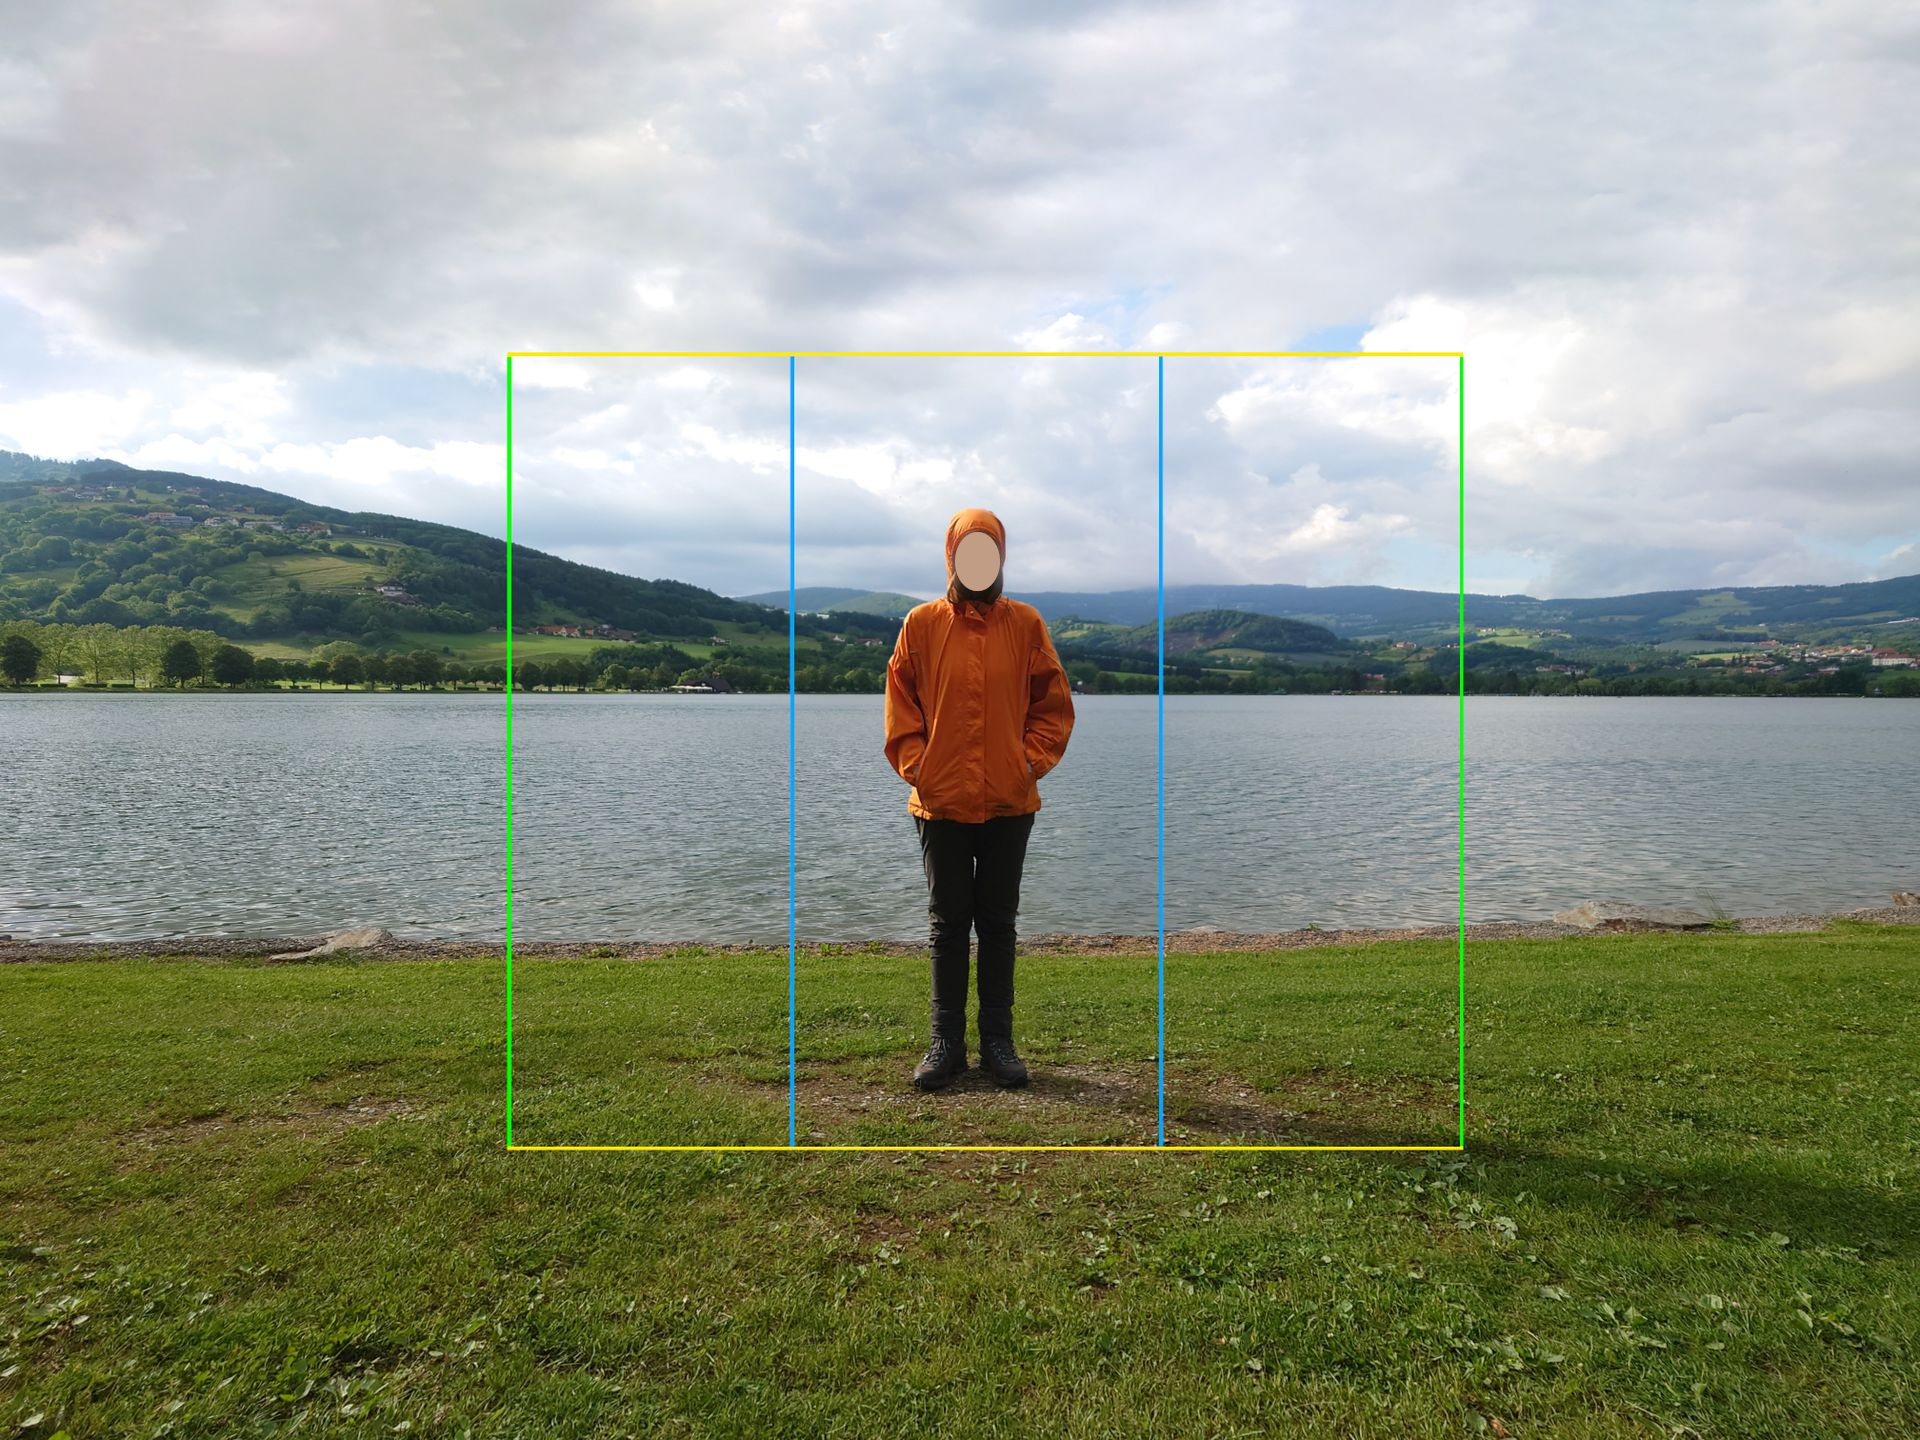
The top and bottom of the frame remains the same, represented above with the yellow line. The green line represents the side crop for desktop, while the blue line is the side crop for a phone.
Considering all the above, it’s easy to understand why the reference photo is so important. Once the reference photo is correctly set and framed, taking to all input specs into considerations as well as your desired Featured Element(s), you can proceed to setting the camera higher and adjusting the frame to produce the actual Input Photograph and the IRI. Nevertheless, the Input Photograph and the IRI don’t represent how the frame will look in the final scene. Which also means it’s best practice to do the FRI first. This will inform you on how to proceed to take the Input Photograph and consequently, the IRI
For clarity, bellow you can see Input Reference Image (IRI):
When compared side by side to FRI, which is how the frame should approximately look once the scene is built, the difference is clear:
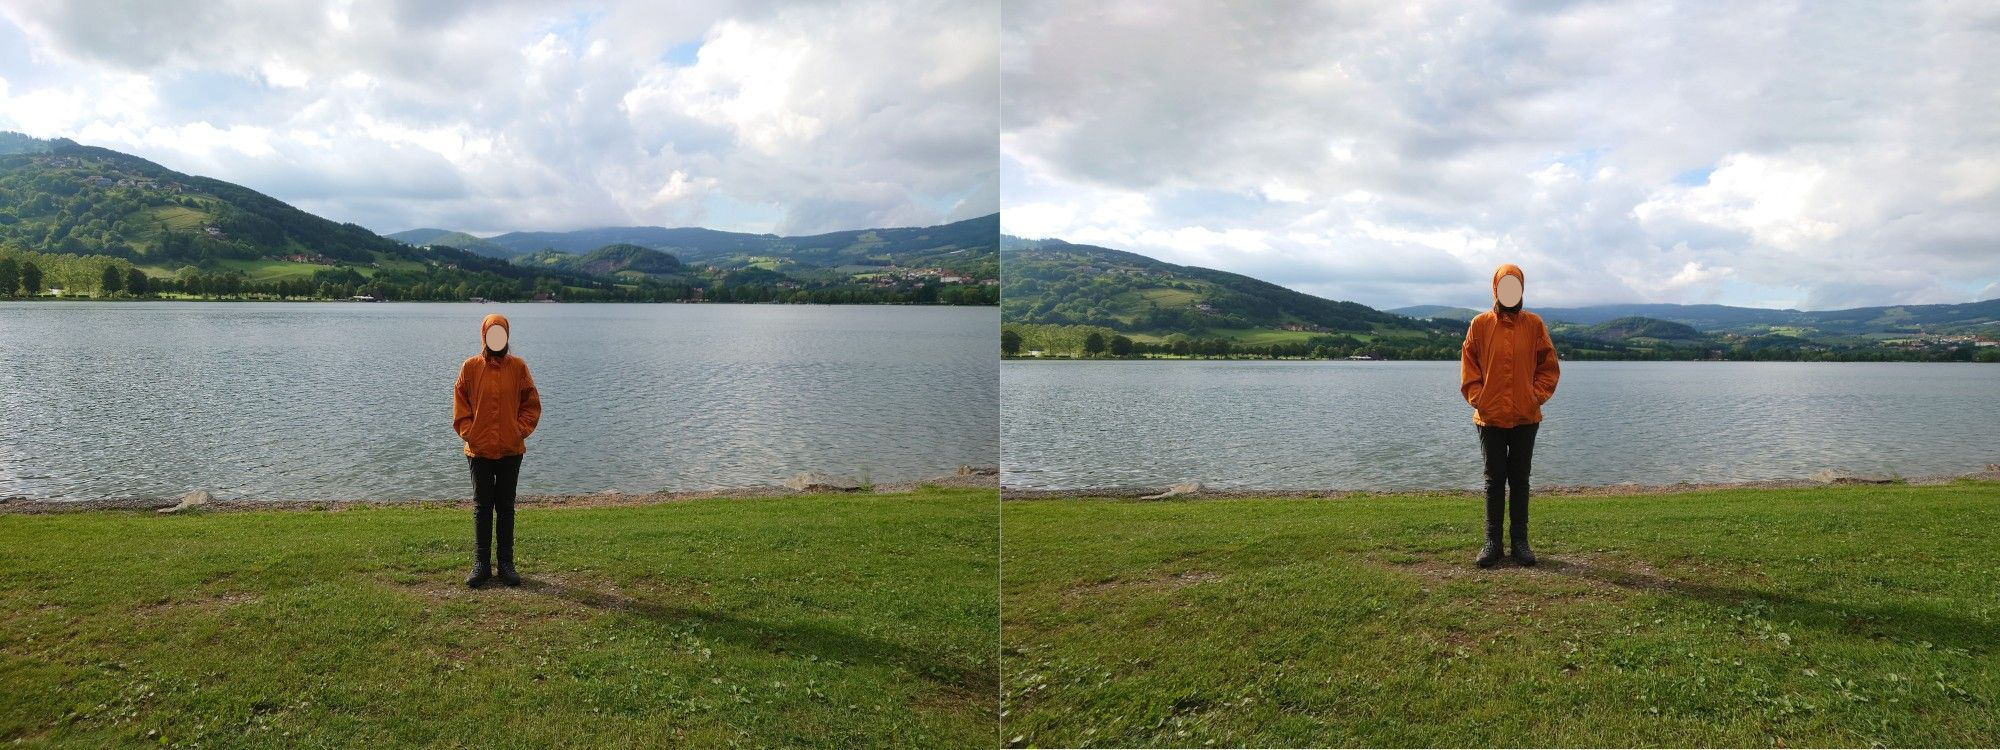
The value of taking a Framing Reference Image to judge the final intended frame becomes obvious.